Brother International PE-DESIGN Ver.6 Users Manual - English - Page 41
Continuing to stage 3 Handle stage
 |
View all Brother International PE-DESIGN Ver.6 manuals
Add to My Manuals
Save this manual to your list of manuals |
Page 41 highlights
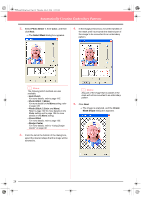
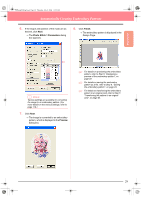
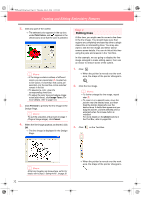
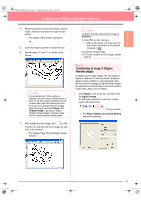
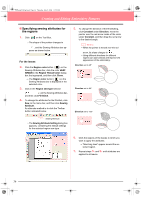
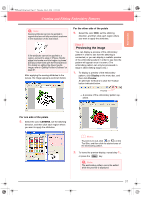
Basic Operation PeDesignV6Eng.book Page 33 Thursday, July 8, 2004 11:59 AM Creating and Editing Embroidery Patterns 4. Move the pointer over the line that you want to erase, and then hold down the right mouse button. → The shape of the pointer changes to . 5. Carefully drag the pointer to erase the line. 6. Repeat steps 4. and 5. to delete a few leaves. b Memo: To select how the reduced line image is displayed: 1) Click on the Tool Box. → When the pointer is moved over the work area, the shape of the pointer changes to . 2) Click the Design Page. 3) To further reduce the line image, repeat step 2). b Memo: • If you deleted part of the outline by mistake, you may need to redraw some of lines. To do this, simply hold down the left mouse button and start drawing the line. • If you are not satisfied with your editing, select the menu command Stage - To Original Image to go back to stage 1 (Original Image stage), and then create the line image and start editing again. 7. After editing the line image, click on the Tool Box to view the entire line image so that it fits in the window. → The Design Page fills the Design Center window. Step 5 Continuing to stage 3 (Figure Handle stage) In stage 2 (Line Image stage), the line image is simply a collection of dots (or pixels). Editing in stage 2 means adding or removing black dots. When you move to stage 3 (Figure Handle stage), the application automatically connects the dots to create lines, which can be edited. 1. Click Stage on the menu bar, and then click To Figure Handle. An alternate method is to click the Toolbar button indicated below. To Figure Handle → The Figure Object Conversion Setting dialog box appears. 33
-
 1
1 -
2
-
3
-
4
-
5
-
6
-
7
-
8
-
9
-
10
-
11
-
12
-
13
-
14
-
15
-
16
-
17
-
18
-
19
-
20
-
21
-
22
-
23
-
24
-
25
-
26
-
27
-
28
-
29
-
30
-
31
-
32
-
33
-
34
-
35
-
 36
36 -
 37
37 -
 38
38 -
 39
39 -
 40
40 -
 41
41 -
 42
42 -
 43
43 -
 44
44 -
 45
45 -
 46
46 -
47
-
48
-
49
-
50
-
51
-
52
-
53
-
54
-
55
-
56
-
57
-
58
-
59
-
60
-
61
-
62
-
63
-
64
-
65
-
66
-
67
-
68
-
69
-
70
-
71
-
72
-
73
-
74
-
75
-
76
-
77
-
78
-
79
-
80
-
81
-
82
-
83
-
84
-
85
-
86
-
87
-
88
-
89
-
90
-
91
-
92
-
93
-
94
-
95
-
96
-
97
-
98
-
99
-
100
-
101
-
102
-
103
-
104
-
105
-
106
-
107
-
108
-
109
-
110
-
111
-
112
-
113
-
114
-
115
-
116
-
117
-
118
-
119
-
120
-
121
-
122
-
123
-
124
-
125
-
126
-
127
-
128
-
129
-
130
-
131
-
132
-
133
-
134
-
135
-
136
-
137
-
138
-
139
-
140
-
141
-
142
-
143
-
144
-
145
-
146
-
147
-
148
-
149
-
150
-
151
-
152
-
153
-
154
-
155
-
156
-
157
-
158
-
159
-
160
-
161
-
162
-
163
-
164
-
165
-
166
-
167
-
168
-
169
-
170
-
171
-
172
-
173
-
174
-
175
-
176
-
177
-
178
-
179
-
180
-
181
-
182
-
183
-
184
-
185
-
186
-
187
-
188
-
189
-
190
-
191
-
192
-
193
-
194
-
195
-
196
-
197
-
198
-
199
-
200
-
201
-
202
-
203
-
204
-
205
-
206
-
207
-
208
-
209
-
210
-
211
-
212
-
213
-
214
-
215
-
216
-
217
-
218
-
219
-
220
-
221
-
222
-
223
-
224
-
225
-
226
-
227
-
228
-
229
-
230
-
231
-
232
-
233
-
234
-
235
-
236
-
237
-
238
-
239
-
240
-
241
-
242
-
243
-
244
-
245
-
246
-
247
-
248
-
249
-
250
-
251
-
252
-
253
-
254
-
255
-
256
-
257
-
258
-
259
-
260
-
261
-
262
-
263
-
264
-
265
-
266
-
267
-
268
-
269
-
270
-
271
-
272
 |
 |
