Brother International PE-DESIGN Ver.6 Users Manual - English - Page 225
Creating a Stamp
 |
View all Brother International PE-DESIGN Ver.6 manuals
Add to My Manuals
Save this manual to your list of manuals |
Page 225 highlights
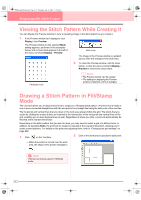
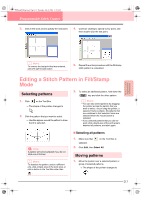
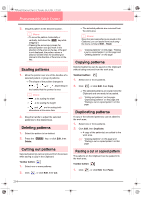
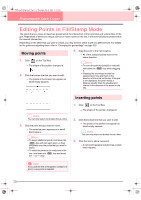
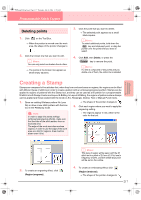
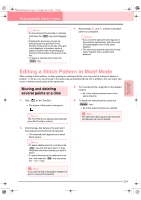
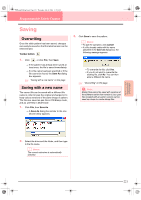
PeDesignV6Eng.book Page 217 Thursday, July 8, 2004 11:59 AM Programmable Stitch Creator Deleting points 1. Click on the Tool Box. → When the pointer is moved over the work area, the shape of the pointer changes to . 2. Click the broken line that you want to edit. b Memo: You can only select one broken line at a time. → The points in the broken line appear as small empty squares. 3. Click the point that you want to delete. → The selected point appears as a small black square. bMemo: To select additional points, hold down the Ctrl key and click each point, or drag the pointer over the points that you want to select. 4. Click Edit, then Delete, or press the Delete key to remove the point. bMemo: If a line is composed of two points and you delete one of them, the entire line is deleted. Creating a Stamp Stamps are composed of line stitches that, when they form enclosed areas or regions, the regions can be filled with different types of stitching in order to create a pattern with an embossing/engraving effect. Stamps can be applied to regions of patterns with the Stamp tool, and they can be used as a fill pattern for a programmable fill stitch in both Design Center and Layout & Editing. In Layout & Editing, the regions of patterns where stamps can be applied are those created with the Circle or Arc, Rectangle, Outline, Text or Manual Punch tools. 1. Open an existing fill/stamp pattern file (.pas file) or draw a new stitch pattern with the Line tool in the Fill/Stamp mode. a Note: In order to apply the stamp settings (embossing/engraving effects), make sure that the lines of the stitch pattern form an enclosed area. The edge of the work area does enclose regions. In order to use the edge of the work area as a limit for regions, lines must be drawn over it first. → The shape of the pointer changes to . 3. Click each region where you want to apply the engraving setting. → The regions appear in red, which is the color for the tool. Advanced Opreation Programmable Stitch Creator 2. To create an engraving effect, click (Region (engrave)). b Memo: This type of region will be sewn with the fill stitch set to a pitch of 2.0 mm (0.16 in) and a frequency of 30%, and the needle drop point will be set on the outline. 4. To create an embossing effect, click (Region (emboss)). → The shape of the pointer changes to . 217
-
 1
1 -
2
-
3
-
4
-
5
-
6
-
7
-
8
-
9
-
10
-
11
-
12
-
13
-
14
-
15
-
16
-
17
-
18
-
19
-
20
-
21
-
22
-
23
-
24
-
25
-
26
-
27
-
28
-
29
-
30
-
31
-
32
-
33
-
34
-
35
-
36
-
37
-
38
-
39
-
40
-
41
-
42
-
43
-
44
-
45
-
46
-
47
-
48
-
49
-
50
-
51
-
52
-
53
-
54
-
55
-
56
-
57
-
58
-
59
-
60
-
61
-
62
-
63
-
64
-
65
-
66
-
67
-
68
-
69
-
70
-
71
-
72
-
73
-
74
-
75
-
76
-
77
-
78
-
79
-
80
-
81
-
82
-
83
-
84
-
85
-
86
-
87
-
88
-
89
-
90
-
91
-
92
-
93
-
94
-
95
-
96
-
97
-
98
-
99
-
100
-
101
-
102
-
103
-
104
-
105
-
106
-
107
-
108
-
109
-
110
-
111
-
112
-
113
-
114
-
115
-
116
-
117
-
118
-
119
-
120
-
121
-
122
-
123
-
124
-
125
-
126
-
127
-
128
-
129
-
130
-
131
-
132
-
133
-
134
-
135
-
136
-
137
-
138
-
139
-
140
-
141
-
142
-
143
-
144
-
145
-
146
-
147
-
148
-
149
-
150
-
151
-
152
-
153
-
154
-
155
-
156
-
157
-
158
-
159
-
160
-
161
-
162
-
163
-
164
-
165
-
166
-
167
-
168
-
169
-
170
-
171
-
172
-
173
-
174
-
175
-
176
-
177
-
178
-
179
-
180
-
181
-
182
-
183
-
184
-
185
-
186
-
187
-
188
-
189
-
190
-
191
-
192
-
193
-
194
-
195
-
196
-
197
-
198
-
199
-
200
-
201
-
202
-
203
-
204
-
205
-
206
-
207
-
208
-
209
-
210
-
211
-
212
-
213
-
214
-
215
-
216
-
217
-
218
-
219
-
 220
220 -
 221
221 -
 222
222 -
 223
223 -
 224
224 -
 225
225 -
 226
226 -
 227
227 -
 228
228 -
 229
229 -
 230
230 -
231
-
232
-
233
-
234
-
235
-
236
-
237
-
238
-
239
-
240
-
241
-
242
-
243
-
244
-
245
-
246
-
247
-
248
-
249
-
250
-
251
-
252
-
253
-
254
-
255
-
256
-
257
-
258
-
259
-
260
-
261
-
262
-
263
-
264
-
265
-
266
-
267
-
268
-
269
-
270
-
271
-
272
 |
 |
