Brother International PE-DESIGN Ver.6 Users Manual - English - Page 140
Scaling patterns
 |
View all Brother International PE-DESIGN Ver.6 manuals
Add to My Manuals
Save this manual to your list of manuals |
Page 140 highlights
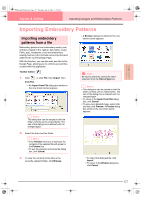
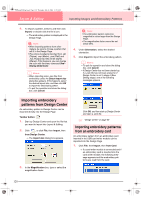
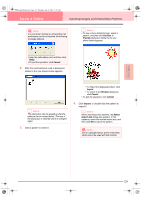
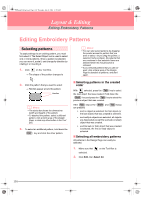
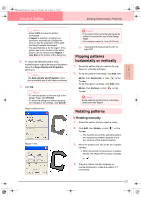
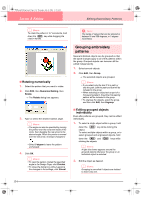
PeDesignV6Eng.book Page 132 Thursday, July 8, 2004 11:59 AM Layout & Editing Editing Embroidery Patterns Patterns set for hole sewing If just the inside pattern is selected, the pattern is aligned on the outline of the inside area. If the outside of the pattern is also selected, the pattern is aligned on the outline of the outside area. b Memo: • As you drag the handle, the current size is displayed on the status bar. • For more precise resizing, select the menu command Edit - Numerical Setting - Size, as described below. 1. Inside area is selected. 2. Outside area is selected. 3. Both the inside and outside areas are selected. Scaling patterns ■ Scaling manually 1. Select the pattern or patterns that you want to resize. 2. Move the pointer over one of the handles of a selected pattern or group of patterns. → The shape of the pointer changes to , , or , depending on the handle that the pointer is over. b Memo: • is for scaling the width. • is for scaling the height. • and are for scaling both dimensions at the same time. 3. Drag the handle to adjust the selected pattern(s) to the desired size. a Note: • Stamp settings remain independent from the patterns that they are applied to. If a pattern containing a stamp is edited, be sure to check the stamp after editing is finished. • Some patterns imported from embroidery cards cannot be scaled. • When scaling stitch patterns, the number of stitches remains the same, resulting in a loss of quality. To maintain the quality of the embroidery pattern, hold down the Ctrl key while scaling. ■ Scaling numerically 1. Select the pattern or patterns that you want to resize. 2. Click Edit, then Numerical Setting, then Size. → The Size dialog box appears. 3. To change the width and height proportionally, select the aspect check box. 4. Select the whether the width and height will be set as a percentage (%) or a dimension (millimeters or inches). 5. Type or select the desired width and height. 132
-
 1
1 -
2
-
3
-
4
-
5
-
6
-
7
-
8
-
9
-
10
-
11
-
12
-
13
-
14
-
15
-
16
-
17
-
18
-
19
-
20
-
21
-
22
-
23
-
24
-
25
-
26
-
27
-
28
-
29
-
30
-
31
-
32
-
33
-
34
-
35
-
36
-
37
-
38
-
39
-
40
-
41
-
42
-
43
-
44
-
45
-
46
-
47
-
48
-
49
-
50
-
51
-
52
-
53
-
54
-
55
-
56
-
57
-
58
-
59
-
60
-
61
-
62
-
63
-
64
-
65
-
66
-
67
-
68
-
69
-
70
-
71
-
72
-
73
-
74
-
75
-
76
-
77
-
78
-
79
-
80
-
81
-
82
-
83
-
84
-
85
-
86
-
87
-
88
-
89
-
90
-
91
-
92
-
93
-
94
-
95
-
96
-
97
-
98
-
99
-
100
-
101
-
102
-
103
-
104
-
105
-
106
-
107
-
108
-
109
-
110
-
111
-
112
-
113
-
114
-
115
-
116
-
117
-
118
-
119
-
120
-
121
-
122
-
123
-
124
-
125
-
126
-
127
-
128
-
129
-
130
-
131
-
132
-
133
-
134
-
 135
135 -
 136
136 -
 137
137 -
 138
138 -
 139
139 -
 140
140 -
 141
141 -
 142
142 -
 143
143 -
 144
144 -
 145
145 -
146
-
147
-
148
-
149
-
150
-
151
-
152
-
153
-
154
-
155
-
156
-
157
-
158
-
159
-
160
-
161
-
162
-
163
-
164
-
165
-
166
-
167
-
168
-
169
-
170
-
171
-
172
-
173
-
174
-
175
-
176
-
177
-
178
-
179
-
180
-
181
-
182
-
183
-
184
-
185
-
186
-
187
-
188
-
189
-
190
-
191
-
192
-
193
-
194
-
195
-
196
-
197
-
198
-
199
-
200
-
201
-
202
-
203
-
204
-
205
-
206
-
207
-
208
-
209
-
210
-
211
-
212
-
213
-
214
-
215
-
216
-
217
-
218
-
219
-
220
-
221
-
222
-
223
-
224
-
225
-
226
-
227
-
228
-
229
-
230
-
231
-
232
-
233
-
234
-
235
-
236
-
237
-
238
-
239
-
240
-
241
-
242
-
243
-
244
-
245
-
246
-
247
-
248
-
249
-
250
-
251
-
252
-
253
-
254
-
255
-
256
-
257
-
258
-
259
-
260
-
261
-
262
-
263
-
264
-
265
-
266
-
267
-
268
-
269
-
270
-
271
-
272
 |
 |
