Brother International PE-DESIGN Ver.6 Users Manual - English - Page 116
Creating a Design
 |
View all Brother International PE-DESIGN Ver.6 manuals
Add to My Manuals
Save this manual to your list of manuals |
Page 116 highlights
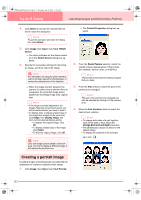
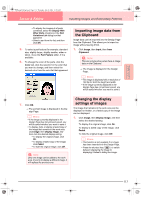
PeDesignV6Eng.book Page 108 Thursday, July 8, 2004 11:59 AM Layout & Editing Inputting Images and Embroidery Patterns Creating a Design Page Creating a new Design Page → The Design Page Property dialog box appears. Toolbar button: 1. Click , or click File, then New. → If the current Design Page has already been saved or has not been edited, a new Design Page immediately appears. → If the current Design Page has not been saved, you will be asked whether you want to save the changes. b Memo: • To save the Design Page, click Yes. • To abandon the Design Page, click No. • To return to the Design Page, for example, to modify it or save it with another file name, click Cancel. c "Opening a Layout & Editing file" below and "Saving" on page 194 Specifying the Design Page The color and size of the Design Page in addition to the color of the background can be changed. You can select a Design Page size according to the size of hoop that you will be using with your sewing machine. You can also customize the Design Page for patterns that will be split into sections. 1. Click Option, then Design Page Property. 2. Select the Design Page size. To adjust the Design Page size according to the hoop size, select Hoop Size, and then select the desired hoop size from the selector. To specify a custom Design Page size, select Custom Size, and then type or select the desired width and height for the Design Page. (The setting range is 100 to 1000 mm (3.9 to 39.4 inches).) In order to make adjustments to the fabric with the layout adjustment function of your sewing machine, select a Design Page size from the Section Size (for Hoop Size) selector. These Design Page sizes are 10 mm (0.39 in.) smaller than regular embroidery hoops. (This function is not for multi-position hooping. For details on multi-position hoops, refer to "Selecting the Design Page size" on page 203.) b Memo: • The preview area shows the setting changes that you make. • When Hoop Size is selected, the sewing machine image shows the orientation of the Design Page (hoop) in relation to the machine. 3. From the Page selector, select the desired color for the Design Page. 4. From the Background selector, select the desired color for the background. 5. Click OK. 108
-
 1
1 -
2
-
3
-
4
-
5
-
6
-
7
-
8
-
9
-
10
-
11
-
12
-
13
-
14
-
15
-
16
-
17
-
18
-
19
-
20
-
21
-
22
-
23
-
24
-
25
-
26
-
27
-
28
-
29
-
30
-
31
-
32
-
33
-
34
-
35
-
36
-
37
-
38
-
39
-
40
-
41
-
42
-
43
-
44
-
45
-
46
-
47
-
48
-
49
-
50
-
51
-
52
-
53
-
54
-
55
-
56
-
57
-
58
-
59
-
60
-
61
-
62
-
63
-
64
-
65
-
66
-
67
-
68
-
69
-
70
-
71
-
72
-
73
-
74
-
75
-
76
-
77
-
78
-
79
-
80
-
81
-
82
-
83
-
84
-
85
-
86
-
87
-
88
-
89
-
90
-
91
-
92
-
93
-
94
-
95
-
96
-
97
-
98
-
99
-
100
-
101
-
102
-
103
-
104
-
105
-
106
-
107
-
108
-
109
-
110
-
 111
111 -
 112
112 -
 113
113 -
 114
114 -
 115
115 -
 116
116 -
 117
117 -
 118
118 -
 119
119 -
 120
120 -
 121
121 -
122
-
123
-
124
-
125
-
126
-
127
-
128
-
129
-
130
-
131
-
132
-
133
-
134
-
135
-
136
-
137
-
138
-
139
-
140
-
141
-
142
-
143
-
144
-
145
-
146
-
147
-
148
-
149
-
150
-
151
-
152
-
153
-
154
-
155
-
156
-
157
-
158
-
159
-
160
-
161
-
162
-
163
-
164
-
165
-
166
-
167
-
168
-
169
-
170
-
171
-
172
-
173
-
174
-
175
-
176
-
177
-
178
-
179
-
180
-
181
-
182
-
183
-
184
-
185
-
186
-
187
-
188
-
189
-
190
-
191
-
192
-
193
-
194
-
195
-
196
-
197
-
198
-
199
-
200
-
201
-
202
-
203
-
204
-
205
-
206
-
207
-
208
-
209
-
210
-
211
-
212
-
213
-
214
-
215
-
216
-
217
-
218
-
219
-
220
-
221
-
222
-
223
-
224
-
225
-
226
-
227
-
228
-
229
-
230
-
231
-
232
-
233
-
234
-
235
-
236
-
237
-
238
-
239
-
240
-
241
-
242
-
243
-
244
-
245
-
246
-
247
-
248
-
249
-
250
-
251
-
252
-
253
-
254
-
255
-
256
-
257
-
258
-
259
-
260
-
261
-
262
-
263
-
264
-
265
-
266
-
267
-
268
-
269
-
270
-
271
-
272
 |
 |
