Brother International PE-DESIGN Ver.6 Users Manual - English - Page 179
Sewing Attribute Setting, Toolbar button, To Beginner mode, To Expert mode, Line Sew, Region Sew,
 |
View all Brother International PE-DESIGN Ver.6 manuals
Add to My Manuals
Save this manual to your list of manuals |
Page 179 highlights
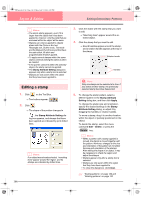
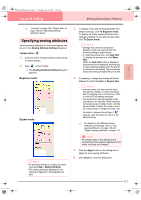
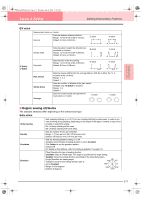
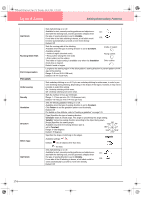
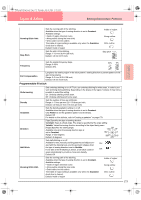
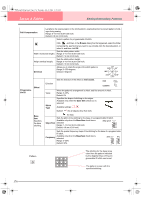
PeDesignV6Eng.book Page 171 Thursday, July 8, 2004 11:59 AM Layout & Editing Editing Embroidery Patterns Advanced Opreation Layout & Editing c "Line sew" on page 168, "Region sew" on page 169 and "Specifying sewing attributes" below Specifying sewing attributes Various sewing attributes for lines and regions can be set in the Sewing Attribute Setting dialog box Toolbar button: 1. Click one of the Tool Box buttons used to draw or select objects. 2. Click in the Toolbar → The Sewing Attribute Setting dialog box appears. Beginner mode: Expert mode: b Memo: • An alternate method is to select the menu command Sew - Setting Attribute. • The sewing attributes displayed in the dialog box depend on the selected sew type. 3. To display only basic sewing attributes and simpler settings, click To Beginner mode. To display all of the sewing attributes and settings available for the selected sew type, click To Expert mode. b Memo: • Settings that cannot be selected in Beginner mode are retained from the previous setting in Expert mode. • To hide the preview box, click Hide Hint. To display the preview box, click Show Hint. When the Hide Hint button is displayed, the preview box is displayed, allowing you to view a stitching sample when the pointer is moved over the setting. The preview box shows the setting changes that you make. 4. If necessary, change the sewing attributes displayed under Line Sew or Region Sew. b Memo: • In some cases, you may need to scroll through the settings, or resize the dialog box by dragging one of its corners in order to view all of the sewing attributes. • The method for entering settings varies according to the attribute. When entering numerical values in Expert mode, click the arrow buttons to select the value or enter the value directly. In Beginner mode, use the slider to change the settings. If appears, click the button to return to the default setting. c For details on the different sewing attributes and settings, refer to "Line sewing attributes" on page 172 and "Region sewing attributes" on page 173. a Note: All settings made in the dialog box are retained and will be applied regardless of the mode, until they are changed. 5. Click the Apply button in the dialog box to apply the new sewing attributes. 6. Click Close to close the dialog box. 171
-
 1
1 -
2
-
3
-
4
-
5
-
6
-
7
-
8
-
9
-
10
-
11
-
12
-
13
-
14
-
15
-
16
-
17
-
18
-
19
-
20
-
21
-
22
-
23
-
24
-
25
-
26
-
27
-
28
-
29
-
30
-
31
-
32
-
33
-
34
-
35
-
36
-
37
-
38
-
39
-
40
-
41
-
42
-
43
-
44
-
45
-
46
-
47
-
48
-
49
-
50
-
51
-
52
-
53
-
54
-
55
-
56
-
57
-
58
-
59
-
60
-
61
-
62
-
63
-
64
-
65
-
66
-
67
-
68
-
69
-
70
-
71
-
72
-
73
-
74
-
75
-
76
-
77
-
78
-
79
-
80
-
81
-
82
-
83
-
84
-
85
-
86
-
87
-
88
-
89
-
90
-
91
-
92
-
93
-
94
-
95
-
96
-
97
-
98
-
99
-
100
-
101
-
102
-
103
-
104
-
105
-
106
-
107
-
108
-
109
-
110
-
111
-
112
-
113
-
114
-
115
-
116
-
117
-
118
-
119
-
120
-
121
-
122
-
123
-
124
-
125
-
126
-
127
-
128
-
129
-
130
-
131
-
132
-
133
-
134
-
135
-
136
-
137
-
138
-
139
-
140
-
141
-
142
-
143
-
144
-
145
-
146
-
147
-
148
-
149
-
150
-
151
-
152
-
153
-
154
-
155
-
156
-
157
-
158
-
159
-
160
-
161
-
162
-
163
-
164
-
165
-
166
-
167
-
168
-
169
-
170
-
171
-
172
-
173
-
 174
174 -
 175
175 -
 176
176 -
 177
177 -
 178
178 -
 179
179 -
 180
180 -
 181
181 -
 182
182 -
 183
183 -
 184
184 -
185
-
186
-
187
-
188
-
189
-
190
-
191
-
192
-
193
-
194
-
195
-
196
-
197
-
198
-
199
-
200
-
201
-
202
-
203
-
204
-
205
-
206
-
207
-
208
-
209
-
210
-
211
-
212
-
213
-
214
-
215
-
216
-
217
-
218
-
219
-
220
-
221
-
222
-
223
-
224
-
225
-
226
-
227
-
228
-
229
-
230
-
231
-
232
-
233
-
234
-
235
-
236
-
237
-
238
-
239
-
240
-
241
-
242
-
243
-
244
-
245
-
246
-
247
-
248
-
249
-
250
-
251
-
252
-
253
-
254
-
255
-
256
-
257
-
258
-
259
-
260
-
261
-
262
-
263
-
264
-
265
-
266
-
267
-
268
-
269
-
270
-
271
-
272
 |
 |
