Brother International PE-DESIGN Ver.6 Users Manual - English - Page 59
Previewing the embroidery, pattern
 |
View all Brother International PE-DESIGN Ver.6 manuals
Add to My Manuals
Save this manual to your list of manuals |
Page 59 highlights
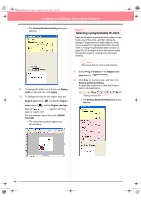
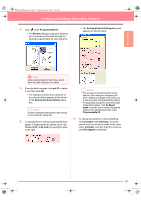
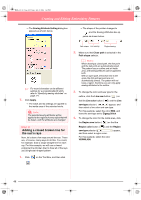
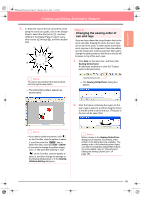
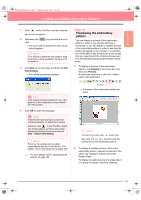
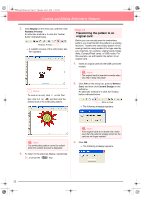
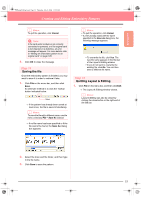
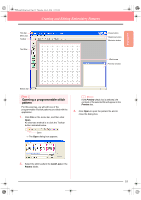
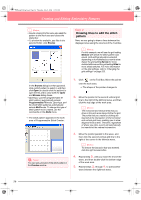
Basic Operation PeDesignV6Eng.book Page 51 Thursday, July 8, 2004 11:59 AM Creating and Editing Embroidery Patterns 1. Click on the Tool Box, and then click the sun's circle to select it. 2. Hold down the Ctrl key and click the sun's rays. → The circle and the broken line are now selected together. b Memo: If it is difficult to select the two patterns, drag the pointer to draw a selection frame around the patterns. 3. Click Sew on the menu bar, and then click Set Hole Sewing. → The following message appears. Step 12 Previewing the embroidery pattern You can display a preview of the embroidery pattern in order to see how the stitching is connected, or you can display a realistic preview of the embroidery pattern in order to see how the pattern will appear once it is sewn. For example, you will be able to see that the part of the broken line (sun rays) behind the circle is not sewn and how the selected programmable fill stitch will be sewn. 1. To display a preview of the embroidery pattern, click Display on the menu bar, and then click Preview. An alternate method is to click the Toolbar button indicated below. a Note: Hole sewing cannot be applied if one of the patterns is not completely enclosed within the other pattern. 4. Click OK to close the message. a Note: Patterns with hole sewing set cannot be moved separately. To adjust their relative positions, click on the Tool Box, select one of the patterns, and then cancel hole sewing by selecting the menu command Sew - Cancel Hole Sewing. b Memo: Points on the outlines can be edited independently with the Point Edit tool. (For details, refer to "Moving points" on page 135) c For more details, refer to "Specifying hole sewing" on page 180. Preview → A preview of the embroidery pattern appears. b Memo: To zoom in (or out), click on the Tool Box, click (or ), and then click the desired area of the embroidery pattern. 2. To display a realistic preview of the entire embroidery pattern, deselect all objects in the pattern by clicking in a blank area of the Design Page. To display a realistic preview of a single object or a group of objects, select the object(s). 51
-
 1
1 -
2
-
3
-
4
-
5
-
6
-
7
-
8
-
9
-
10
-
11
-
12
-
13
-
14
-
15
-
16
-
17
-
18
-
19
-
20
-
21
-
22
-
23
-
24
-
25
-
26
-
27
-
28
-
29
-
30
-
31
-
32
-
33
-
34
-
35
-
36
-
37
-
38
-
39
-
40
-
41
-
42
-
43
-
44
-
45
-
46
-
47
-
48
-
49
-
50
-
51
-
52
-
53
-
 54
54 -
 55
55 -
 56
56 -
 57
57 -
 58
58 -
 59
59 -
 60
60 -
 61
61 -
 62
62 -
 63
63 -
 64
64 -
65
-
66
-
67
-
68
-
69
-
70
-
71
-
72
-
73
-
74
-
75
-
76
-
77
-
78
-
79
-
80
-
81
-
82
-
83
-
84
-
85
-
86
-
87
-
88
-
89
-
90
-
91
-
92
-
93
-
94
-
95
-
96
-
97
-
98
-
99
-
100
-
101
-
102
-
103
-
104
-
105
-
106
-
107
-
108
-
109
-
110
-
111
-
112
-
113
-
114
-
115
-
116
-
117
-
118
-
119
-
120
-
121
-
122
-
123
-
124
-
125
-
126
-
127
-
128
-
129
-
130
-
131
-
132
-
133
-
134
-
135
-
136
-
137
-
138
-
139
-
140
-
141
-
142
-
143
-
144
-
145
-
146
-
147
-
148
-
149
-
150
-
151
-
152
-
153
-
154
-
155
-
156
-
157
-
158
-
159
-
160
-
161
-
162
-
163
-
164
-
165
-
166
-
167
-
168
-
169
-
170
-
171
-
172
-
173
-
174
-
175
-
176
-
177
-
178
-
179
-
180
-
181
-
182
-
183
-
184
-
185
-
186
-
187
-
188
-
189
-
190
-
191
-
192
-
193
-
194
-
195
-
196
-
197
-
198
-
199
-
200
-
201
-
202
-
203
-
204
-
205
-
206
-
207
-
208
-
209
-
210
-
211
-
212
-
213
-
214
-
215
-
216
-
217
-
218
-
219
-
220
-
221
-
222
-
223
-
224
-
225
-
226
-
227
-
228
-
229
-
230
-
231
-
232
-
233
-
234
-
235
-
236
-
237
-
238
-
239
-
240
-
241
-
242
-
243
-
244
-
245
-
246
-
247
-
248
-
249
-
250
-
251
-
252
-
253
-
254
-
255
-
256
-
257
-
258
-
259
-
260
-
261
-
262
-
263
-
264
-
265
-
266
-
267
-
268
-
269
-
270
-
271
-
272
 |
 |
