Brother International PE-DESIGN Ver.6 Users Manual - English - Page 189
Using the Applique Wizard
 |
View all Brother International PE-DESIGN Ver.6 manuals
Add to My Manuals
Save this manual to your list of manuals |
Page 189 highlights
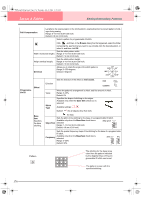
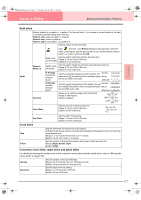
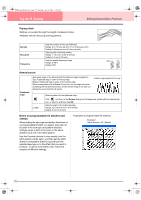
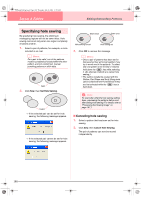
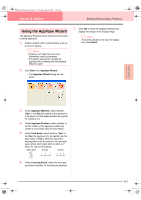
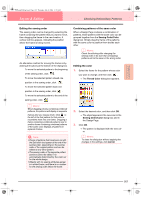
PeDesignV6Eng.book Page 181 Thursday, July 8, 2004 11:59 AM Layout & Editing Editing Embroidery Patterns Using the Applique Wizard The Applique Wizard provides instructions for easily creating appliqués. 1. Select a pattern with a closed shape, such as a circle or square. b Memo: • A pattern with lines that cross over themselves cannot be selected. • The pattern selected for creating the appliqué will be deleted after the Applique Wizard is used. 2. Click Sew, then Applique Wizard. → The Applique Wizard dialog box appears. 7. Click OK to finish the Applique Wizard and display the design in the Design Page. b Memo: To quit the operation and close the dialog box, click Cancel. Advanced Opreation Layout & Editing 3. Under Applique Material, select whether (Yes) or not (No) the outline of the appliqué is to be sewn onto the appliqué fabric as a guide for cutting it out. 4. Under Applique Position, select whether or not the outline of the appliqué positioning outline is to be sewn onto the base fabric. 5. Under Tack down, select whether (Yes) or not (No) the appliqué is to be basted onto the base fabric. If Yes is selected, select the basting stitch from the selector. You can also select which stitch (satin stitch, E stitch or V stitch) to use for the basting. Satin stitch E stitch V stitch 6. Under Covering Stitch, select the sew type and other attributes for finishing the appliqué. 181
-
 1
1 -
2
-
3
-
4
-
5
-
6
-
7
-
8
-
9
-
10
-
11
-
12
-
13
-
14
-
15
-
16
-
17
-
18
-
19
-
20
-
21
-
22
-
23
-
24
-
25
-
26
-
27
-
28
-
29
-
30
-
31
-
32
-
33
-
34
-
35
-
36
-
37
-
38
-
39
-
40
-
41
-
42
-
43
-
44
-
45
-
46
-
47
-
48
-
49
-
50
-
51
-
52
-
53
-
54
-
55
-
56
-
57
-
58
-
59
-
60
-
61
-
62
-
63
-
64
-
65
-
66
-
67
-
68
-
69
-
70
-
71
-
72
-
73
-
74
-
75
-
76
-
77
-
78
-
79
-
80
-
81
-
82
-
83
-
84
-
85
-
86
-
87
-
88
-
89
-
90
-
91
-
92
-
93
-
94
-
95
-
96
-
97
-
98
-
99
-
100
-
101
-
102
-
103
-
104
-
105
-
106
-
107
-
108
-
109
-
110
-
111
-
112
-
113
-
114
-
115
-
116
-
117
-
118
-
119
-
120
-
121
-
122
-
123
-
124
-
125
-
126
-
127
-
128
-
129
-
130
-
131
-
132
-
133
-
134
-
135
-
136
-
137
-
138
-
139
-
140
-
141
-
142
-
143
-
144
-
145
-
146
-
147
-
148
-
149
-
150
-
151
-
152
-
153
-
154
-
155
-
156
-
157
-
158
-
159
-
160
-
161
-
162
-
163
-
164
-
165
-
166
-
167
-
168
-
169
-
170
-
171
-
172
-
173
-
174
-
175
-
176
-
177
-
178
-
179
-
180
-
181
-
182
-
183
-
 184
184 -
 185
185 -
 186
186 -
 187
187 -
 188
188 -
 189
189 -
 190
190 -
 191
191 -
 192
192 -
 193
193 -
 194
194 -
195
-
196
-
197
-
198
-
199
-
200
-
201
-
202
-
203
-
204
-
205
-
206
-
207
-
208
-
209
-
210
-
211
-
212
-
213
-
214
-
215
-
216
-
217
-
218
-
219
-
220
-
221
-
222
-
223
-
224
-
225
-
226
-
227
-
228
-
229
-
230
-
231
-
232
-
233
-
234
-
235
-
236
-
237
-
238
-
239
-
240
-
241
-
242
-
243
-
244
-
245
-
246
-
247
-
248
-
249
-
250
-
251
-
252
-
253
-
254
-
255
-
256
-
257
-
258
-
259
-
260
-
261
-
262
-
263
-
264
-
265
-
266
-
267
-
268
-
269
-
270
-
271
-
272
 |
 |
