Brother International PE-DESIGN Ver.6 Users Manual - English - Page 195
Changing realistic preview, settings
 |
View all Brother International PE-DESIGN Ver.6 manuals
Add to My Manuals
Save this manual to your list of manuals |
Page 195 highlights
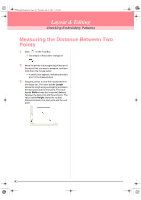
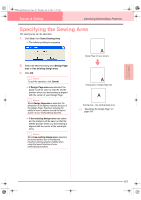
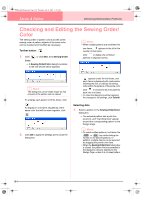
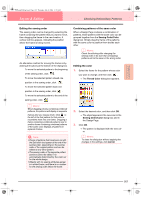
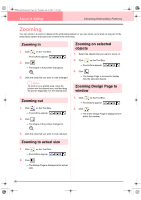
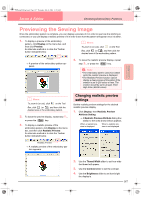
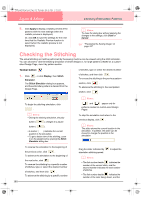
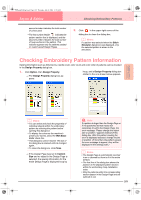
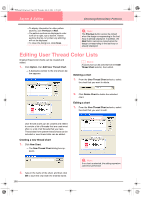
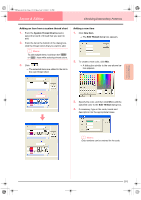
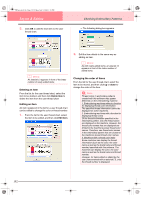
Advanced Opreation Layout & Editing PeDesignV6Eng.book Page 187 Thursday, July 8, 2004 11:59 AM Layout & Editing Checking Embroidery Patterns Previewing the Sewing Image Once the embroidery pattern is complete, you can display a preview of it in order to see how the stitching is connected, or you can display a realistic preview of it in order to see how the pattern will appear once it is sewn. 1. To display a preview of the embroidery pattern, click Display on the menu bar, and then click Preview. An alternate method is to click the Toolbar button indicated below. b Memo: To zoom in (or out), click on the Tool Box, click (or ), and then click the desired area of the embroidery pattern. Preview → A preview of the embroidery pattern appears. 4. To leave the realistic preview display, repeat step 3., or press the Esc key. a Note: • The embroidery pattern cannot be edited while the realistic preview is displayed. • The Realistic Preview function cannot display a clean preview of the pattern if the monitor is set to 256 colors or less. The monitor should be set to at least 16-bit High Color (65536 colors). b Memo: To zoom in (or out), click on the Tool Box, click (or ), and then click the desired area of the embroidery pattern. 2. To leave the preview display, repeat step 1., or press the Esc key. 3. To display a realistic preview of the embroidery pattern, click Display on the menu bar, and then click Realistic Preview. An alternate method is to click the Toolbar button indicated below. Realistic Preview → A realistic preview of the embroidery pattern appears. Changing realistic preview settings Set the realistic preview settings for the desired realistic preview display. 1. Click Display, then Realistic Preview Attribute Setting. → A Realistic Preview Attribute dialog box similar to the ones shown below appears. When a realistic preview is displayed When a realistic preview is not displayed 2. Use the Thread Width slider to set how wide the thread will appear. 3. Use the Contrast slider to set the contrast. 4. Use the Brightness slider to set how bright the display is. 187
-
 1
1 -
2
-
3
-
4
-
5
-
6
-
7
-
8
-
9
-
10
-
11
-
12
-
13
-
14
-
15
-
16
-
17
-
18
-
19
-
20
-
21
-
22
-
23
-
24
-
25
-
26
-
27
-
28
-
29
-
30
-
31
-
32
-
33
-
34
-
35
-
36
-
37
-
38
-
39
-
40
-
41
-
42
-
43
-
44
-
45
-
46
-
47
-
48
-
49
-
50
-
51
-
52
-
53
-
54
-
55
-
56
-
57
-
58
-
59
-
60
-
61
-
62
-
63
-
64
-
65
-
66
-
67
-
68
-
69
-
70
-
71
-
72
-
73
-
74
-
75
-
76
-
77
-
78
-
79
-
80
-
81
-
82
-
83
-
84
-
85
-
86
-
87
-
88
-
89
-
90
-
91
-
92
-
93
-
94
-
95
-
96
-
97
-
98
-
99
-
100
-
101
-
102
-
103
-
104
-
105
-
106
-
107
-
108
-
109
-
110
-
111
-
112
-
113
-
114
-
115
-
116
-
117
-
118
-
119
-
120
-
121
-
122
-
123
-
124
-
125
-
126
-
127
-
128
-
129
-
130
-
131
-
132
-
133
-
134
-
135
-
136
-
137
-
138
-
139
-
140
-
141
-
142
-
143
-
144
-
145
-
146
-
147
-
148
-
149
-
150
-
151
-
152
-
153
-
154
-
155
-
156
-
157
-
158
-
159
-
160
-
161
-
162
-
163
-
164
-
165
-
166
-
167
-
168
-
169
-
170
-
171
-
172
-
173
-
174
-
175
-
176
-
177
-
178
-
179
-
180
-
181
-
182
-
183
-
184
-
185
-
186
-
187
-
188
-
189
-
 190
190 -
 191
191 -
 192
192 -
 193
193 -
 194
194 -
 195
195 -
 196
196 -
 197
197 -
 198
198 -
 199
199 -
 200
200 -
201
-
202
-
203
-
204
-
205
-
206
-
207
-
208
-
209
-
210
-
211
-
212
-
213
-
214
-
215
-
216
-
217
-
218
-
219
-
220
-
221
-
222
-
223
-
224
-
225
-
226
-
227
-
228
-
229
-
230
-
231
-
232
-
233
-
234
-
235
-
236
-
237
-
238
-
239
-
240
-
241
-
242
-
243
-
244
-
245
-
246
-
247
-
248
-
249
-
250
-
251
-
252
-
253
-
254
-
255
-
256
-
257
-
258
-
259
-
260
-
261
-
262
-
263
-
264
-
265
-
266
-
267
-
268
-
269
-
270
-
271
-
272
 |
 |
