Brother International PE-DESIGN Ver.6 Users Manual - English - Page 65
Applying embossing/engraving, effects
 |
View all Brother International PE-DESIGN Ver.6 manuals
Add to My Manuals
Save this manual to your list of manuals |
Page 65 highlights
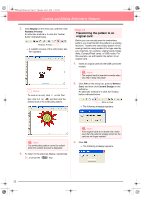
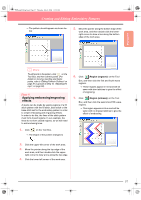
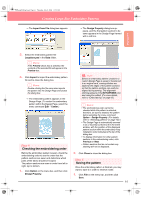
PeDesignV6Eng.book Page 57 Thursday, July 8, 2004 11:59 AM Creating and Editing Embroidery Patterns → The pattern should appear as shown below. 5. Move the pointer along the bottom edge of the work area, and then double-click the lowerright corner to draw a line along the bottom edge of the work area. Basic Operation b Memo: To edit points in the pattern, click on the Tool Box, and then edit the points. (For details on moving, inserting and delete points, refer to "Editing Points in Outlines" on page 81 or go back to Step 10, "Adjusting the rays", on page 50). Step 4 Applying embossing/engraving effects A stamp can be made by sewing regions of a fill stitch pattern with the fill stitch, satin stitch or the base stitch set for the embroidery pattern in order to create embossing and engraving effects. In order to do this, the lines of the stitch pattern must form closed regions. In our example, the lines do not form closed regions, so we will need to add enclosing lines. 1. Click on the Tool Box. → The shape of the pointer changes to . 2. Click the upper-left corner of the work area. 3. Move the pointer along the top edge of the work area, and then double-click the upperright corner to draw a line along the top edge. 4. Click the lower-left corner of the work area. 6. Click (Region (engrave)) on the Tool Box, and then click the first and fourth wave regions. → These regions appear in red and will be sewn with short stitches to give the effect of engraving. 7. Click (Region (emboss)) on the Tool Box, and then click the second and fifth wave regions. → This region appears in blue and will be sewn with no dropped stitches to give the effect of embossing. 57
-
 1
1 -
2
-
3
-
4
-
5
-
6
-
7
-
8
-
9
-
10
-
11
-
12
-
13
-
14
-
15
-
16
-
17
-
18
-
19
-
20
-
21
-
22
-
23
-
24
-
25
-
26
-
27
-
28
-
29
-
30
-
31
-
32
-
33
-
34
-
35
-
36
-
37
-
38
-
39
-
40
-
41
-
42
-
43
-
44
-
45
-
46
-
47
-
48
-
49
-
50
-
51
-
52
-
53
-
54
-
55
-
56
-
57
-
58
-
59
-
 60
60 -
 61
61 -
 62
62 -
 63
63 -
 64
64 -
 65
65 -
 66
66 -
 67
67 -
 68
68 -
 69
69 -
 70
70 -
71
-
72
-
73
-
74
-
75
-
76
-
77
-
78
-
79
-
80
-
81
-
82
-
83
-
84
-
85
-
86
-
87
-
88
-
89
-
90
-
91
-
92
-
93
-
94
-
95
-
96
-
97
-
98
-
99
-
100
-
101
-
102
-
103
-
104
-
105
-
106
-
107
-
108
-
109
-
110
-
111
-
112
-
113
-
114
-
115
-
116
-
117
-
118
-
119
-
120
-
121
-
122
-
123
-
124
-
125
-
126
-
127
-
128
-
129
-
130
-
131
-
132
-
133
-
134
-
135
-
136
-
137
-
138
-
139
-
140
-
141
-
142
-
143
-
144
-
145
-
146
-
147
-
148
-
149
-
150
-
151
-
152
-
153
-
154
-
155
-
156
-
157
-
158
-
159
-
160
-
161
-
162
-
163
-
164
-
165
-
166
-
167
-
168
-
169
-
170
-
171
-
172
-
173
-
174
-
175
-
176
-
177
-
178
-
179
-
180
-
181
-
182
-
183
-
184
-
185
-
186
-
187
-
188
-
189
-
190
-
191
-
192
-
193
-
194
-
195
-
196
-
197
-
198
-
199
-
200
-
201
-
202
-
203
-
204
-
205
-
206
-
207
-
208
-
209
-
210
-
211
-
212
-
213
-
214
-
215
-
216
-
217
-
218
-
219
-
220
-
221
-
222
-
223
-
224
-
225
-
226
-
227
-
228
-
229
-
230
-
231
-
232
-
233
-
234
-
235
-
236
-
237
-
238
-
239
-
240
-
241
-
242
-
243
-
244
-
245
-
246
-
247
-
248
-
249
-
250
-
251
-
252
-
253
-
254
-
255
-
256
-
257
-
258
-
259
-
260
-
261
-
262
-
263
-
264
-
265
-
266
-
267
-
268
-
269
-
270
-
271
-
272
 |
 |
