Brother International PE-DESIGN Ver.6 Users Manual - English - Page 72
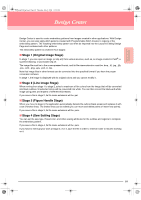
Template, vertical line indicates the center of the, embroidery hoop.
 |
View all Brother International PE-DESIGN Ver.6 manuals
Add to My Manuals
Save this manual to your list of manuals |
Page 72 highlights
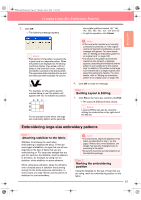
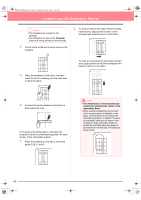
PeDesignV6Eng.book Page 64 Thursday, July 8, 2004 11:59 AM Creating Large-Size Embroidery Patterns b Memo: • The templates are included in the package. • The templates are also in the Template folder and can be printed out with a printer. 1. Punch a hole at the end of each arrow on the template. 2. To mark an area to the right of the previously marked area, align points A and D on the template with marks B and C on the fabric. A AB B D DC C To mark an area below the previously marked area, align points A and B on the template with marks C and D on the fabric. 2. Place the template on the fabric, and then insert the tip of a marking pen into each hole to mark the fabric. A B A B D C 3. Connect the points marked on the fabric to draw reference lines. For a large embroidery pattern, reposition the template to draw the embroidering position for each section of the embroidery pattern. 1. Place the template on the fabric, and mark points A, B, C and D. D C a Note: • The intersection of the horizontal and vertical line indicates the center of the embroidery hoop. • While carefully considering how the fabric will be hooped, place the template on the fabric, and then draw lines to indicate the embroidering position. In addition, because all embroidery areas are not drawn on the template for large embroidery hoops, be careful that the embroidery area does not extend from the marked area on the fabric as shown below. A B D C 64
-
 1
1 -
2
-
3
-
4
-
5
-
6
-
7
-
8
-
9
-
10
-
11
-
12
-
13
-
14
-
15
-
16
-
17
-
18
-
19
-
20
-
21
-
22
-
23
-
24
-
25
-
26
-
27
-
28
-
29
-
30
-
31
-
32
-
33
-
34
-
35
-
36
-
37
-
38
-
39
-
40
-
41
-
42
-
43
-
44
-
45
-
46
-
47
-
48
-
49
-
50
-
51
-
52
-
53
-
54
-
55
-
56
-
57
-
58
-
59
-
60
-
61
-
62
-
63
-
64
-
65
-
66
-
 67
67 -
 68
68 -
 69
69 -
 70
70 -
 71
71 -
 72
72 -
 73
73 -
 74
74 -
 75
75 -
 76
76 -
 77
77 -
78
-
79
-
80
-
81
-
82
-
83
-
84
-
85
-
86
-
87
-
88
-
89
-
90
-
91
-
92
-
93
-
94
-
95
-
96
-
97
-
98
-
99
-
100
-
101
-
102
-
103
-
104
-
105
-
106
-
107
-
108
-
109
-
110
-
111
-
112
-
113
-
114
-
115
-
116
-
117
-
118
-
119
-
120
-
121
-
122
-
123
-
124
-
125
-
126
-
127
-
128
-
129
-
130
-
131
-
132
-
133
-
134
-
135
-
136
-
137
-
138
-
139
-
140
-
141
-
142
-
143
-
144
-
145
-
146
-
147
-
148
-
149
-
150
-
151
-
152
-
153
-
154
-
155
-
156
-
157
-
158
-
159
-
160
-
161
-
162
-
163
-
164
-
165
-
166
-
167
-
168
-
169
-
170
-
171
-
172
-
173
-
174
-
175
-
176
-
177
-
178
-
179
-
180
-
181
-
182
-
183
-
184
-
185
-
186
-
187
-
188
-
189
-
190
-
191
-
192
-
193
-
194
-
195
-
196
-
197
-
198
-
199
-
200
-
201
-
202
-
203
-
204
-
205
-
206
-
207
-
208
-
209
-
210
-
211
-
212
-
213
-
214
-
215
-
216
-
217
-
218
-
219
-
220
-
221
-
222
-
223
-
224
-
225
-
226
-
227
-
228
-
229
-
230
-
231
-
232
-
233
-
234
-
235
-
236
-
237
-
238
-
239
-
240
-
241
-
242
-
243
-
244
-
245
-
246
-
247
-
248
-
249
-
250
-
251
-
252
-
253
-
254
-
255
-
256
-
257
-
258
-
259
-
260
-
261
-
262
-
263
-
264
-
265
-
266
-
267
-
268
-
269
-
270
-
271
-
272
 |
 |
