Brother International PE-DESIGN Ver.6 Users Manual - English - Page 165
Selecting characters, Specifying text attributes
 |
View all Brother International PE-DESIGN Ver.6 manuals
Add to My Manuals
Save this manual to your list of manuals |
Page 165 highlights
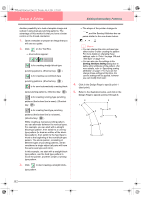
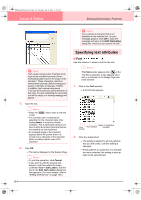
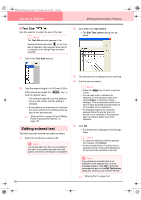
Advanced Opreation Layout & Editing PeDesignV6Eng.book Page 157 Thursday, July 8, 2004 11:59 AM Layout & Editing Editing Embroidery Patterns Selecting characters 1. Click on the Tool Box. → Two buttons appear: 2. Click !btn29.. → The shape of the pointer changes to . 3. Click the text that you want to edit. → The points in the text appear as small empty squares. 4. To select a single character, click the point for the character that you want to select. To select multiple characters, hold down the Ctrl key and click each point for the other characters, or drag the pointer over the characters that you want to select. → The points for the selected characters appear as a small black squares. b Memo: • To select all characters between the selected character and the next character selected, hold down the Shift key while clicking the next character. • To select an additional character in the direction of the last character, hold down the Shift key and press the → or ↓ key. To select an additional character in the direction of the first character, hold down the Shift key and press the ← or ↑ key. Holding down the Shift key and pressing the opposite arrow key deselects the character. • To deselect the current character and select the following character in the direction of the last character, hold down the Ctrl key and press the → or ↓ key. To deselect the current character and select the following character in the direction of the first character, hold down the Ctrl key and press the ← or ↑ key. 5. Change the font, size, color, sew type and other attributes. b Memo: With TrueType fonts, the outline can be set to be sewn or not, and settings can be selected for the color and sew type. Specifying text attributes Various character attributes for text can be set in the Text Attribute Setting dialog box. Toolbar button: 1. Select the text that you want to edit. 2. Click , or click Text, then Text Attribute Setting. → The Text Attribute Setting dialog box appears. 157
-
 1
1 -
2
-
3
-
4
-
5
-
6
-
7
-
8
-
9
-
10
-
11
-
12
-
13
-
14
-
15
-
16
-
17
-
18
-
19
-
20
-
21
-
22
-
23
-
24
-
25
-
26
-
27
-
28
-
29
-
30
-
31
-
32
-
33
-
34
-
35
-
36
-
37
-
38
-
39
-
40
-
41
-
42
-
43
-
44
-
45
-
46
-
47
-
48
-
49
-
50
-
51
-
52
-
53
-
54
-
55
-
56
-
57
-
58
-
59
-
60
-
61
-
62
-
63
-
64
-
65
-
66
-
67
-
68
-
69
-
70
-
71
-
72
-
73
-
74
-
75
-
76
-
77
-
78
-
79
-
80
-
81
-
82
-
83
-
84
-
85
-
86
-
87
-
88
-
89
-
90
-
91
-
92
-
93
-
94
-
95
-
96
-
97
-
98
-
99
-
100
-
101
-
102
-
103
-
104
-
105
-
106
-
107
-
108
-
109
-
110
-
111
-
112
-
113
-
114
-
115
-
116
-
117
-
118
-
119
-
120
-
121
-
122
-
123
-
124
-
125
-
126
-
127
-
128
-
129
-
130
-
131
-
132
-
133
-
134
-
135
-
136
-
137
-
138
-
139
-
140
-
141
-
142
-
143
-
144
-
145
-
146
-
147
-
148
-
149
-
150
-
151
-
152
-
153
-
154
-
155
-
156
-
157
-
158
-
159
-
 160
160 -
 161
161 -
 162
162 -
 163
163 -
 164
164 -
 165
165 -
 166
166 -
 167
167 -
 168
168 -
 169
169 -
 170
170 -
171
-
172
-
173
-
174
-
175
-
176
-
177
-
178
-
179
-
180
-
181
-
182
-
183
-
184
-
185
-
186
-
187
-
188
-
189
-
190
-
191
-
192
-
193
-
194
-
195
-
196
-
197
-
198
-
199
-
200
-
201
-
202
-
203
-
204
-
205
-
206
-
207
-
208
-
209
-
210
-
211
-
212
-
213
-
214
-
215
-
216
-
217
-
218
-
219
-
220
-
221
-
222
-
223
-
224
-
225
-
226
-
227
-
228
-
229
-
230
-
231
-
232
-
233
-
234
-
235
-
236
-
237
-
238
-
239
-
240
-
241
-
242
-
243
-
244
-
245
-
246
-
247
-
248
-
249
-
250
-
251
-
252
-
253
-
254
-
255
-
256
-
257
-
258
-
259
-
260
-
261
-
262
-
263
-
264
-
265
-
266
-
267
-
268
-
269
-
270
-
271
-
272
 |
 |
