Brother International PE-DESIGN Ver.6 Users Manual - English - Page 40
Editing lines
 |
View all Brother International PE-DESIGN Ver.6 manuals
Add to My Manuals
Save this manual to your list of manuals |
Page 40 highlights
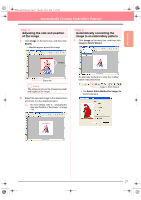
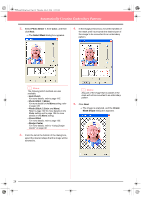
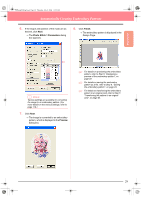
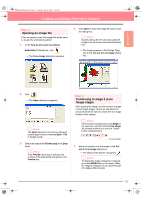
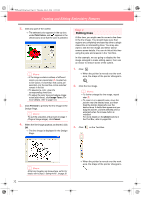
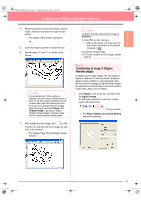
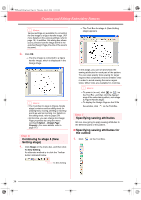
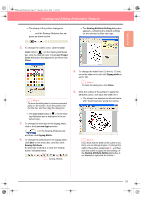
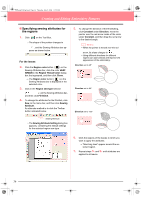
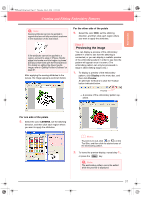
PeDesignV6Eng.book Page 32 Thursday, July 8, 2004 11:59 AM Creating and Editing Embroidery Patterns 2. Click any part of the outline. → The selected color appears in the top box under Pick Colors, and appears in the check box to show that the color is selected. b Memo: • If the image contains outlines of different colors, you can repeat step 2. to select up to five colors. If more than five colors are selected, only the last five colors selected remain in the list. • To deselect a color, clear the corresponding check box. • To adjust the color tone and reduce image noise (distortions), click Image Tune. (For more details, refer to page 74.) 3. Click Preview to preview the line image in the Design Page. b Memo: To quit the operation and go back to stage 1 (Original Image stage), click Cancel. 4. When the line image appears as desired, click OK. → The line image is displayed in the Design Page. Step 4 Editing lines At this time, you might need to correct a few lines in the line image. You should make sure that regions are completely enclosed by either a single closed line or intersecting lines. You may also want to edit the line image and either add or remove some details. You can do this at this time using the pens and erasers in the Tool Box. In this example, we are going to display the line image enlarged to make editing easier, then use an eraser to remove some of the outline. 1. Click . → When the pointer is moved over the work area, the shape of the pointer changes to . 2. Click the line image. b Memo: • To further enlarge the line image, repeat step 2. • To zoom in on a specific area, move the pointer near the desired area, and then drag the pointer diagonally over the desired area. A dotted box appears as you drag the pointer, and the selected area is enlarged when the mouse button is released. For more details on the Zoom buttons in the Tool Box, refer to page 234. 3. Click on the Tool Box. b Memo: At this time, the pattern can be saved as a .pel file. For details, refer to Step 9, "Saving the file", on page 38. 32 → When the pointer is moved over the work area, the shape of the pointer changes to .
-
 1
1 -
2
-
3
-
4
-
5
-
6
-
7
-
8
-
9
-
10
-
11
-
12
-
13
-
14
-
15
-
16
-
17
-
18
-
19
-
20
-
21
-
22
-
23
-
24
-
25
-
26
-
27
-
28
-
29
-
30
-
31
-
32
-
33
-
34
-
 35
35 -
 36
36 -
 37
37 -
 38
38 -
 39
39 -
 40
40 -
 41
41 -
 42
42 -
 43
43 -
 44
44 -
 45
45 -
46
-
47
-
48
-
49
-
50
-
51
-
52
-
53
-
54
-
55
-
56
-
57
-
58
-
59
-
60
-
61
-
62
-
63
-
64
-
65
-
66
-
67
-
68
-
69
-
70
-
71
-
72
-
73
-
74
-
75
-
76
-
77
-
78
-
79
-
80
-
81
-
82
-
83
-
84
-
85
-
86
-
87
-
88
-
89
-
90
-
91
-
92
-
93
-
94
-
95
-
96
-
97
-
98
-
99
-
100
-
101
-
102
-
103
-
104
-
105
-
106
-
107
-
108
-
109
-
110
-
111
-
112
-
113
-
114
-
115
-
116
-
117
-
118
-
119
-
120
-
121
-
122
-
123
-
124
-
125
-
126
-
127
-
128
-
129
-
130
-
131
-
132
-
133
-
134
-
135
-
136
-
137
-
138
-
139
-
140
-
141
-
142
-
143
-
144
-
145
-
146
-
147
-
148
-
149
-
150
-
151
-
152
-
153
-
154
-
155
-
156
-
157
-
158
-
159
-
160
-
161
-
162
-
163
-
164
-
165
-
166
-
167
-
168
-
169
-
170
-
171
-
172
-
173
-
174
-
175
-
176
-
177
-
178
-
179
-
180
-
181
-
182
-
183
-
184
-
185
-
186
-
187
-
188
-
189
-
190
-
191
-
192
-
193
-
194
-
195
-
196
-
197
-
198
-
199
-
200
-
201
-
202
-
203
-
204
-
205
-
206
-
207
-
208
-
209
-
210
-
211
-
212
-
213
-
214
-
215
-
216
-
217
-
218
-
219
-
220
-
221
-
222
-
223
-
224
-
225
-
226
-
227
-
228
-
229
-
230
-
231
-
232
-
233
-
234
-
235
-
236
-
237
-
238
-
239
-
240
-
241
-
242
-
243
-
244
-
245
-
246
-
247
-
248
-
249
-
250
-
251
-
252
-
253
-
254
-
255
-
256
-
257
-
258
-
259
-
260
-
261
-
262
-
263
-
264
-
265
-
266
-
267
-
268
-
269
-
270
-
271
-
272
 |
 |
