Brother International PE-DESIGN Ver.6 Users Manual - English - Page 202
Overwriting, Saving with a new name
 |
View all Brother International PE-DESIGN Ver.6 manuals
Add to My Manuals
Save this manual to your list of manuals |
Page 202 highlights
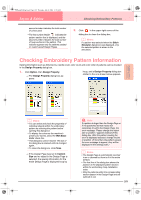
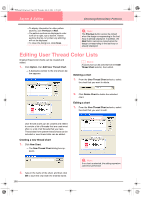
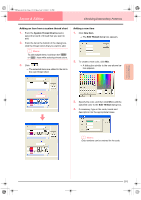
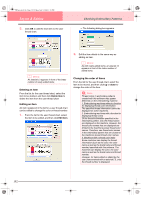
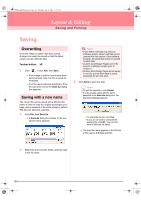
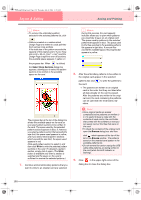
PeDesignV6Eng.book Page 194 Thursday, July 8, 2004 11:59 AM Layout & Editing Saving and Printing Saving Overwriting Once the image or pattern has been saved, changes can easily be saved so that the latest version can be retrieved later. Toolbar button: 1. Click , or click File, then Save. → If the image or pattern has already been saved at least once, the file is saved immediately. → If no file name has been specified or if the file cannot be found, the Save As dialog box appears. Saving with a new name The current file can be saved with a different file name in order to keep the original unchanged or to keep various versions of the same image or pattern. The files are saved as .pes files. 1. Click File, then Save As. → A Save As dialog box similar to the one shown below appears. a Note: • If you select a file type of a previous software version, saved .pes files can be opened with that version of the software; however, all saved data will be converted to stitch data. • Custom-sized Design Pages cannot be saved in a software version prior to version 6. • Custom-sized Design Pages will be saved in one file, but the stitch data is saved separately for all hoop sizes. 3. Click Save to save the data. b Memo: • To quit the operation, click Cancel. • If a file already exists with the name specified in the Save As dialog box, the following message appears. • To overwrite the file, click Yes. • If you do not want to overwrite the existing file, click No. You can then enter a different file name. → The new file name appears in the title bar of the Layout & Editing window. 2. Select the drive and the folder, and then type in the file name. 194
-
 1
1 -
2
-
3
-
4
-
5
-
6
-
7
-
8
-
9
-
10
-
11
-
12
-
13
-
14
-
15
-
16
-
17
-
18
-
19
-
20
-
21
-
22
-
23
-
24
-
25
-
26
-
27
-
28
-
29
-
30
-
31
-
32
-
33
-
34
-
35
-
36
-
37
-
38
-
39
-
40
-
41
-
42
-
43
-
44
-
45
-
46
-
47
-
48
-
49
-
50
-
51
-
52
-
53
-
54
-
55
-
56
-
57
-
58
-
59
-
60
-
61
-
62
-
63
-
64
-
65
-
66
-
67
-
68
-
69
-
70
-
71
-
72
-
73
-
74
-
75
-
76
-
77
-
78
-
79
-
80
-
81
-
82
-
83
-
84
-
85
-
86
-
87
-
88
-
89
-
90
-
91
-
92
-
93
-
94
-
95
-
96
-
97
-
98
-
99
-
100
-
101
-
102
-
103
-
104
-
105
-
106
-
107
-
108
-
109
-
110
-
111
-
112
-
113
-
114
-
115
-
116
-
117
-
118
-
119
-
120
-
121
-
122
-
123
-
124
-
125
-
126
-
127
-
128
-
129
-
130
-
131
-
132
-
133
-
134
-
135
-
136
-
137
-
138
-
139
-
140
-
141
-
142
-
143
-
144
-
145
-
146
-
147
-
148
-
149
-
150
-
151
-
152
-
153
-
154
-
155
-
156
-
157
-
158
-
159
-
160
-
161
-
162
-
163
-
164
-
165
-
166
-
167
-
168
-
169
-
170
-
171
-
172
-
173
-
174
-
175
-
176
-
177
-
178
-
179
-
180
-
181
-
182
-
183
-
184
-
185
-
186
-
187
-
188
-
189
-
190
-
191
-
192
-
193
-
194
-
195
-
196
-
 197
197 -
 198
198 -
 199
199 -
 200
200 -
 201
201 -
 202
202 -
 203
203 -
 204
204 -
 205
205 -
 206
206 -
 207
207 -
208
-
209
-
210
-
211
-
212
-
213
-
214
-
215
-
216
-
217
-
218
-
219
-
220
-
221
-
222
-
223
-
224
-
225
-
226
-
227
-
228
-
229
-
230
-
231
-
232
-
233
-
234
-
235
-
236
-
237
-
238
-
239
-
240
-
241
-
242
-
243
-
244
-
245
-
246
-
247
-
248
-
249
-
250
-
251
-
252
-
253
-
254
-
255
-
256
-
257
-
258
-
259
-
260
-
261
-
262
-
263
-
264
-
265
-
266
-
267
-
268
-
269
-
270
-
271
-
272
 |
 |
