Brother International PE-DESIGN Ver.6 Users Manual - English - Page 107
Editing a stamp
 |
View all Brother International PE-DESIGN Ver.6 manuals
Add to My Manuals
Save this manual to your list of manuals |
Page 107 highlights
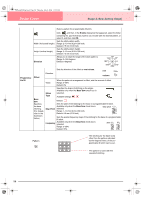
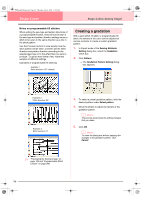
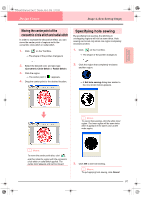
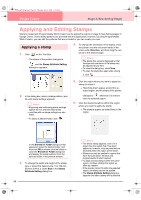
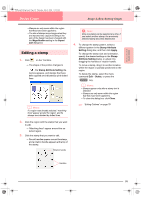
Advanced Opreation Design Center PeDesignV6Eng.book Page 99 Thursday, July 8, 2004 11:59 AM Design Center Stage 4 (Sew Setting Stage) • Stamps are only sewn within the region that they have been applied to. • The size of stamps may change when they are imported into Layout & Editing if the size of the design has been changed with the Magnification setting in the Import size dialog box. Editing a stamp 1. Click on the Tool Box. → The shape of the pointer changes to , the Stamp Attribute Setting dialog box appears, and stamps that have been applied are indicated by pink dotted lines. b Memo: If a region was already selected, "marching lines" appear around the region, and its stamps are indicated by dotted lines. 2. Click the region with the stamp that you want to edit. → "Marching lines" appear around the selected region. 3. Click the stamp that you want to edit. → Round handles appear around the stamp, and a rotation handle appears at the top of the stamp. Rotation handle a Note: Only one stamp can be selected at a time. If you select another stamp, the previously selected stamp becomes deselected. 4. To change the stamp pattern, select a different pattern in the Stamp Attribute Setting dialog box, and then click Apply. To change the stamp size and orientation, specify the desired settings in the Stamp Attribute Setting dialog, or adjust it by dragging the handles or rotation handle. To move a stamp, drag it to another location within the region or partially positioned on the region. To delete the stamp, select the menu command Edit - Delete, or press the Delete key. b Memo: • Stamps appear only after a stamp tool is selected. • Stamps are only sewn within the region that they have been applied to. • To close the dialog box, click Close. c "Editing Outlines" on page 78 Handles 99
-
 1
1 -
2
-
3
-
4
-
5
-
6
-
7
-
8
-
9
-
10
-
11
-
12
-
13
-
14
-
15
-
16
-
17
-
18
-
19
-
20
-
21
-
22
-
23
-
24
-
25
-
26
-
27
-
28
-
29
-
30
-
31
-
32
-
33
-
34
-
35
-
36
-
37
-
38
-
39
-
40
-
41
-
42
-
43
-
44
-
45
-
46
-
47
-
48
-
49
-
50
-
51
-
52
-
53
-
54
-
55
-
56
-
57
-
58
-
59
-
60
-
61
-
62
-
63
-
64
-
65
-
66
-
67
-
68
-
69
-
70
-
71
-
72
-
73
-
74
-
75
-
76
-
77
-
78
-
79
-
80
-
81
-
82
-
83
-
84
-
85
-
86
-
87
-
88
-
89
-
90
-
91
-
92
-
93
-
94
-
95
-
96
-
97
-
98
-
99
-
100
-
101
-
 102
102 -
 103
103 -
 104
104 -
 105
105 -
 106
106 -
 107
107 -
 108
108 -
 109
109 -
 110
110 -
 111
111 -
 112
112 -
113
-
114
-
115
-
116
-
117
-
118
-
119
-
120
-
121
-
122
-
123
-
124
-
125
-
126
-
127
-
128
-
129
-
130
-
131
-
132
-
133
-
134
-
135
-
136
-
137
-
138
-
139
-
140
-
141
-
142
-
143
-
144
-
145
-
146
-
147
-
148
-
149
-
150
-
151
-
152
-
153
-
154
-
155
-
156
-
157
-
158
-
159
-
160
-
161
-
162
-
163
-
164
-
165
-
166
-
167
-
168
-
169
-
170
-
171
-
172
-
173
-
174
-
175
-
176
-
177
-
178
-
179
-
180
-
181
-
182
-
183
-
184
-
185
-
186
-
187
-
188
-
189
-
190
-
191
-
192
-
193
-
194
-
195
-
196
-
197
-
198
-
199
-
200
-
201
-
202
-
203
-
204
-
205
-
206
-
207
-
208
-
209
-
210
-
211
-
212
-
213
-
214
-
215
-
216
-
217
-
218
-
219
-
220
-
221
-
222
-
223
-
224
-
225
-
226
-
227
-
228
-
229
-
230
-
231
-
232
-
233
-
234
-
235
-
236
-
237
-
238
-
239
-
240
-
241
-
242
-
243
-
244
-
245
-
246
-
247
-
248
-
249
-
250
-
251
-
252
-
253
-
254
-
255
-
256
-
257
-
258
-
259
-
260
-
261
-
262
-
263
-
264
-
265
-
266
-
267
-
268
-
269
-
270
-
271
-
272
 |
 |
