Brother International PE-DESIGN Ver.6 Users Manual - English - Page 198
Editing User Thread Color Lists
 |
View all Brother International PE-DESIGN Ver.6 manuals
Add to My Manuals
Save this manual to your list of manuals |
Page 198 highlights
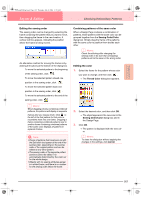
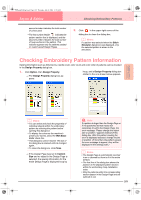
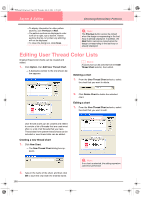
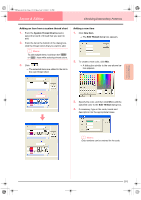
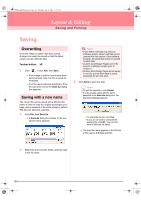
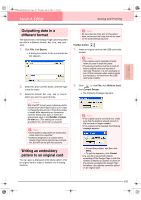
PeDesignV6Eng.book Page 190 Thursday, July 8, 2004 11:59 AM Layout & Editing Checking Embroidery Patterns • To display information for other pattern sections, click Previous or Next. • The pattern sections are displayed in order from left to right, top to bottom. Pattern sections that do not contain any stitching will not be displayed. • To close the dialog box, click Close. a Note: The Previous button cannot be clicked when the design corresponding to the first hoop is already displayed. In addition, the Next button cannot be clicked when the design corresponding to the last hoop is already displayed. Editing User Thread Color Lists Original thread color charts can be created and edited. 1. Click Option, then Edit User Thread Chart. → A dialog box similar to the one shown below appears. b Memo: A saved chart can be selected from the User Thread Chart selector, then edited. Deleting a chart 1. From the User Thread Chart selector, select the chart that you want to delete. 2. Click Delete Chart to delete the selected chart. Editing a chart 1. From the User Thread Chart selector, select the chart that you want to edit. User thread charts can be created and edited to contain a list of threads that are used most often or a list of all threads that you have. Thread data from system thread charts can be included or new thread data can be added. Creating a new thread chart 1. Click New Chart. → The New Thread Chart dialog box appears. 2. Type in the name of the chart, and then click OK to save the chart with the entered name. 190 a Note: If no chart is selected, the editing operation cannot be performed.
-
 1
1 -
2
-
3
-
4
-
5
-
6
-
7
-
8
-
9
-
10
-
11
-
12
-
13
-
14
-
15
-
16
-
17
-
18
-
19
-
20
-
21
-
22
-
23
-
24
-
25
-
26
-
27
-
28
-
29
-
30
-
31
-
32
-
33
-
34
-
35
-
36
-
37
-
38
-
39
-
40
-
41
-
42
-
43
-
44
-
45
-
46
-
47
-
48
-
49
-
50
-
51
-
52
-
53
-
54
-
55
-
56
-
57
-
58
-
59
-
60
-
61
-
62
-
63
-
64
-
65
-
66
-
67
-
68
-
69
-
70
-
71
-
72
-
73
-
74
-
75
-
76
-
77
-
78
-
79
-
80
-
81
-
82
-
83
-
84
-
85
-
86
-
87
-
88
-
89
-
90
-
91
-
92
-
93
-
94
-
95
-
96
-
97
-
98
-
99
-
100
-
101
-
102
-
103
-
104
-
105
-
106
-
107
-
108
-
109
-
110
-
111
-
112
-
113
-
114
-
115
-
116
-
117
-
118
-
119
-
120
-
121
-
122
-
123
-
124
-
125
-
126
-
127
-
128
-
129
-
130
-
131
-
132
-
133
-
134
-
135
-
136
-
137
-
138
-
139
-
140
-
141
-
142
-
143
-
144
-
145
-
146
-
147
-
148
-
149
-
150
-
151
-
152
-
153
-
154
-
155
-
156
-
157
-
158
-
159
-
160
-
161
-
162
-
163
-
164
-
165
-
166
-
167
-
168
-
169
-
170
-
171
-
172
-
173
-
174
-
175
-
176
-
177
-
178
-
179
-
180
-
181
-
182
-
183
-
184
-
185
-
186
-
187
-
188
-
189
-
190
-
191
-
192
-
 193
193 -
 194
194 -
 195
195 -
 196
196 -
 197
197 -
 198
198 -
 199
199 -
 200
200 -
 201
201 -
 202
202 -
 203
203 -
204
-
205
-
206
-
207
-
208
-
209
-
210
-
211
-
212
-
213
-
214
-
215
-
216
-
217
-
218
-
219
-
220
-
221
-
222
-
223
-
224
-
225
-
226
-
227
-
228
-
229
-
230
-
231
-
232
-
233
-
234
-
235
-
236
-
237
-
238
-
239
-
240
-
241
-
242
-
243
-
244
-
245
-
246
-
247
-
248
-
249
-
250
-
251
-
252
-
253
-
254
-
255
-
256
-
257
-
258
-
259
-
260
-
261
-
262
-
263
-
264
-
265
-
266
-
267
-
268
-
269
-
270
-
271
-
272
 |
 |
