Brother International PE-DESIGN Ver.6 Users Manual - English - Page 214
Saving the pattern, Writing the pattern to an, original card
 |
View all Brother International PE-DESIGN Ver.6 manuals
Add to My Manuals
Save this manual to your list of manuals |
Page 214 highlights
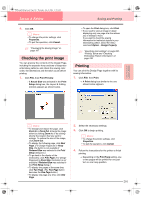
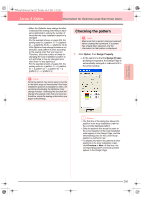
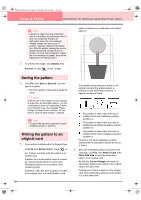
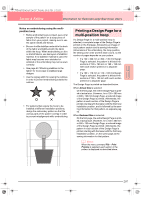
PeDesignV6Eng.book Page 206 Thursday, July 8, 2004 11:59 AM Layout & Editing Information for Optional Large-Size Hoop Users a Note: • If pattern is larger than the embroidery area or if a pattern is positioned so that it does not completely fit within an embroidery area, the error message "Please change the object size or position." appears instead of this dialog box. After the pattern causing the error is displayed selected, change its size or position. (If more than one pattern causes the error message to appear, they will be displayed in the sewing order.) 2. To preview the image, click Display, then Preview, or click on the Toolbar. pattern is saved as a combination of multiple patterns. Saving the pattern 1. Click File, then Save or Save As, and then save the pattern. → The entire pattern is saved as a single file (.pes). b Memo: If the file size or the number of color changes is larger than the specified number, or if one of the patterns does not completely fit within an embroidery area, the message "Please change the object size or position. Do you want to save the data anyway?" appears. a Note: • The saved file cannot be opened in Layout & Editing versions 1 and 2.0x. Writing the pattern to an original card 1. If your pattern is displayed in the Design Page, click File, then Write to Card, or click on the Toolbar, and then write the pattern to an original card. A pattern for a multi-position hoop is created by considering the pattern in each hoop installation position as one pattern, then combining them. Therefore, when this type of pattern is written to an original card, one multi-position hoop 206 If the pattern shown above is written to an original card and the written pattern is checked on the embroidery machine, it appears as shown below. : This pattern is sewn when the hoop is installed at the top installation position (position a). : This pattern is sewn when the hoop is installed at the middle installation position (position b). : This pattern is sewn when the hoop is installed at the bottom installation position (position c). Therefore, the frame installation position sewing order for the pattern shown above is b, a, then c. 2. After the embroidery pattern is saved on the computer, click File, then Write to Card, then Other PES files to write the embroidery pattern to an original card. As with the Current Design command, all embroidery patterns are written to the original card at the same time. Furthermore, if there is space on the original card, other embroidery patterns can be written to it at the same time.
-
 1
1 -
2
-
3
-
4
-
5
-
6
-
7
-
8
-
9
-
10
-
11
-
12
-
13
-
14
-
15
-
16
-
17
-
18
-
19
-
20
-
21
-
22
-
23
-
24
-
25
-
26
-
27
-
28
-
29
-
30
-
31
-
32
-
33
-
34
-
35
-
36
-
37
-
38
-
39
-
40
-
41
-
42
-
43
-
44
-
45
-
46
-
47
-
48
-
49
-
50
-
51
-
52
-
53
-
54
-
55
-
56
-
57
-
58
-
59
-
60
-
61
-
62
-
63
-
64
-
65
-
66
-
67
-
68
-
69
-
70
-
71
-
72
-
73
-
74
-
75
-
76
-
77
-
78
-
79
-
80
-
81
-
82
-
83
-
84
-
85
-
86
-
87
-
88
-
89
-
90
-
91
-
92
-
93
-
94
-
95
-
96
-
97
-
98
-
99
-
100
-
101
-
102
-
103
-
104
-
105
-
106
-
107
-
108
-
109
-
110
-
111
-
112
-
113
-
114
-
115
-
116
-
117
-
118
-
119
-
120
-
121
-
122
-
123
-
124
-
125
-
126
-
127
-
128
-
129
-
130
-
131
-
132
-
133
-
134
-
135
-
136
-
137
-
138
-
139
-
140
-
141
-
142
-
143
-
144
-
145
-
146
-
147
-
148
-
149
-
150
-
151
-
152
-
153
-
154
-
155
-
156
-
157
-
158
-
159
-
160
-
161
-
162
-
163
-
164
-
165
-
166
-
167
-
168
-
169
-
170
-
171
-
172
-
173
-
174
-
175
-
176
-
177
-
178
-
179
-
180
-
181
-
182
-
183
-
184
-
185
-
186
-
187
-
188
-
189
-
190
-
191
-
192
-
193
-
194
-
195
-
196
-
197
-
198
-
199
-
200
-
201
-
202
-
203
-
204
-
205
-
206
-
207
-
208
-
 209
209 -
 210
210 -
 211
211 -
 212
212 -
 213
213 -
 214
214 -
 215
215 -
 216
216 -
 217
217 -
 218
218 -
 219
219 -
220
-
221
-
222
-
223
-
224
-
225
-
226
-
227
-
228
-
229
-
230
-
231
-
232
-
233
-
234
-
235
-
236
-
237
-
238
-
239
-
240
-
241
-
242
-
243
-
244
-
245
-
246
-
247
-
248
-
249
-
250
-
251
-
252
-
253
-
254
-
255
-
256
-
257
-
258
-
259
-
260
-
261
-
262
-
263
-
264
-
265
-
266
-
267
-
268
-
269
-
270
-
271
-
272
 |
 |
