Brother International PE-DESIGN Ver.6 Users Manual - English - Page 238
Converting Embroidery Patterns to, Different Formats
 |
View all Brother International PE-DESIGN Ver.6 manuals
Add to My Manuals
Save this manual to your list of manuals |
Page 238 highlights
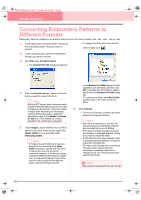
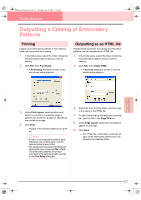
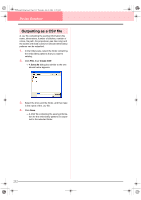
PeDesignV6Eng.book Page 230 Thursday, July 8, 2004 11:59 AM Design Database Converting Embroidery Patterns to Different Formats Embroidery files can easily be converted to a file of one of the other formats (.pes, .dst., .exp., .pcs or .hus). 1. In the folder pane, select the folder containing the embroidery pattern that you want to convert. • To change the folder where the new file will be added, click . 2. In the contents pane, select the embroidery file that you want to convert. 3. Click File, then Convert Format. → The Convert Format dialog box appears. 4. From the Format selector, select the format that you want to convert the file to. b Memo: With the DST format, jump codes are used to indicate when the thread must be cut in order to change the thread color. Since the number of codes differ depending on the sewing machine being used, type or select the appropriate value in the Number of jumps for trim box. (This setting can only be specified if the .dst format is selected.) 5. Under Output, select whether the new file is added to the same folder as the original file (Same folder) or to a specified folder (Following folder). b Memo: • If multiple files with different formats are selected to be converted while Same folder is selected, any file with the same format as the new one will not be converted. However, if the files are being added to a different folder than the original one, any file with the same format as the new one will be copied to the different folder, instead of being converted. In the Browse for Folder dialog box that appeared, click the folder, and then click OK (or double-click the folder) to select it and to close the Browse for Folder dialog box. • To create a new folder, click New Folder, and then type in the name of the new folder. 6. Click Convert. → The file is converted, and the new file is added to the specified folder. b Memo: • If the file is converted to a .pes file, the thread colors are converted as if the file was imported into Layout & Editing. • If the path to a folder that does not exist was typed in, a message appears, asking if you want to create the folder. • If a file with the same name already exists, a message appears, asking if you want to overwrite the original file. • The name of the file after the conversion is the same as the name before the conversion, except the extension is changed to the one corresponding to the selected file format. a Note: Files cannot be converted to the .phc format. 230
-
 1
1 -
2
-
3
-
4
-
5
-
6
-
7
-
8
-
9
-
10
-
11
-
12
-
13
-
14
-
15
-
16
-
17
-
18
-
19
-
20
-
21
-
22
-
23
-
24
-
25
-
26
-
27
-
28
-
29
-
30
-
31
-
32
-
33
-
34
-
35
-
36
-
37
-
38
-
39
-
40
-
41
-
42
-
43
-
44
-
45
-
46
-
47
-
48
-
49
-
50
-
51
-
52
-
53
-
54
-
55
-
56
-
57
-
58
-
59
-
60
-
61
-
62
-
63
-
64
-
65
-
66
-
67
-
68
-
69
-
70
-
71
-
72
-
73
-
74
-
75
-
76
-
77
-
78
-
79
-
80
-
81
-
82
-
83
-
84
-
85
-
86
-
87
-
88
-
89
-
90
-
91
-
92
-
93
-
94
-
95
-
96
-
97
-
98
-
99
-
100
-
101
-
102
-
103
-
104
-
105
-
106
-
107
-
108
-
109
-
110
-
111
-
112
-
113
-
114
-
115
-
116
-
117
-
118
-
119
-
120
-
121
-
122
-
123
-
124
-
125
-
126
-
127
-
128
-
129
-
130
-
131
-
132
-
133
-
134
-
135
-
136
-
137
-
138
-
139
-
140
-
141
-
142
-
143
-
144
-
145
-
146
-
147
-
148
-
149
-
150
-
151
-
152
-
153
-
154
-
155
-
156
-
157
-
158
-
159
-
160
-
161
-
162
-
163
-
164
-
165
-
166
-
167
-
168
-
169
-
170
-
171
-
172
-
173
-
174
-
175
-
176
-
177
-
178
-
179
-
180
-
181
-
182
-
183
-
184
-
185
-
186
-
187
-
188
-
189
-
190
-
191
-
192
-
193
-
194
-
195
-
196
-
197
-
198
-
199
-
200
-
201
-
202
-
203
-
204
-
205
-
206
-
207
-
208
-
209
-
210
-
211
-
212
-
213
-
214
-
215
-
216
-
217
-
218
-
219
-
220
-
221
-
222
-
223
-
224
-
225
-
226
-
227
-
228
-
229
-
230
-
231
-
232
-
 233
233 -
 234
234 -
 235
235 -
 236
236 -
 237
237 -
 238
238 -
 239
239 -
 240
240 -
 241
241 -
 242
242 -
 243
243 -
244
-
245
-
246
-
247
-
248
-
249
-
250
-
251
-
252
-
253
-
254
-
255
-
256
-
257
-
258
-
259
-
260
-
261
-
262
-
263
-
264
-
265
-
266
-
267
-
268
-
269
-
270
-
271
-
272
 |
 |
