Brother International PE-DESIGN Ver.6 Users Manual - English - Page 45
Previewing the image
 |
View all Brother International PE-DESIGN Ver.6 manuals
Add to My Manuals
Save this manual to your list of manuals |
Page 45 highlights
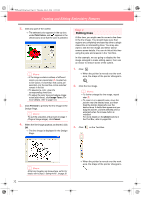
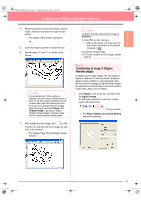
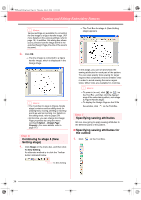
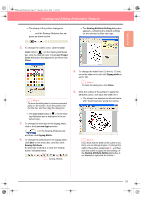
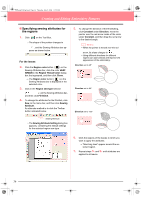
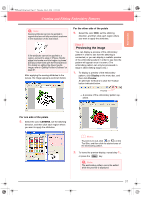
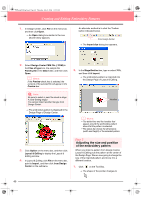
Basic Operation PeDesignV6Eng.book Page 37 Thursday, July 8, 2004 11:59 AM Creating and Editing Embroidery Patterns a Note: Sewing attributes cannot be applied to regions that are not fully enclosed, as shown in the illustration of the leaf below. If the attributes cannot be applied to a region, go back to stage 3 (Figure Handle stage) and make sure that region is closed. Edit any broken lines with the Point Edit tool. For details on editing the figure handle image, refer to "Editing Points in Outlines" on page 81. After applying the sewing attributes to the leaves, the image appears as shown below. For the other side of the petals 9. Select the color RED, set the stitching direction, and then click each region where you want to apply the attributes. Step 8 Previewing the image You can display a preview of the embroidery pattern in order to see how the stitching is connected, or you can display a realistic preview of the embroidery pattern in order to see how the pattern will appear once it is sewn. (The embroidery pattern can only be previewed in stage 4 (Sew Setting stage) only.) 1. To display a preview of the embroidery pattern, click Display on the menu bar, and then click Preview. An alternate method is to click the Toolbar button indicated below. Preview → A preview of the embroidery pattern appears. For one side of the petals 8. Select the color CARMINE, set the stitching direction, and then click each region where you want to apply the attributes. b Memo: To zoom in (or out), click (or ) on the Tool Box, and then click the desired area of the embroidery pattern. 2. To leave the preview display, repeat step 1., or press the Esc key. a Note: The embroidery pattern cannot be edited while the preview is displayed. 37
-
 1
1 -
2
-
3
-
4
-
5
-
6
-
7
-
8
-
9
-
10
-
11
-
12
-
13
-
14
-
15
-
16
-
17
-
18
-
19
-
20
-
21
-
22
-
23
-
24
-
25
-
26
-
27
-
28
-
29
-
30
-
31
-
32
-
33
-
34
-
35
-
36
-
37
-
38
-
39
-
 40
40 -
 41
41 -
 42
42 -
 43
43 -
 44
44 -
 45
45 -
 46
46 -
 47
47 -
 48
48 -
 49
49 -
 50
50 -
51
-
52
-
53
-
54
-
55
-
56
-
57
-
58
-
59
-
60
-
61
-
62
-
63
-
64
-
65
-
66
-
67
-
68
-
69
-
70
-
71
-
72
-
73
-
74
-
75
-
76
-
77
-
78
-
79
-
80
-
81
-
82
-
83
-
84
-
85
-
86
-
87
-
88
-
89
-
90
-
91
-
92
-
93
-
94
-
95
-
96
-
97
-
98
-
99
-
100
-
101
-
102
-
103
-
104
-
105
-
106
-
107
-
108
-
109
-
110
-
111
-
112
-
113
-
114
-
115
-
116
-
117
-
118
-
119
-
120
-
121
-
122
-
123
-
124
-
125
-
126
-
127
-
128
-
129
-
130
-
131
-
132
-
133
-
134
-
135
-
136
-
137
-
138
-
139
-
140
-
141
-
142
-
143
-
144
-
145
-
146
-
147
-
148
-
149
-
150
-
151
-
152
-
153
-
154
-
155
-
156
-
157
-
158
-
159
-
160
-
161
-
162
-
163
-
164
-
165
-
166
-
167
-
168
-
169
-
170
-
171
-
172
-
173
-
174
-
175
-
176
-
177
-
178
-
179
-
180
-
181
-
182
-
183
-
184
-
185
-
186
-
187
-
188
-
189
-
190
-
191
-
192
-
193
-
194
-
195
-
196
-
197
-
198
-
199
-
200
-
201
-
202
-
203
-
204
-
205
-
206
-
207
-
208
-
209
-
210
-
211
-
212
-
213
-
214
-
215
-
216
-
217
-
218
-
219
-
220
-
221
-
222
-
223
-
224
-
225
-
226
-
227
-
228
-
229
-
230
-
231
-
232
-
233
-
234
-
235
-
236
-
237
-
238
-
239
-
240
-
241
-
242
-
243
-
244
-
245
-
246
-
247
-
248
-
249
-
250
-
251
-
252
-
253
-
254
-
255
-
256
-
257
-
258
-
259
-
260
-
261
-
262
-
263
-
264
-
265
-
266
-
267
-
268
-
269
-
270
-
271
-
272
 |
 |
