Brother International PE-DESIGN Ver.6 Users Manual - English - Page 188
Specifying hole sewing
 |
View all Brother International PE-DESIGN Ver.6 manuals
Add to My Manuals
Save this manual to your list of manuals |
Page 188 highlights
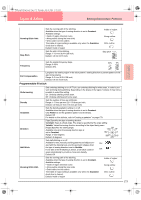
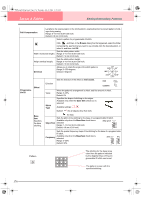
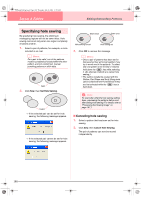
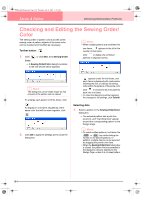
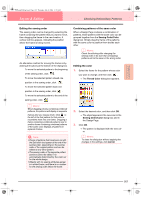
PeDesignV6Eng.book Page 180 Thursday, July 8, 2004 11:59 AM Layout & Editing Editing Embroidery Patterns Specifying hole sewing By specifying hole sewing, the stitching in overlapping regions will not be sewn twice. Hole sewing can be set only when one region completely encloses another. 1. Select a pair of patterns, for example, a circle included in an oval. b Memo: For a pair to be valid, one of the patterns must be completely enclosed within the other pattern, and not contain text, manual punching patterns or stitch data. Valid 2. Click Sew, then Set Hole Sewing. Invalid → If the selected pair can be set for hole sewing, the following message appears. → If the selected pair cannot be set for hole sewing, the following message appears. Sewn twice Sewn once Hole sewing not set Hole sewing set 3. Click OK to remove the message. b Memo: • Once a pair of patterns has been set for hole sewing, they will move together if you try to move one of the patterns. To select only one pattern to be moved or resized, hold down the Alt key while selecting it. (An alternate method is to cancel hole sewing.) • The outline of patterns created with the Outline, Fan Shape and Arc & String tools can be edited with the Point Edit tool if they are first selected while the Alt key is held down. a Note: To see better what the hole sewing setting does, previewing the patterns before and after setting hole sewing (For details, refer to "Previewing the Sewing Image" on page 187.) ■ Canceling hole sewing 1. Select a pattern that has been set for hole sewing. 2. Click Sew, then Cancel Hole Sewing. The pair of patterns can now be moved independently. 180
-
 1
1 -
2
-
3
-
4
-
5
-
6
-
7
-
8
-
9
-
10
-
11
-
12
-
13
-
14
-
15
-
16
-
17
-
18
-
19
-
20
-
21
-
22
-
23
-
24
-
25
-
26
-
27
-
28
-
29
-
30
-
31
-
32
-
33
-
34
-
35
-
36
-
37
-
38
-
39
-
40
-
41
-
42
-
43
-
44
-
45
-
46
-
47
-
48
-
49
-
50
-
51
-
52
-
53
-
54
-
55
-
56
-
57
-
58
-
59
-
60
-
61
-
62
-
63
-
64
-
65
-
66
-
67
-
68
-
69
-
70
-
71
-
72
-
73
-
74
-
75
-
76
-
77
-
78
-
79
-
80
-
81
-
82
-
83
-
84
-
85
-
86
-
87
-
88
-
89
-
90
-
91
-
92
-
93
-
94
-
95
-
96
-
97
-
98
-
99
-
100
-
101
-
102
-
103
-
104
-
105
-
106
-
107
-
108
-
109
-
110
-
111
-
112
-
113
-
114
-
115
-
116
-
117
-
118
-
119
-
120
-
121
-
122
-
123
-
124
-
125
-
126
-
127
-
128
-
129
-
130
-
131
-
132
-
133
-
134
-
135
-
136
-
137
-
138
-
139
-
140
-
141
-
142
-
143
-
144
-
145
-
146
-
147
-
148
-
149
-
150
-
151
-
152
-
153
-
154
-
155
-
156
-
157
-
158
-
159
-
160
-
161
-
162
-
163
-
164
-
165
-
166
-
167
-
168
-
169
-
170
-
171
-
172
-
173
-
174
-
175
-
176
-
177
-
178
-
179
-
180
-
181
-
182
-
 183
183 -
 184
184 -
 185
185 -
 186
186 -
 187
187 -
 188
188 -
 189
189 -
 190
190 -
 191
191 -
 192
192 -
 193
193 -
194
-
195
-
196
-
197
-
198
-
199
-
200
-
201
-
202
-
203
-
204
-
205
-
206
-
207
-
208
-
209
-
210
-
211
-
212
-
213
-
214
-
215
-
216
-
217
-
218
-
219
-
220
-
221
-
222
-
223
-
224
-
225
-
226
-
227
-
228
-
229
-
230
-
231
-
232
-
233
-
234
-
235
-
236
-
237
-
238
-
239
-
240
-
241
-
242
-
243
-
244
-
245
-
246
-
247
-
248
-
249
-
250
-
251
-
252
-
253
-
254
-
255
-
256
-
257
-
258
-
259
-
260
-
261
-
262
-
263
-
264
-
265
-
266
-
267
-
268
-
269
-
270
-
271
-
272
 |
 |
