Brother International PE-DESIGN Ver.6 Users Manual - English - Page 67
Creating Large-Size Embroidery Patterns
 |
View all Brother International PE-DESIGN Ver.6 manuals
Add to My Manuals
Save this manual to your list of manuals |
Page 67 highlights
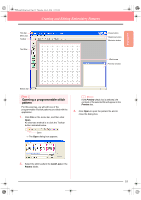
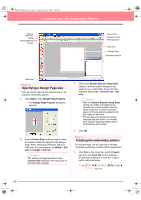
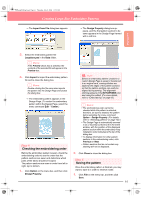
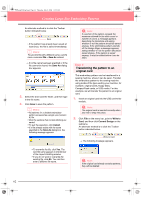
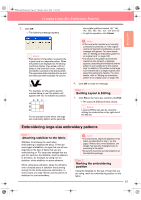
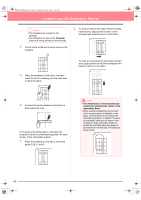
Basic Operation PeDesignV6Eng.book Page 59 Thursday, July 8, 2004 11:59 AM Creating Large-Size Embroidery Patterns A large-size embroidery pattern can be designed by specifying the size of the pattern, creating the embroidery pattern, then automatically dividing the pattern into a size that can be embroidered. By separately embroidering each section of the pattern side by side, large-size embroidery can be sewn. In addition, the joining edges can be embroidered slightly overlapping in order to blend beautifully. Some large-size patterns may not be appropriate for use with the split sewing feature. We recommend using designs with many small filled areas, such as a bouquet of flowers, lace designs and embroidery created using the Photo Stitch function. Since designs with very large filled areas may not align properly due to fabric pull, we suggest these types of designs not be used. In this section, we are going to adapt an existing embroidery pattern for large-size embroidery, and then sew it. The complete procedure will take you through the different steps of a normal working session with a large-size embroidery pattern and will introduce you to its most important options. Follow the instructions in this section step by step. If you have to interrupt this exercise for any reason, it is recommended to save the file (refer to Step 5, "Saving the pattern", on page 61). You will be able to retrieve it later and resume your work. Designing a large-size embroidery pattern Step 1 Starting up Layout & Editing Step 2 Specifying a Design Page size Step 3 Creating the embroidery pattern Step 4 Checking the embroidering order Step 5 Saving the pattern Step 6 Transferring the pattern to an original card Step 7 Quitting Layout & Editing Embroidering large-size embroidery patterns Step 1 Attaching stabilizer to the fabric Step 2 Marking the embroidering position Step 3 Hooping the fabric Step 4 Embroidering page 59 page 60 page 60 page 61 page 61 page 62 page 63 page 63 page 63 page 65 page 65 Designing a large-size embroidery pattern Step 1 Starting up Layout & Editing 1. Click , select All Programs, then PE-DESIGN Ver.6. Select Layout & Editing to open the Layout & Editing window. b Memo: If a shortcut for Layout & Editing was created, for example, on the desktop, double-click it to start up the application. → The Layout & Editing window appears. b Memo: To fill the entire screen with the Layout & Editing window, click the maximize button on the right end of the title bar. 59
-
 1
1 -
2
-
3
-
4
-
5
-
6
-
7
-
8
-
9
-
10
-
11
-
12
-
13
-
14
-
15
-
16
-
17
-
18
-
19
-
20
-
21
-
22
-
23
-
24
-
25
-
26
-
27
-
28
-
29
-
30
-
31
-
32
-
33
-
34
-
35
-
36
-
37
-
38
-
39
-
40
-
41
-
42
-
43
-
44
-
45
-
46
-
47
-
48
-
49
-
50
-
51
-
52
-
53
-
54
-
55
-
56
-
57
-
58
-
59
-
60
-
61
-
 62
62 -
 63
63 -
 64
64 -
 65
65 -
 66
66 -
 67
67 -
 68
68 -
 69
69 -
 70
70 -
 71
71 -
 72
72 -
73
-
74
-
75
-
76
-
77
-
78
-
79
-
80
-
81
-
82
-
83
-
84
-
85
-
86
-
87
-
88
-
89
-
90
-
91
-
92
-
93
-
94
-
95
-
96
-
97
-
98
-
99
-
100
-
101
-
102
-
103
-
104
-
105
-
106
-
107
-
108
-
109
-
110
-
111
-
112
-
113
-
114
-
115
-
116
-
117
-
118
-
119
-
120
-
121
-
122
-
123
-
124
-
125
-
126
-
127
-
128
-
129
-
130
-
131
-
132
-
133
-
134
-
135
-
136
-
137
-
138
-
139
-
140
-
141
-
142
-
143
-
144
-
145
-
146
-
147
-
148
-
149
-
150
-
151
-
152
-
153
-
154
-
155
-
156
-
157
-
158
-
159
-
160
-
161
-
162
-
163
-
164
-
165
-
166
-
167
-
168
-
169
-
170
-
171
-
172
-
173
-
174
-
175
-
176
-
177
-
178
-
179
-
180
-
181
-
182
-
183
-
184
-
185
-
186
-
187
-
188
-
189
-
190
-
191
-
192
-
193
-
194
-
195
-
196
-
197
-
198
-
199
-
200
-
201
-
202
-
203
-
204
-
205
-
206
-
207
-
208
-
209
-
210
-
211
-
212
-
213
-
214
-
215
-
216
-
217
-
218
-
219
-
220
-
221
-
222
-
223
-
224
-
225
-
226
-
227
-
228
-
229
-
230
-
231
-
232
-
233
-
234
-
235
-
236
-
237
-
238
-
239
-
240
-
241
-
242
-
243
-
244
-
245
-
246
-
247
-
248
-
249
-
250
-
251
-
252
-
253
-
254
-
255
-
256
-
257
-
258
-
259
-
260
-
261
-
262
-
263
-
264
-
265
-
266
-
267
-
268
-
269
-
270
-
271
-
272
 |
 |
