Brother International PE-DESIGN Ver.6 Users Manual - English - Page 22
Tips and Techniques for Creating, Embroidery Patterns
 |
View all Brother International PE-DESIGN Ver.6 manuals
Add to My Manuals
Save this manual to your list of manuals |
Page 22 highlights
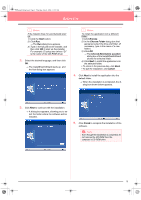
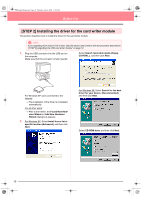
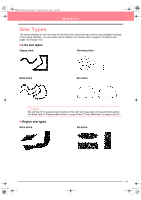
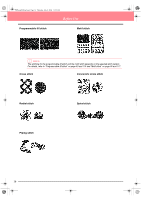
PeDesignV6Eng.book Page 14 Thursday, July 8, 2004 11:59 AM Before Use Tips and Techniques for Creating Embroidery Patterns ■ Sewing wide areas When satin stitching is sewn in a wide area, the stitched area may shrink after sewing, depending on the material and the type of thread used. If this happens, switch to this alternate method: Select the fill stitch and use stabilizer material on the reverse side of the fabric. Pattern After sewing a Note: When using the satin stitch in a wide area, the needle may move out of position by about 10 mm with some machines. In order to avoid this, use the above-mentioned alternate method. ■ Sewing direction In order to limit shrinking, select a stitch direction perpendicular to the larger edge of the area. Shrinking more likely to occur Shrinking less likely to occur ■ Sewing order After creating an embroidery pattern made of several different parts (in Design Center or Layout & Editing), be sure to check the sewing order and correct it if necessary. With Design Center, the default sewing order is the order in which the sewing attributes are applied. With Layout & Editing, the default sewing order is the order in which the elements are drawn. ■ Enlarging/reducing embroidery patterns There are several ways of enlarging or reducing an imported embroidery pattern in Layout & Editing. You may choose to scale your pattern with the pointer, or apply the Stitch to Block function, then scale the pattern. When you normally scale an imported pattern, the number of stitches that will be sewn remains the same, resulting in a change of embroidery quality if the size of the pattern is greatly changed. However, by holding down the Ctrl key while scaling the imported embroidery pattern, the original embroidery quality can be maintained, since the stitch density and fill pattern automatically adapts to the new size. Another method of maintaining the original embroidery quality of the pattern is to select the Sew - Stitch to Block command, then scale the pattern. When a pattern is scaled only moderately, it may not be necessary to apply the Stitch to Block function. This system allows you to create a wide variety of embroidery patterns and supports wider ranges for the setting of the sewing attributes (thread density, sewing pitch, etc.). However, the final result also depends on your particular sewing machine model. We recommend that you make a trial sewing sample with your sewing data before sewing on the final material. Remember to sew your trial sample on the same type of fabric as your final material and to use the same needle and the same machine embroidery thread. 14
-
 1
1 -
2
-
3
-
4
-
5
-
6
-
7
-
8
-
9
-
10
-
11
-
12
-
13
-
14
-
15
-
16
-
 17
17 -
 18
18 -
 19
19 -
 20
20 -
 21
21 -
 22
22 -
 23
23 -
 24
24 -
 25
25 -
 26
26 -
 27
27 -
28
-
29
-
30
-
31
-
32
-
33
-
34
-
35
-
36
-
37
-
38
-
39
-
40
-
41
-
42
-
43
-
44
-
45
-
46
-
47
-
48
-
49
-
50
-
51
-
52
-
53
-
54
-
55
-
56
-
57
-
58
-
59
-
60
-
61
-
62
-
63
-
64
-
65
-
66
-
67
-
68
-
69
-
70
-
71
-
72
-
73
-
74
-
75
-
76
-
77
-
78
-
79
-
80
-
81
-
82
-
83
-
84
-
85
-
86
-
87
-
88
-
89
-
90
-
91
-
92
-
93
-
94
-
95
-
96
-
97
-
98
-
99
-
100
-
101
-
102
-
103
-
104
-
105
-
106
-
107
-
108
-
109
-
110
-
111
-
112
-
113
-
114
-
115
-
116
-
117
-
118
-
119
-
120
-
121
-
122
-
123
-
124
-
125
-
126
-
127
-
128
-
129
-
130
-
131
-
132
-
133
-
134
-
135
-
136
-
137
-
138
-
139
-
140
-
141
-
142
-
143
-
144
-
145
-
146
-
147
-
148
-
149
-
150
-
151
-
152
-
153
-
154
-
155
-
156
-
157
-
158
-
159
-
160
-
161
-
162
-
163
-
164
-
165
-
166
-
167
-
168
-
169
-
170
-
171
-
172
-
173
-
174
-
175
-
176
-
177
-
178
-
179
-
180
-
181
-
182
-
183
-
184
-
185
-
186
-
187
-
188
-
189
-
190
-
191
-
192
-
193
-
194
-
195
-
196
-
197
-
198
-
199
-
200
-
201
-
202
-
203
-
204
-
205
-
206
-
207
-
208
-
209
-
210
-
211
-
212
-
213
-
214
-
215
-
216
-
217
-
218
-
219
-
220
-
221
-
222
-
223
-
224
-
225
-
226
-
227
-
228
-
229
-
230
-
231
-
232
-
233
-
234
-
235
-
236
-
237
-
238
-
239
-
240
-
241
-
242
-
243
-
244
-
245
-
246
-
247
-
248
-
249
-
250
-
251
-
252
-
253
-
254
-
255
-
256
-
257
-
258
-
259
-
260
-
261
-
262
-
263
-
264
-
265
-
266
-
267
-
268
-
269
-
270
-
271
-
272
 |
 |
