Brother International PE-DESIGN Ver.6 Users Manual - English - Page 42
Step 6, Step 7
 |
View all Brother International PE-DESIGN Ver.6 manuals
Add to My Manuals
Save this manual to your list of manuals |
Page 42 highlights
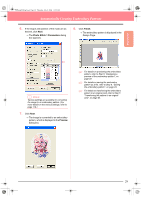
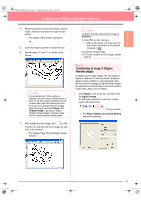
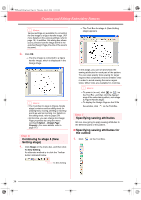
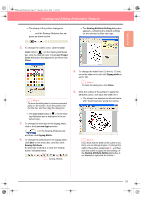
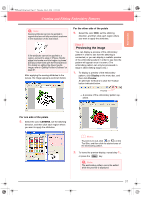
PeDesignV6Eng.book Page 34 Thursday, July 8, 2004 11:59 AM Creating and Editing Embroidery Patterns b Memo: Various settings are available for converting the line image to a figure handle image. (For more details on the various settings, refer to page 76.) In addition, this dialog box allows you to preview how the image will fit in the selected Design Page (the size of the area to be sewn). 2. Click OK. → The line image is converted to a figure handle image, which is displayed in the Design Page. b Memo: • The Tool Box for stage 3 (Figure Handle stage) contains various editing tools for drawing lines, moving, deleting or inserting points as well as zooming. For details on the editing tools, refer to page 234. • At this time, you can change the Design Page properties by using the menu command Option - Design Page Property. (For more details, refer to page 77.) Step 6 Continuing to stage 4 (Sew Setting stage) 1. Click Stage on the menu bar, and then click To Sew Setting. An alternate method is to click the Toolbar button indicated below. → The Tool Box for stage 4 (Sew Setting stage) appears. In this stage, you can set and check the sewing attributes for each part of the pattern. You can also specify hole sewing for larger regions that completely enclose smaller ones in order to avoid sewing the same region twice. Other tools are available for zooming. b Memo: • To zoom in (or out), click (or ) on the Tool Box, and then click the desired area of the embroidery pattern, as in stage 3 (Figure Handle stage). • To display the Design Page so that it fits the window, click on the Tool Box. Step 7 Specifying sewing attributes We are now going to apply sewing attributes to the different parts of the pattern. ■ Specifying sewing attributes for the outline 1. Click on the Tool Box. To Sew Setting 34
-
 1
1 -
2
-
3
-
4
-
5
-
6
-
7
-
8
-
9
-
10
-
11
-
12
-
13
-
14
-
15
-
16
-
17
-
18
-
19
-
20
-
21
-
22
-
23
-
24
-
25
-
26
-
27
-
28
-
29
-
30
-
31
-
32
-
33
-
34
-
35
-
36
-
 37
37 -
 38
38 -
 39
39 -
 40
40 -
 41
41 -
 42
42 -
 43
43 -
 44
44 -
 45
45 -
 46
46 -
 47
47 -
48
-
49
-
50
-
51
-
52
-
53
-
54
-
55
-
56
-
57
-
58
-
59
-
60
-
61
-
62
-
63
-
64
-
65
-
66
-
67
-
68
-
69
-
70
-
71
-
72
-
73
-
74
-
75
-
76
-
77
-
78
-
79
-
80
-
81
-
82
-
83
-
84
-
85
-
86
-
87
-
88
-
89
-
90
-
91
-
92
-
93
-
94
-
95
-
96
-
97
-
98
-
99
-
100
-
101
-
102
-
103
-
104
-
105
-
106
-
107
-
108
-
109
-
110
-
111
-
112
-
113
-
114
-
115
-
116
-
117
-
118
-
119
-
120
-
121
-
122
-
123
-
124
-
125
-
126
-
127
-
128
-
129
-
130
-
131
-
132
-
133
-
134
-
135
-
136
-
137
-
138
-
139
-
140
-
141
-
142
-
143
-
144
-
145
-
146
-
147
-
148
-
149
-
150
-
151
-
152
-
153
-
154
-
155
-
156
-
157
-
158
-
159
-
160
-
161
-
162
-
163
-
164
-
165
-
166
-
167
-
168
-
169
-
170
-
171
-
172
-
173
-
174
-
175
-
176
-
177
-
178
-
179
-
180
-
181
-
182
-
183
-
184
-
185
-
186
-
187
-
188
-
189
-
190
-
191
-
192
-
193
-
194
-
195
-
196
-
197
-
198
-
199
-
200
-
201
-
202
-
203
-
204
-
205
-
206
-
207
-
208
-
209
-
210
-
211
-
212
-
213
-
214
-
215
-
216
-
217
-
218
-
219
-
220
-
221
-
222
-
223
-
224
-
225
-
226
-
227
-
228
-
229
-
230
-
231
-
232
-
233
-
234
-
235
-
236
-
237
-
238
-
239
-
240
-
241
-
242
-
243
-
244
-
245
-
246
-
247
-
248
-
249
-
250
-
251
-
252
-
253
-
254
-
255
-
256
-
257
-
258
-
259
-
260
-
261
-
262
-
263
-
264
-
265
-
266
-
267
-
268
-
269
-
270
-
271
-
272
 |
 |
