Brother International PE-DESIGN Ver.6 Users Manual - English - Page 117
Opening a Layout & Editing file
 |
View all Brother International PE-DESIGN Ver.6 manuals
Add to My Manuals
Save this manual to your list of manuals |
Page 117 highlights
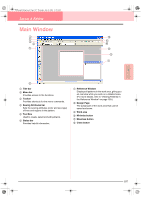
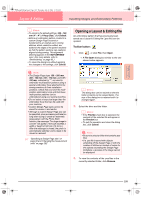
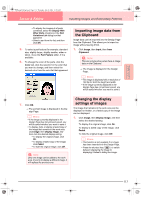
Advanced Opreation Layout & Editing PeDesignV6Eng.book Page 109 Thursday, July 8, 2004 11:59 AM Layout & Editing Inputting Images and Embroidery Patterns b Memo: • To return to the default settings (100 × 100 mm (4" × 4") of Hoop Size), click Default. • Before an embroidery pattern created in a custom Design Page is saved or transferred to an original card, running stitches, which cannot be edited, are added at the edges of the pattern sections so that the pattern sections can easily be aligned during sewing. This alignment stitching appears in the NOT DEFINED color. (For more details, refer to "Embroidering" on page 65.) • To close the dialog box without applying the changes to the settings, click Cancel. a Note: • The Design Page sizes 130 × 300 mm, 300 × 130 mm, 100 × 172 mm, and 172 × 100 mm, indicated by "*", are used to embroider multi-position patterns using a special embroidery hoop attached to the sewing machine at three installation positions. Check that you have the multiposition embroidery hoop and that these multi-position patterns can be embroidered using your sewing machine. • Do not select a hoop size larger than the embroidery hoop that can be used with your machine. • Custom Design Page sizes cannot be saved for version 5 and earlier. • Although a custom Design Page size can be specified, since processing will take too long when trying to create an extremely large pattern with the Photo Stitch function, the message "Too large image to convert" will appear if the size exceeds a width or height of 500 mm (19 3/4 in.). After the message is closed, the photo is automatically selected, and is ready to be moved or reduced. c "Specifying a Design Page size" on page 60 and "Changing the measurement units" on page 202 Opening a Layout & Editing file An embroidery pattern that has previously been saved as a Layout & Editing file (.pes file) can be opened. Toolbar button: 1. Click , or click File, then Open. → A File Open dialog box similar to the one shown below appears. b Memo: This dialog box can be resized so that the folder contents can be viewed better. The size of the dialog box is retained until it is changed again. 2. Select the drive and the folder. b Memo: • If the Preview check box is selected, the contents of the selected file will appear in the Preview box. • To quit the operation and close the dialog box, click Cancel. a Note: • Be sure to select a folder that contains.pes files. • If a .pes file is saved with objects extending off the Design Page or with the number of stitches or number of colors for the objects exceeding the Design Page limitations, a preview of the image cannot be displayed. 3. To view the contents of the .pes files in the currently selected folder, click Browse. 109
-
 1
1 -
2
-
3
-
4
-
5
-
6
-
7
-
8
-
9
-
10
-
11
-
12
-
13
-
14
-
15
-
16
-
17
-
18
-
19
-
20
-
21
-
22
-
23
-
24
-
25
-
26
-
27
-
28
-
29
-
30
-
31
-
32
-
33
-
34
-
35
-
36
-
37
-
38
-
39
-
40
-
41
-
42
-
43
-
44
-
45
-
46
-
47
-
48
-
49
-
50
-
51
-
52
-
53
-
54
-
55
-
56
-
57
-
58
-
59
-
60
-
61
-
62
-
63
-
64
-
65
-
66
-
67
-
68
-
69
-
70
-
71
-
72
-
73
-
74
-
75
-
76
-
77
-
78
-
79
-
80
-
81
-
82
-
83
-
84
-
85
-
86
-
87
-
88
-
89
-
90
-
91
-
92
-
93
-
94
-
95
-
96
-
97
-
98
-
99
-
100
-
101
-
102
-
103
-
104
-
105
-
106
-
107
-
108
-
109
-
110
-
111
-
 112
112 -
 113
113 -
 114
114 -
 115
115 -
 116
116 -
 117
117 -
 118
118 -
 119
119 -
 120
120 -
 121
121 -
 122
122 -
123
-
124
-
125
-
126
-
127
-
128
-
129
-
130
-
131
-
132
-
133
-
134
-
135
-
136
-
137
-
138
-
139
-
140
-
141
-
142
-
143
-
144
-
145
-
146
-
147
-
148
-
149
-
150
-
151
-
152
-
153
-
154
-
155
-
156
-
157
-
158
-
159
-
160
-
161
-
162
-
163
-
164
-
165
-
166
-
167
-
168
-
169
-
170
-
171
-
172
-
173
-
174
-
175
-
176
-
177
-
178
-
179
-
180
-
181
-
182
-
183
-
184
-
185
-
186
-
187
-
188
-
189
-
190
-
191
-
192
-
193
-
194
-
195
-
196
-
197
-
198
-
199
-
200
-
201
-
202
-
203
-
204
-
205
-
206
-
207
-
208
-
209
-
210
-
211
-
212
-
213
-
214
-
215
-
216
-
217
-
218
-
219
-
220
-
221
-
222
-
223
-
224
-
225
-
226
-
227
-
228
-
229
-
230
-
231
-
232
-
233
-
234
-
235
-
236
-
237
-
238
-
239
-
240
-
241
-
242
-
243
-
244
-
245
-
246
-
247
-
248
-
249
-
250
-
251
-
252
-
253
-
254
-
255
-
256
-
257
-
258
-
259
-
260
-
261
-
262
-
263
-
264
-
265
-
266
-
267
-
268
-
269
-
270
-
271
-
272
 |
 |
