Brother International PE-DESIGN Ver.6 Users Manual - English - Page 64
Drawing lines to edit the stitch, pattern
 |
View all Brother International PE-DESIGN Ver.6 manuals
Add to My Manuals
Save this manual to your list of manuals |
Page 64 highlights
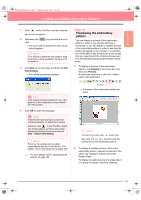
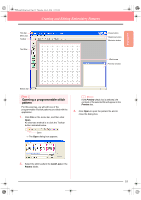
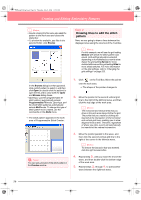
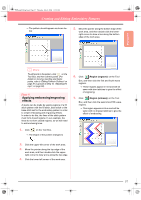
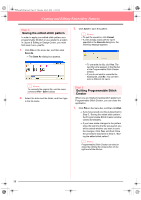
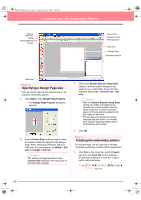
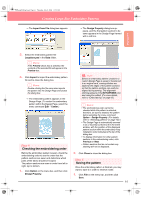
PeDesignV6Eng.book Page 56 Thursday, July 8, 2004 11:59 AM Creating and Editing Embroidery Patterns b Memo: • Double-clicking the file name also adds the pattern to the work area and closes the dialog box. • To preview the available .pas files in the selected folder, click Browse. Step 3 Drawing lines to edit the stitch pattern Now, we are going to draw a lines between the displayed ones using the Line tool of the Tool Box. b Memo: For this example, we will use the grid setting Medium with which the stitch pattern was saved. Grid settings should be selected depending on how detailed you want to draw. Select the grid setting Narrow for more detailed stitches and the grid setting Wide for more simple stitches. For more information on the grid settings, refer to "Changing the grid settings" on page 222. In the Browse dialog box that appeared, click a stitch pattern to select it, and then click Open (or double-click the pattern) to open the file and to close both the Open and Browse dialog boxes. • Opening a .pas file (programmable fill stitch pattern) automatically selects Programmable Fill mode. Opening a .pmf file (motif stitch patterns) automatically selects Motif mode. To change the type of stitch pattern to be created, use the commands on the Mode menu. → The stitch pattern appears in the work area of Programmable Stitch Creator. a Note: You can see a preview of the stitch pattern in the Preview window. 1. Click on the Tool Box. Move the pointer over the work area. → The shape of the pointer changes to . 2. Move the pointer to the second vertical grid line to the right of the leftmost wave, and then click the top edge of the work area. b Memo: The horizontal and vertical lines that you draw on the work area always follow the grid. The points that you create by clicking are inserted at the intersection of the horizontal and vertical grid lines, enabling you to draw diagonal lines as well. Therefore, regardless of where you click, a point will automatically be inserted at the nearest intersection. 3. Move the pointer parallel to the wave, and then click the second vertical grid line to the right of the corner in the leftmost wave. b Memo: To remove the last point that was entered, click the right mouse button. 4. Repeat step 3. until you reach the end of the wave, and then double-click the bottom edge of the work area. 5. Repeat steps 2. through 4. to add another wave between the rightmost wave. 56
-
 1
1 -
2
-
3
-
4
-
5
-
6
-
7
-
8
-
9
-
10
-
11
-
12
-
13
-
14
-
15
-
16
-
17
-
18
-
19
-
20
-
21
-
22
-
23
-
24
-
25
-
26
-
27
-
28
-
29
-
30
-
31
-
32
-
33
-
34
-
35
-
36
-
37
-
38
-
39
-
40
-
41
-
42
-
43
-
44
-
45
-
46
-
47
-
48
-
49
-
50
-
51
-
52
-
53
-
54
-
55
-
56
-
57
-
58
-
 59
59 -
 60
60 -
 61
61 -
 62
62 -
 63
63 -
 64
64 -
 65
65 -
 66
66 -
 67
67 -
 68
68 -
 69
69 -
70
-
71
-
72
-
73
-
74
-
75
-
76
-
77
-
78
-
79
-
80
-
81
-
82
-
83
-
84
-
85
-
86
-
87
-
88
-
89
-
90
-
91
-
92
-
93
-
94
-
95
-
96
-
97
-
98
-
99
-
100
-
101
-
102
-
103
-
104
-
105
-
106
-
107
-
108
-
109
-
110
-
111
-
112
-
113
-
114
-
115
-
116
-
117
-
118
-
119
-
120
-
121
-
122
-
123
-
124
-
125
-
126
-
127
-
128
-
129
-
130
-
131
-
132
-
133
-
134
-
135
-
136
-
137
-
138
-
139
-
140
-
141
-
142
-
143
-
144
-
145
-
146
-
147
-
148
-
149
-
150
-
151
-
152
-
153
-
154
-
155
-
156
-
157
-
158
-
159
-
160
-
161
-
162
-
163
-
164
-
165
-
166
-
167
-
168
-
169
-
170
-
171
-
172
-
173
-
174
-
175
-
176
-
177
-
178
-
179
-
180
-
181
-
182
-
183
-
184
-
185
-
186
-
187
-
188
-
189
-
190
-
191
-
192
-
193
-
194
-
195
-
196
-
197
-
198
-
199
-
200
-
201
-
202
-
203
-
204
-
205
-
206
-
207
-
208
-
209
-
210
-
211
-
212
-
213
-
214
-
215
-
216
-
217
-
218
-
219
-
220
-
221
-
222
-
223
-
224
-
225
-
226
-
227
-
228
-
229
-
230
-
231
-
232
-
233
-
234
-
235
-
236
-
237
-
238
-
239
-
240
-
241
-
242
-
243
-
244
-
245
-
246
-
247
-
248
-
249
-
250
-
251
-
252
-
253
-
254
-
255
-
256
-
257
-
258
-
259
-
260
-
261
-
262
-
263
-
264
-
265
-
266
-
267
-
268
-
269
-
270
-
271
-
272
 |
 |
