Brother International PE-DESIGN Ver.6 Users Manual - English - Page 30
Displaying a preview of the, embroidery pattern
 |
View all Brother International PE-DESIGN Ver.6 manuals
Add to My Manuals
Save this manual to your list of manuals |
Page 30 highlights
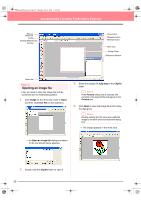
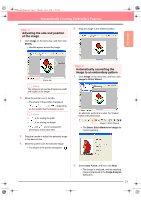
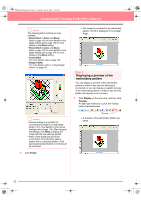
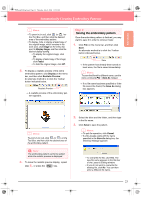
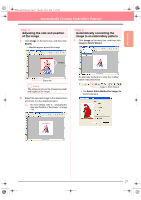
PeDesignV6Eng.book Page 22 Thursday, July 8, 2004 11:59 AM Automatically Creating Embroidery Patterns b Memo: The following stitch methods are also available. • Photo Stitch 1 (Color and Mono) Refer to page 116 for more details on the Color setting and to page 120 for more details on the Mono setting. • Photo Stitch 2 (Color and Mono) Refer to page 122 for more details on the Color setting and to page 124 for more details on the Mono setting. • Cross Stitch For more details, refer to page 125. • Design Center For more details, refer to "Using Design Center" on page 30. b Memo: • Various settings are available for converting the image to an embroidery pattern. (For more details on the various settings, refer to page 115.) After changing the settings, click Retry to display the image with the new settings applied. • Areas of the image that will not be converted to the embroidery pattern appear with a crosshatch pattern. Click each area to select whether or not it should be converted. 3. Click Finish. → The image is converted to an embroidery pattern, which is displayed in the Design Page. Step 5 Displaying a preview of the embroidery pattern You can display a preview of the embroidery pattern in order to see how the stitching is connected, or you can display a realistic preview of the embroidery pattern in order to see how the pattern will appear once it is sewn. 1. Click Display on the menu bar, and then click Preview. An alternate method is to click the Toolbar button indicated below. Preview → A preview of the embroidery pattern appears. 22
-
 1
1 -
2
-
3
-
4
-
5
-
6
-
7
-
8
-
9
-
10
-
11
-
12
-
13
-
14
-
15
-
16
-
17
-
18
-
19
-
20
-
21
-
22
-
23
-
24
-
 25
25 -
 26
26 -
 27
27 -
 28
28 -
 29
29 -
 30
30 -
 31
31 -
 32
32 -
 33
33 -
 34
34 -
 35
35 -
36
-
37
-
38
-
39
-
40
-
41
-
42
-
43
-
44
-
45
-
46
-
47
-
48
-
49
-
50
-
51
-
52
-
53
-
54
-
55
-
56
-
57
-
58
-
59
-
60
-
61
-
62
-
63
-
64
-
65
-
66
-
67
-
68
-
69
-
70
-
71
-
72
-
73
-
74
-
75
-
76
-
77
-
78
-
79
-
80
-
81
-
82
-
83
-
84
-
85
-
86
-
87
-
88
-
89
-
90
-
91
-
92
-
93
-
94
-
95
-
96
-
97
-
98
-
99
-
100
-
101
-
102
-
103
-
104
-
105
-
106
-
107
-
108
-
109
-
110
-
111
-
112
-
113
-
114
-
115
-
116
-
117
-
118
-
119
-
120
-
121
-
122
-
123
-
124
-
125
-
126
-
127
-
128
-
129
-
130
-
131
-
132
-
133
-
134
-
135
-
136
-
137
-
138
-
139
-
140
-
141
-
142
-
143
-
144
-
145
-
146
-
147
-
148
-
149
-
150
-
151
-
152
-
153
-
154
-
155
-
156
-
157
-
158
-
159
-
160
-
161
-
162
-
163
-
164
-
165
-
166
-
167
-
168
-
169
-
170
-
171
-
172
-
173
-
174
-
175
-
176
-
177
-
178
-
179
-
180
-
181
-
182
-
183
-
184
-
185
-
186
-
187
-
188
-
189
-
190
-
191
-
192
-
193
-
194
-
195
-
196
-
197
-
198
-
199
-
200
-
201
-
202
-
203
-
204
-
205
-
206
-
207
-
208
-
209
-
210
-
211
-
212
-
213
-
214
-
215
-
216
-
217
-
218
-
219
-
220
-
221
-
222
-
223
-
224
-
225
-
226
-
227
-
228
-
229
-
230
-
231
-
232
-
233
-
234
-
235
-
236
-
237
-
238
-
239
-
240
-
241
-
242
-
243
-
244
-
245
-
246
-
247
-
248
-
249
-
250
-
251
-
252
-
253
-
254
-
255
-
256
-
257
-
258
-
259
-
260
-
261
-
262
-
263
-
264
-
265
-
266
-
267
-
268
-
269
-
270
-
271
-
272
 |
 |
