Brother International PE-DESIGN Ver.6 Users Manual - English - Page 127
Auto Select Setting, Auto Select, Use Color List, Edit List
 |
View all Brother International PE-DESIGN Ver.6 manuals
Add to My Manuals
Save this manual to your list of manuals |
Page 127 highlights
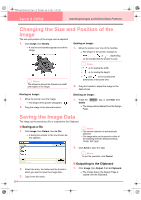
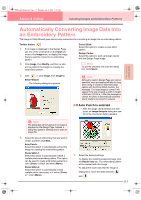
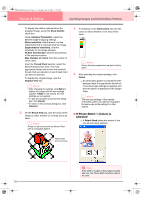
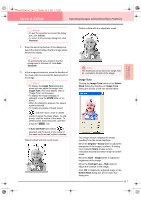
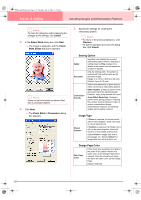
Advanced Opreation Layout & Editing PeDesignV6Eng.book Page 119 Thursday, July 8, 2004 11:59 AM Layout & Editing Inputting Images and Embroidery Patterns Auto Select Setting Selects the thread chart for selecting the thread color with the Auto Select function. Thread Chart The most appropriate thread colors from the selected thread chart are selected. A user thread chart can also be selected. Color Count Sets the number of colors selected by the Auto Select function. Range: 1 to 50 Default: 10 Auto Select Click this button to use the settings specified under Auto Select Setting and automatically select from the selected thread chart the most appropriate thread colors for creating the photo embroidery. The selected thread colors appear in the Use Color List mentioned below. This button can be clicked only if the settings under Auto Select Setting have been changed. Use Color List This list allows the selected thread colors to be checked and edited. Use Color List Thread colors selected for creating the pattern are displayed, in order, by their level of brightness. This order is the sewing order. The order cannot be changed. The maximum number of colors is 50. Edit List Click this button to open the Edit List dialog box, which lets you manually set the thread colors to be used when creating the pattern (see below). Edit List Click this button to display the Edit List dialog box. In this dialog box, you can manually set the thread colors to be used in the data conversion. To move the color selected in the Color List to the Use Color List, click Add. If no color is selected, or if the Use Color List already contains 50 colors, this button cannot be clicked. To delete the color selected in the Use Color List, click Remove. If no color is selected in the Use Color List, this button cannot be clicked. b Memo: • The thread colors in the Color List and Use Color List are listed, in order, starting from the brightest. This order is the sewing order and cannot be changed. • The maximum number of colors that can be added to the Use Color List is 50. • Thread colors displayed in the Use Color List are not displayed in the Color List. • To select several colors, hold the Shift key (to select adjacent colors) or the Ctrl key (to select colors that are not adjacent), and then select the desired colors. To apply the changes to the list and close the dialog box, click OK. The edited settings will appear in the Photo Stitch 1 Parameters dialog box. This button cannot be clicked if the Use Color List is empty. b Memo: To close the dialog box without applying the changes, click Cancel. 6. In the Photo Stitch 1 Parameters dialog box, click Next. → A Preview dialog box similar to the one shown below appears, allowing the created embroidery pattern to be previewed. 119
-
 1
1 -
2
-
3
-
4
-
5
-
6
-
7
-
8
-
9
-
10
-
11
-
12
-
13
-
14
-
15
-
16
-
17
-
18
-
19
-
20
-
21
-
22
-
23
-
24
-
25
-
26
-
27
-
28
-
29
-
30
-
31
-
32
-
33
-
34
-
35
-
36
-
37
-
38
-
39
-
40
-
41
-
42
-
43
-
44
-
45
-
46
-
47
-
48
-
49
-
50
-
51
-
52
-
53
-
54
-
55
-
56
-
57
-
58
-
59
-
60
-
61
-
62
-
63
-
64
-
65
-
66
-
67
-
68
-
69
-
70
-
71
-
72
-
73
-
74
-
75
-
76
-
77
-
78
-
79
-
80
-
81
-
82
-
83
-
84
-
85
-
86
-
87
-
88
-
89
-
90
-
91
-
92
-
93
-
94
-
95
-
96
-
97
-
98
-
99
-
100
-
101
-
102
-
103
-
104
-
105
-
106
-
107
-
108
-
109
-
110
-
111
-
112
-
113
-
114
-
115
-
116
-
117
-
118
-
119
-
120
-
121
-
 122
122 -
 123
123 -
 124
124 -
 125
125 -
 126
126 -
 127
127 -
 128
128 -
 129
129 -
 130
130 -
 131
131 -
 132
132 -
133
-
134
-
135
-
136
-
137
-
138
-
139
-
140
-
141
-
142
-
143
-
144
-
145
-
146
-
147
-
148
-
149
-
150
-
151
-
152
-
153
-
154
-
155
-
156
-
157
-
158
-
159
-
160
-
161
-
162
-
163
-
164
-
165
-
166
-
167
-
168
-
169
-
170
-
171
-
172
-
173
-
174
-
175
-
176
-
177
-
178
-
179
-
180
-
181
-
182
-
183
-
184
-
185
-
186
-
187
-
188
-
189
-
190
-
191
-
192
-
193
-
194
-
195
-
196
-
197
-
198
-
199
-
200
-
201
-
202
-
203
-
204
-
205
-
206
-
207
-
208
-
209
-
210
-
211
-
212
-
213
-
214
-
215
-
216
-
217
-
218
-
219
-
220
-
221
-
222
-
223
-
224
-
225
-
226
-
227
-
228
-
229
-
230
-
231
-
232
-
233
-
234
-
235
-
236
-
237
-
238
-
239
-
240
-
241
-
242
-
243
-
244
-
245
-
246
-
247
-
248
-
249
-
250
-
251
-
252
-
253
-
254
-
255
-
256
-
257
-
258
-
259
-
260
-
261
-
262
-
263
-
264
-
265
-
266
-
267
-
268
-
269
-
270
-
271
-
272
 |
 |
