Brother International PE-DESIGN Ver.6 Users Manual - English - Page 106
Applying and Editing Stamps
 |
View all Brother International PE-DESIGN Ver.6 manuals
Add to My Manuals
Save this manual to your list of manuals |
Page 106 highlights
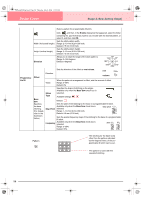
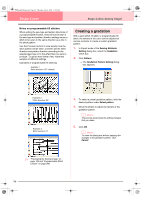
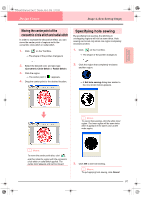
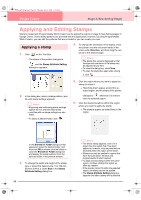
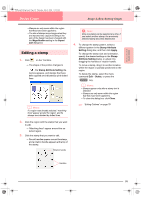
PeDesignV6Eng.book Page 98 Thursday, July 8, 2004 11:59 AM Design Center Stage 4 (Sew Setting Stage) Applying and Editing Stamps Stamps created with Programmable Stitch Creator can be applied to regions in stage 4 (Sew Setting stage) of Design Center. Some stamp patterns are provided with this application; however, by using Programmable Stitch Creator, you can edit the patterns that are provided or you can create your own. Applying a stamp 1. Click on the Tool Box. → The shape of the pointer changes to , and the Stamp Attribute Setting dialog box appears. 4. To change the orientation of the stamp, move the pointer over the red arrow inside of the circle under Direction, and then drag the red arrow to the desired angle. b Memo: • The dialog box remains displayed so that the size and orientation of the stamp can be adjusted at any time. • To close the dialog box, click Close. • To open the dialog box again after closing it, click . !!scr114.bmp!! 2. In the dialog box, select a stamp pattern (.pas file with stamp settings applied). b Memo: • Engraving and embossing stamp settings appear as red- and blue-filled areas. • .pas files with no stamp settings are also listed. • To select a different folder, click . 5. Click the region where you want to apply the stamp to select it. → "Marching lines" appear around the selected region, and the shape of the pointer changes to whenever it is moved over the selected region. 6. Click the desired locations within the region where you want to apply the stamp. → The stamps appear as dotted lines in the region. In the Browse for Folder dialog box that appeared, select the desired folder, and then click OK (or double-click the folder) to close the Browse for Folder dialog box and display the stamp patterns from the selected folder in the preview window. 3. To change the width and height of the stamp, type or select the desired size (1 to 100 mm (0.04 to 3.94 in.)) under Size in the Stamp Attribute Setting dialog box. 98 b Memo: • The whole stamp appears, even if it is larger than the region that it has been applied to, however, only the parts that are enclosed within the region will be sewn. • Stamps can only be applied to regions that have the satin stitch, fill stitch and programmable fill stitch applied. • To apply several stamps within the same region, continue clicking the region as often as needed. • If the pointer cannot fit within the selected region, the stamp cannot be applied. • The Stamp Attribute Setting dialog box appears only after a stamp tool is selected.
-
 1
1 -
2
-
3
-
4
-
5
-
6
-
7
-
8
-
9
-
10
-
11
-
12
-
13
-
14
-
15
-
16
-
17
-
18
-
19
-
20
-
21
-
22
-
23
-
24
-
25
-
26
-
27
-
28
-
29
-
30
-
31
-
32
-
33
-
34
-
35
-
36
-
37
-
38
-
39
-
40
-
41
-
42
-
43
-
44
-
45
-
46
-
47
-
48
-
49
-
50
-
51
-
52
-
53
-
54
-
55
-
56
-
57
-
58
-
59
-
60
-
61
-
62
-
63
-
64
-
65
-
66
-
67
-
68
-
69
-
70
-
71
-
72
-
73
-
74
-
75
-
76
-
77
-
78
-
79
-
80
-
81
-
82
-
83
-
84
-
85
-
86
-
87
-
88
-
89
-
90
-
91
-
92
-
93
-
94
-
95
-
96
-
97
-
98
-
99
-
100
-
 101
101 -
 102
102 -
 103
103 -
 104
104 -
 105
105 -
 106
106 -
 107
107 -
 108
108 -
 109
109 -
 110
110 -
 111
111 -
112
-
113
-
114
-
115
-
116
-
117
-
118
-
119
-
120
-
121
-
122
-
123
-
124
-
125
-
126
-
127
-
128
-
129
-
130
-
131
-
132
-
133
-
134
-
135
-
136
-
137
-
138
-
139
-
140
-
141
-
142
-
143
-
144
-
145
-
146
-
147
-
148
-
149
-
150
-
151
-
152
-
153
-
154
-
155
-
156
-
157
-
158
-
159
-
160
-
161
-
162
-
163
-
164
-
165
-
166
-
167
-
168
-
169
-
170
-
171
-
172
-
173
-
174
-
175
-
176
-
177
-
178
-
179
-
180
-
181
-
182
-
183
-
184
-
185
-
186
-
187
-
188
-
189
-
190
-
191
-
192
-
193
-
194
-
195
-
196
-
197
-
198
-
199
-
200
-
201
-
202
-
203
-
204
-
205
-
206
-
207
-
208
-
209
-
210
-
211
-
212
-
213
-
214
-
215
-
216
-
217
-
218
-
219
-
220
-
221
-
222
-
223
-
224
-
225
-
226
-
227
-
228
-
229
-
230
-
231
-
232
-
233
-
234
-
235
-
236
-
237
-
238
-
239
-
240
-
241
-
242
-
243
-
244
-
245
-
246
-
247
-
248
-
249
-
250
-
251
-
252
-
253
-
254
-
255
-
256
-
257
-
258
-
259
-
260
-
261
-
262
-
263
-
264
-
265
-
266
-
267
-
268
-
269
-
270
-
271
-
272
 |
 |
