Brother International PE-DESIGN Ver.6 Users Manual - English - Page 58
Step 10, Step 11
 |
View all Brother International PE-DESIGN Ver.6 manuals
Add to My Manuals
Save this manual to your list of manuals |
Page 58 highlights
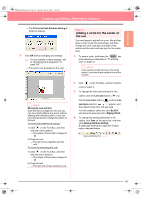
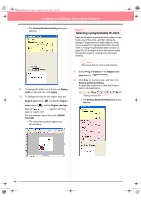
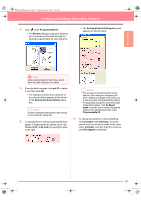
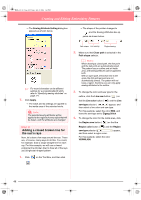
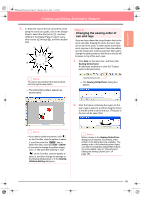
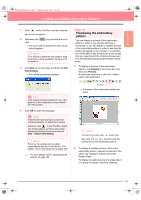
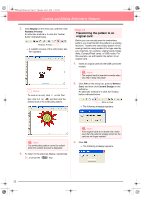
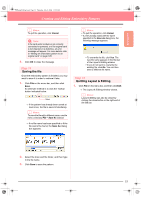
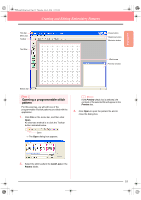
PeDesignV6Eng.book Page 50 Thursday, July 8, 2004 11:59 AM Creating and Editing Embroidery Patterns 3. Click the frame containing the outline for the sun's rays to select it, and then drag the selected frame between the region for the sun's rays and the circle for the sun. 4. Drag the point to the new location. 4. Click OK. → The sun's rays will be sewn before the sun (circle). If necessary, move the circle so that it looks centered relative to the sun's rays. Step 10 Adjusting the rays At this time, you might want to modify the rays. You can do this by moving, deleting and adding points in the closed broken line pattern. 1. Click on the Tool Box, and then click . → The shape of the pointer changes to . 2. Click the sun's rays to select it. → The points in the pattern appear as small empty squares. 3. Click the point that you want to move. → The selected point appears as a small black square. c For details on adding and deleting points, refer to "Inserting points" on page 136 and "Deleting points" on page 137. Step 11 Setting hole sewing If the sun is sewn according to the current settings, the sun's rays will be sewn first, and then the sun (circle) will be sewn on top of it. In order to avoid sewing the same region twice, you can specify hole sewing for a larger region that completely encloses smaller ones. If hole sewing is specified, the part of the rays behind the circle will not be sewn. 50
-
 1
1 -
2
-
3
-
4
-
5
-
6
-
7
-
8
-
9
-
10
-
11
-
12
-
13
-
14
-
15
-
16
-
17
-
18
-
19
-
20
-
21
-
22
-
23
-
24
-
25
-
26
-
27
-
28
-
29
-
30
-
31
-
32
-
33
-
34
-
35
-
36
-
37
-
38
-
39
-
40
-
41
-
42
-
43
-
44
-
45
-
46
-
47
-
48
-
49
-
50
-
51
-
52
-
 53
53 -
 54
54 -
 55
55 -
 56
56 -
 57
57 -
 58
58 -
 59
59 -
 60
60 -
 61
61 -
 62
62 -
 63
63 -
64
-
65
-
66
-
67
-
68
-
69
-
70
-
71
-
72
-
73
-
74
-
75
-
76
-
77
-
78
-
79
-
80
-
81
-
82
-
83
-
84
-
85
-
86
-
87
-
88
-
89
-
90
-
91
-
92
-
93
-
94
-
95
-
96
-
97
-
98
-
99
-
100
-
101
-
102
-
103
-
104
-
105
-
106
-
107
-
108
-
109
-
110
-
111
-
112
-
113
-
114
-
115
-
116
-
117
-
118
-
119
-
120
-
121
-
122
-
123
-
124
-
125
-
126
-
127
-
128
-
129
-
130
-
131
-
132
-
133
-
134
-
135
-
136
-
137
-
138
-
139
-
140
-
141
-
142
-
143
-
144
-
145
-
146
-
147
-
148
-
149
-
150
-
151
-
152
-
153
-
154
-
155
-
156
-
157
-
158
-
159
-
160
-
161
-
162
-
163
-
164
-
165
-
166
-
167
-
168
-
169
-
170
-
171
-
172
-
173
-
174
-
175
-
176
-
177
-
178
-
179
-
180
-
181
-
182
-
183
-
184
-
185
-
186
-
187
-
188
-
189
-
190
-
191
-
192
-
193
-
194
-
195
-
196
-
197
-
198
-
199
-
200
-
201
-
202
-
203
-
204
-
205
-
206
-
207
-
208
-
209
-
210
-
211
-
212
-
213
-
214
-
215
-
216
-
217
-
218
-
219
-
220
-
221
-
222
-
223
-
224
-
225
-
226
-
227
-
228
-
229
-
230
-
231
-
232
-
233
-
234
-
235
-
236
-
237
-
238
-
239
-
240
-
241
-
242
-
243
-
244
-
245
-
246
-
247
-
248
-
249
-
250
-
251
-
252
-
253
-
254
-
255
-
256
-
257
-
258
-
259
-
260
-
261
-
262
-
263
-
264
-
265
-
266
-
267
-
268
-
269
-
270
-
271
-
272
 |
 |
