Brother International PE-DESIGN Ver.6 Users Manual - English - Page 159
Creating Manual Punching Data
 |
View all Brother International PE-DESIGN Ver.6 manuals
Add to My Manuals
Save this manual to your list of manuals |
Page 159 highlights
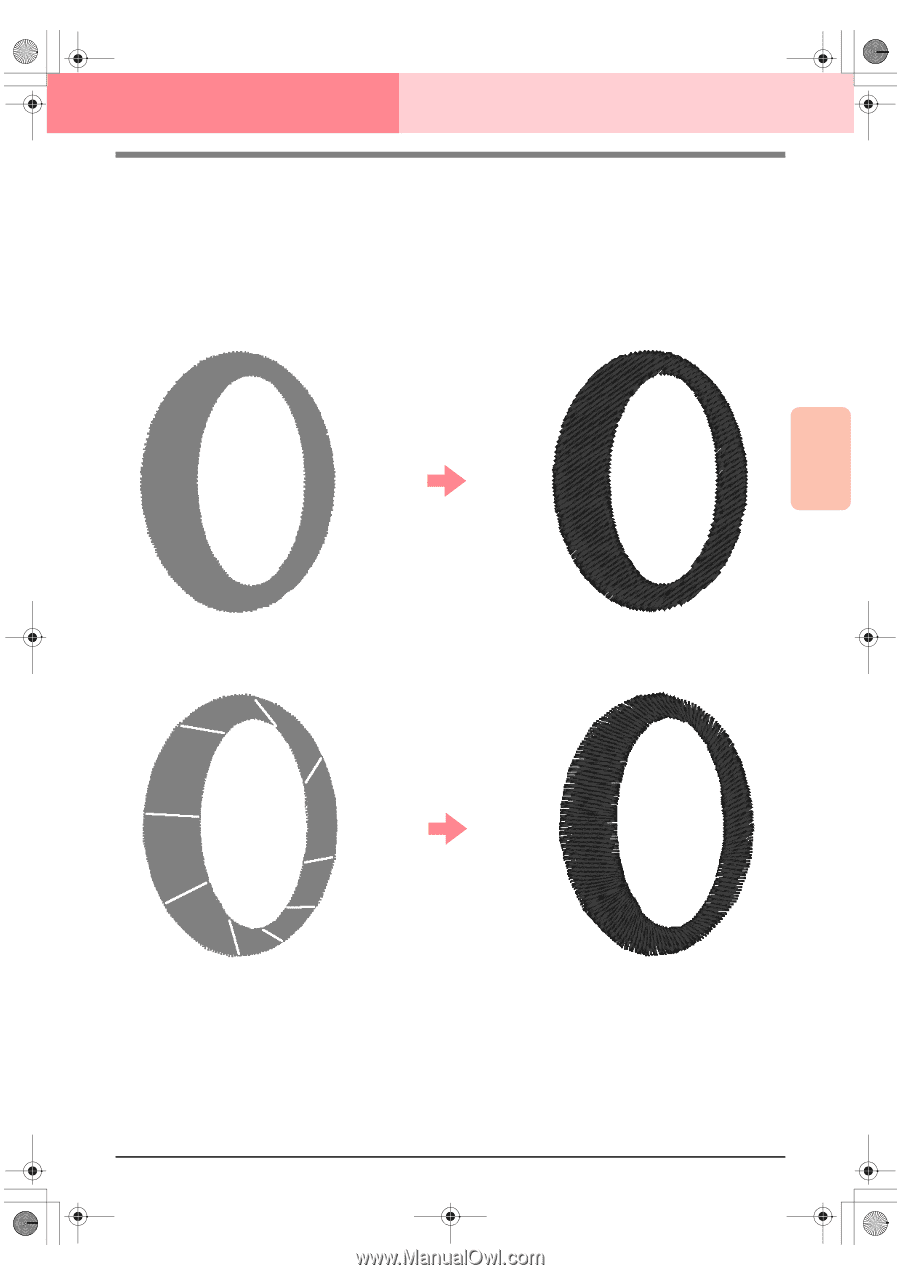
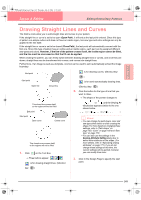
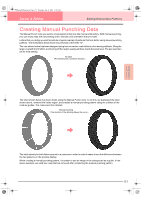
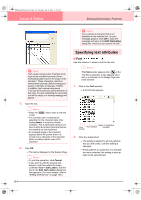
PeDesignV6Eng.book Page 151 Thursday, July 8, 2004 11:59 AM Layout & Editing Editing Embroidery Patterns Creating Manual Punching Data The Manual Punch tools are used to create patterns that look like manual embroidery. With manual punching, you can create data with any sewing order, direction and orientation that you want. Letters that you design yourself constitute a typical example of patterns that look better using manual punching patterns. The illustrations below show two previews of the letter "O". The one shown below has been designed using two concentric ovals without a line sewing attribute, filling the larger oval with the fill stitch, and turning off the region sewing attribute inside the small oval. The pair was then set for hole sewing. Fill stitch (The stitching has a constant direction.) The letter shown below has been drawn using the Manual Punch tools. To do this, we duplicated the letter shown above, removed the inside region, and created a manual punching pattern using the outlines of the ovals as guides. The ovals were then deleted. Manual punching (The direction of the stitching follows the curve.) Advanced Opreation Layout & Editing The stitch density for both letters was set to a minimum in order to make it easier to see the difference between the two patterns on the preview display. When creating a manual punching pattern, it is easier to use an image in the background as a guide. In the above example, we used two ovals that we removed after completing the manual punching pattern. 151
-
 1
1 -
2
-
3
-
4
-
5
-
6
-
7
-
8
-
9
-
10
-
11
-
12
-
13
-
14
-
15
-
16
-
17
-
18
-
19
-
20
-
21
-
22
-
23
-
24
-
25
-
26
-
27
-
28
-
29
-
30
-
31
-
32
-
33
-
34
-
35
-
36
-
37
-
38
-
39
-
40
-
41
-
42
-
43
-
44
-
45
-
46
-
47
-
48
-
49
-
50
-
51
-
52
-
53
-
54
-
55
-
56
-
57
-
58
-
59
-
60
-
61
-
62
-
63
-
64
-
65
-
66
-
67
-
68
-
69
-
70
-
71
-
72
-
73
-
74
-
75
-
76
-
77
-
78
-
79
-
80
-
81
-
82
-
83
-
84
-
85
-
86
-
87
-
88
-
89
-
90
-
91
-
92
-
93
-
94
-
95
-
96
-
97
-
98
-
99
-
100
-
101
-
102
-
103
-
104
-
105
-
106
-
107
-
108
-
109
-
110
-
111
-
112
-
113
-
114
-
115
-
116
-
117
-
118
-
119
-
120
-
121
-
122
-
123
-
124
-
125
-
126
-
127
-
128
-
129
-
130
-
131
-
132
-
133
-
134
-
135
-
136
-
137
-
138
-
139
-
140
-
141
-
142
-
143
-
144
-
145
-
146
-
147
-
148
-
149
-
150
-
151
-
152
-
153
-
 154
154 -
 155
155 -
 156
156 -
 157
157 -
 158
158 -
 159
159 -
 160
160 -
 161
161 -
 162
162 -
 163
163 -
 164
164 -
165
-
166
-
167
-
168
-
169
-
170
-
171
-
172
-
173
-
174
-
175
-
176
-
177
-
178
-
179
-
180
-
181
-
182
-
183
-
184
-
185
-
186
-
187
-
188
-
189
-
190
-
191
-
192
-
193
-
194
-
195
-
196
-
197
-
198
-
199
-
200
-
201
-
202
-
203
-
204
-
205
-
206
-
207
-
208
-
209
-
210
-
211
-
212
-
213
-
214
-
215
-
216
-
217
-
218
-
219
-
220
-
221
-
222
-
223
-
224
-
225
-
226
-
227
-
228
-
229
-
230
-
231
-
232
-
233
-
234
-
235
-
236
-
237
-
238
-
239
-
240
-
241
-
242
-
243
-
244
-
245
-
246
-
247
-
248
-
249
-
250
-
251
-
252
-
253
-
254
-
255
-
256
-
257
-
258
-
259
-
260
-
261
-
262
-
263
-
264
-
265
-
266
-
267
-
268
-
269
-
270
-
271
-
272
 |
 |