Brother International PE-DESIGN Ver.6 Users Manual - English - Page 161
Entering Text
 |
View all Brother International PE-DESIGN Ver.6 manuals
Add to My Manuals
Save this manual to your list of manuals |
Page 161 highlights
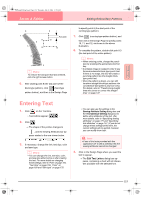
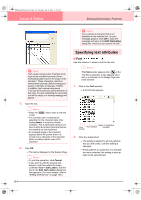
Advanced Opreation Layout & Editing PeDesignV6Eng.book Page 153 Thursday, July 8, 2004 11:59 AM Layout & Editing Editing Embroidery Patterns 8 7 5 11 6 12 4 3 9 Run pitch 10 13 1 2 b Memo: To remove the last point that was entered, click the right mouse button. 6. After clicking point 8 (the last point of the block-type pattern), click (feed-type pattern button), and then in the Design Page to specify point 9 (the start point of the running-type pattern). 7. Click (running-type pattern button), and then click in the Design Page to specify points 10, 11, and 12, as shown in the above illustration. 8. To complete the pattern, double-click point 13 (the last point of the entire pattern). b Memo: • When entering points, change the punch type by pressing the appropriate shortcut key. • A template image is needed in order to use the semi-automatic block-type punch tool. If there is no image, this tool will create a punching pattern like the straight blocktype punch tool. • Once the pattern is drawn, you can still transform straight block-type patterns into curved block-type patterns and vice versa. For details, refer to "Transforming straight lines into curves or curves into straight lines" on page 137. Entering Text 1. Click on the Tool Box. → Two buttons appear: . 2. Click . → The shape of the pointer changes to , and the Sewing Attributes bar ap- pears similar to the one shown below. 3. If necessary, change the font, text size, color and sew type. b Memo: • You can change the font, text size, color, and sew type either before or after creating the text. For more details on changing these settings, refer to "Font" on page 154, "Text Size" on page 156, "Color" on page 169 and "Sew type" on page 170. • You can also use the settings in the Sewing Attribute Setting dialog box and the Text Attribute Setting dialog box to define other attributes of the text. (For more details, refer to "Specifying sewing attributes" on page 171 and "Specifying text attributes" on page 157.) If you do not change these settings at this time, the current settings will be applied, however you can modify them later. a Note: • If one of the fonts provided with this application (01 to 35) is selected, the line sewing attributes cannot be changed. 4. Click in the Design Page where you want the text to appear. → The Edit Text Letters dialog box appears, containing a chart with all characters available with the selected font. 153
-
 1
1 -
2
-
3
-
4
-
5
-
6
-
7
-
8
-
9
-
10
-
11
-
12
-
13
-
14
-
15
-
16
-
17
-
18
-
19
-
20
-
21
-
22
-
23
-
24
-
25
-
26
-
27
-
28
-
29
-
30
-
31
-
32
-
33
-
34
-
35
-
36
-
37
-
38
-
39
-
40
-
41
-
42
-
43
-
44
-
45
-
46
-
47
-
48
-
49
-
50
-
51
-
52
-
53
-
54
-
55
-
56
-
57
-
58
-
59
-
60
-
61
-
62
-
63
-
64
-
65
-
66
-
67
-
68
-
69
-
70
-
71
-
72
-
73
-
74
-
75
-
76
-
77
-
78
-
79
-
80
-
81
-
82
-
83
-
84
-
85
-
86
-
87
-
88
-
89
-
90
-
91
-
92
-
93
-
94
-
95
-
96
-
97
-
98
-
99
-
100
-
101
-
102
-
103
-
104
-
105
-
106
-
107
-
108
-
109
-
110
-
111
-
112
-
113
-
114
-
115
-
116
-
117
-
118
-
119
-
120
-
121
-
122
-
123
-
124
-
125
-
126
-
127
-
128
-
129
-
130
-
131
-
132
-
133
-
134
-
135
-
136
-
137
-
138
-
139
-
140
-
141
-
142
-
143
-
144
-
145
-
146
-
147
-
148
-
149
-
150
-
151
-
152
-
153
-
154
-
155
-
 156
156 -
 157
157 -
 158
158 -
 159
159 -
 160
160 -
 161
161 -
 162
162 -
 163
163 -
 164
164 -
 165
165 -
 166
166 -
167
-
168
-
169
-
170
-
171
-
172
-
173
-
174
-
175
-
176
-
177
-
178
-
179
-
180
-
181
-
182
-
183
-
184
-
185
-
186
-
187
-
188
-
189
-
190
-
191
-
192
-
193
-
194
-
195
-
196
-
197
-
198
-
199
-
200
-
201
-
202
-
203
-
204
-
205
-
206
-
207
-
208
-
209
-
210
-
211
-
212
-
213
-
214
-
215
-
216
-
217
-
218
-
219
-
220
-
221
-
222
-
223
-
224
-
225
-
226
-
227
-
228
-
229
-
230
-
231
-
232
-
233
-
234
-
235
-
236
-
237
-
238
-
239
-
240
-
241
-
242
-
243
-
244
-
245
-
246
-
247
-
248
-
249
-
250
-
251
-
252
-
253
-
254
-
255
-
256
-
257
-
258
-
259
-
260
-
261
-
262
-
263
-
264
-
265
-
266
-
267
-
268
-
269
-
270
-
271
-
272
 |
 |
