Brother International PE-DESIGN Ver.6 Users Manual - English - Page 168
Transforming text
 |
View all Brother International PE-DESIGN Ver.6 manuals
Add to My Manuals
Save this manual to your list of manuals |
Page 168 highlights
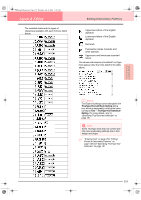
PeDesignV6Eng.book Page 160 Thursday, July 8, 2004 11:59 AM Layout & Editing Editing Embroidery Patterns ■ Canceling text arrangement The text arrangement on a path can be cancelled. Toolbar button: 1. Select text that is arranged on a path (Fit to Path). 2. Click , or click Text, then Release Text from Path. c "Specifying text arrangement" on page 158 Transforming text A preset transform shape can be applied to text. Toolbar button: 1. Select the text that you want to transform. 2. Click , or click Text, then Transform Text. → The Text Transform Setting dialog box appears. a Note: A text pattern created from a TrueType font contains data for both line and region sewing. Therefore, if this command is selected, depending on the form of the TrueType font, there may be a gap between the line and the region in the text. c "Canceling text transformation" below ■ Transform level Use this selector to select the level of transformation. b Memo: The Transform level selector appears in the Sewing Attributes bar when transformed text in the Design Page has been selected. 1. Click in the Transform level selector 2. Type the desired value (0 to 100%) and press the Enter key, or click the desired value. → The setting is applied to all transformed text patterns that you will create, until the setting is changed. → If a text pattern was selected, the setting is applied to the selected text. 3. Select the desired transformation shape, and then click OK, or double-click the shape to apply the transformation. b Memo: • To quit the operation, click Cancel. • If necessary, set the level of transformation. For details, refer to "Transform level" on this page. 160 50% 100% c "Entering Text" on page 153 and "Transforming text" on this page ■ Canceling text transformation The original shape of the text can be restored. Toolbar button: 1. Select the transformed text.
-
 1
1 -
2
-
3
-
4
-
5
-
6
-
7
-
8
-
9
-
10
-
11
-
12
-
13
-
14
-
15
-
16
-
17
-
18
-
19
-
20
-
21
-
22
-
23
-
24
-
25
-
26
-
27
-
28
-
29
-
30
-
31
-
32
-
33
-
34
-
35
-
36
-
37
-
38
-
39
-
40
-
41
-
42
-
43
-
44
-
45
-
46
-
47
-
48
-
49
-
50
-
51
-
52
-
53
-
54
-
55
-
56
-
57
-
58
-
59
-
60
-
61
-
62
-
63
-
64
-
65
-
66
-
67
-
68
-
69
-
70
-
71
-
72
-
73
-
74
-
75
-
76
-
77
-
78
-
79
-
80
-
81
-
82
-
83
-
84
-
85
-
86
-
87
-
88
-
89
-
90
-
91
-
92
-
93
-
94
-
95
-
96
-
97
-
98
-
99
-
100
-
101
-
102
-
103
-
104
-
105
-
106
-
107
-
108
-
109
-
110
-
111
-
112
-
113
-
114
-
115
-
116
-
117
-
118
-
119
-
120
-
121
-
122
-
123
-
124
-
125
-
126
-
127
-
128
-
129
-
130
-
131
-
132
-
133
-
134
-
135
-
136
-
137
-
138
-
139
-
140
-
141
-
142
-
143
-
144
-
145
-
146
-
147
-
148
-
149
-
150
-
151
-
152
-
153
-
154
-
155
-
156
-
157
-
158
-
159
-
160
-
161
-
162
-
 163
163 -
 164
164 -
 165
165 -
 166
166 -
 167
167 -
 168
168 -
 169
169 -
 170
170 -
 171
171 -
 172
172 -
 173
173 -
174
-
175
-
176
-
177
-
178
-
179
-
180
-
181
-
182
-
183
-
184
-
185
-
186
-
187
-
188
-
189
-
190
-
191
-
192
-
193
-
194
-
195
-
196
-
197
-
198
-
199
-
200
-
201
-
202
-
203
-
204
-
205
-
206
-
207
-
208
-
209
-
210
-
211
-
212
-
213
-
214
-
215
-
216
-
217
-
218
-
219
-
220
-
221
-
222
-
223
-
224
-
225
-
226
-
227
-
228
-
229
-
230
-
231
-
232
-
233
-
234
-
235
-
236
-
237
-
238
-
239
-
240
-
241
-
242
-
243
-
244
-
245
-
246
-
247
-
248
-
249
-
250
-
251
-
252
-
253
-
254
-
255
-
256
-
257
-
258
-
259
-
260
-
261
-
262
-
263
-
264
-
265
-
266
-
267
-
268
-
269
-
270
-
271
-
272
 |
 |
