Brother International PE-DESIGN Ver.6 Users Manual - English - Page 80
Importing image data from a, TWAIN device
 |
View all Brother International PE-DESIGN Ver.6 manuals
Add to My Manuals
Save this manual to your list of manuals |
Page 80 highlights
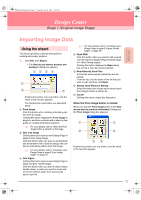
PeDesignV6Eng.book Page 72 Thursday, July 8, 2004 11:59 AM Design Center Stage 1 (Original Image Stage) The functions for each button are described below. 1 Open Image File Click this button to open a previously saved image file and paste the image in the Design Page. c For details, refer to "Opening an image file" on page 20. 2 From Clipboard Clicking this button pastes the image on the Clipboard into the Design Page. This function can only be used when there is an image on the Clipboard. 3 From TWAIN device Click this button to import an image from a TWAIN device (such as a scanner or digital camera) connected to your computer, then paste it in the Design Page. c For details, refer to "Importing image data from a TWAIN device" below. 4 Use Current image Click this button to use an image opened in stage 1 (Original Image stage). This function can only be used when an image is opened in stage 1. 5 Previous Clicking this button closes the current dialog box, and returns to the How do you want to produce embroidery? dialog box. 6 Cancel Clicking this button closes this dialog box. → If any button other than Previous or Cancel is clicked, the image will be imported and pasted into the Design Page of stage 1 (Original Image stage), and the Cut out to Line Image dialog box appears, allowing you to choose colors for outlines. c For details on the next stages, refer to "Continuing to Stage 2 (Line Image Stage)" on page 73, "Continuing to Stage 3 (Figure Handle Stage)" on page 76, then "Continuing to Stage 4 (Sew Setting Stage)" on page 83. Importing image data from a TWAIN device TWAIN is an application interface (API) standardization for software that controls scanners and other devices. Design Center supports TWAIN standardized devices, allowing you to control the device and import the image directly. 1. Check that the scanner or other TWAIN device is correctly connected to your computer. 2. Click File, then Select TWAIN device. → The Select Source dialog box appears. !!scr94.bmp!! 3. From the Sources list, click the desired device to select it. a Note: If no TWAIN device is installed, there will be no names displayed in the Sources list. First, install the driver software for the TWAIN device that you want to use. 4. Click Select to choose the selected device and to close the dialog box. b Memo: To quit the operation and close the dialog box, click Cancel. 5. Click File, then Input from TWAIN device. → The driver interface for the device selected in the Select Source dialog box appears. 6. Specify the necessary settings for importing an image, and then import the image. a Note: For information on using the driver interface, refer to the help manual for that interface, or contact the manufacturer of the interface. → When the image transfer between the scanner (or other device) and the driver is completed, the imported image will be pasted in a Design Page of stage 1 (Original Image stage). b Memo: If the image currently displayed in the Design Page has not yet been saved, you will be asked whether you want to save it. 72
-
 1
1 -
2
-
3
-
4
-
5
-
6
-
7
-
8
-
9
-
10
-
11
-
12
-
13
-
14
-
15
-
16
-
17
-
18
-
19
-
20
-
21
-
22
-
23
-
24
-
25
-
26
-
27
-
28
-
29
-
30
-
31
-
32
-
33
-
34
-
35
-
36
-
37
-
38
-
39
-
40
-
41
-
42
-
43
-
44
-
45
-
46
-
47
-
48
-
49
-
50
-
51
-
52
-
53
-
54
-
55
-
56
-
57
-
58
-
59
-
60
-
61
-
62
-
63
-
64
-
65
-
66
-
67
-
68
-
69
-
70
-
71
-
72
-
73
-
74
-
 75
75 -
 76
76 -
 77
77 -
 78
78 -
 79
79 -
 80
80 -
 81
81 -
 82
82 -
 83
83 -
 84
84 -
 85
85 -
86
-
87
-
88
-
89
-
90
-
91
-
92
-
93
-
94
-
95
-
96
-
97
-
98
-
99
-
100
-
101
-
102
-
103
-
104
-
105
-
106
-
107
-
108
-
109
-
110
-
111
-
112
-
113
-
114
-
115
-
116
-
117
-
118
-
119
-
120
-
121
-
122
-
123
-
124
-
125
-
126
-
127
-
128
-
129
-
130
-
131
-
132
-
133
-
134
-
135
-
136
-
137
-
138
-
139
-
140
-
141
-
142
-
143
-
144
-
145
-
146
-
147
-
148
-
149
-
150
-
151
-
152
-
153
-
154
-
155
-
156
-
157
-
158
-
159
-
160
-
161
-
162
-
163
-
164
-
165
-
166
-
167
-
168
-
169
-
170
-
171
-
172
-
173
-
174
-
175
-
176
-
177
-
178
-
179
-
180
-
181
-
182
-
183
-
184
-
185
-
186
-
187
-
188
-
189
-
190
-
191
-
192
-
193
-
194
-
195
-
196
-
197
-
198
-
199
-
200
-
201
-
202
-
203
-
204
-
205
-
206
-
207
-
208
-
209
-
210
-
211
-
212
-
213
-
214
-
215
-
216
-
217
-
218
-
219
-
220
-
221
-
222
-
223
-
224
-
225
-
226
-
227
-
228
-
229
-
230
-
231
-
232
-
233
-
234
-
235
-
236
-
237
-
238
-
239
-
240
-
241
-
242
-
243
-
244
-
245
-
246
-
247
-
248
-
249
-
250
-
251
-
252
-
253
-
254
-
255
-
256
-
257
-
258
-
259
-
260
-
261
-
262
-
263
-
264
-
265
-
266
-
267
-
268
-
269
-
270
-
271
-
272
 |
 |
