Brother International PE-DESIGN Ver.6 Users Manual - English - Page 52
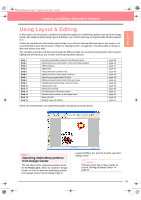
Fitting the text around the oval
 |
View all Brother International PE-DESIGN Ver.6 manuals
Add to My Manuals
Save this manual to your list of manuals |
Page 52 highlights
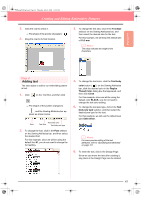
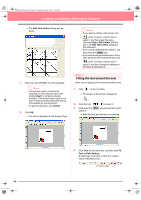
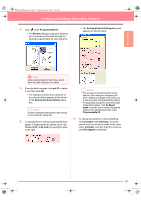
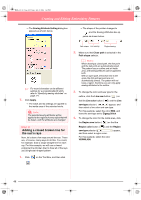
PeDesignV6Eng.book Page 44 Thursday, July 8, 2004 11:59 AM Creating and Editing Embroidery Patterns → The Edit Text Letters dialog box appears. b Memo: • If you want to edit the entered text, click on the Tool Box, click the text to select it, and then select the menu command Text - Edit Letters. Edit the text in the Edit Text Letters dialog box that appeared. • If you want to delete the text, select it, and then press the Delete key. • If you want to change the text color, font or other attributes after entering the text, click on the Tool Box, click the text to select it, and then change the settings on the Sewing Attributes bar. 7. Type your text ("ROSE", for this example). b Memo: • You can also enter a character by selecting it in the character table, then clicking Insert, or simply by doubleclicking it. This is particularly useful if you have to enter accented characters that are not available on your keyboard. • To quit the operation, click Cancel. 8. Click OK. → The text is displayed in the Design Page. Step 5 Fitting the text around the oval Here, we are going to fit the text around the oval. 1. Click on the Tool Box. → The shape of the pointer changes to . 2. Click the text to select it. 3. Hold down the Ctrl key and click the oval to select it. → Both the oval and the text are selected. 4. Click Text on the menu bar, and then click Fit Text to Path Setting. An alternate method is to click the Toolbar button indicated below. Fit Text to path 44
-
 1
1 -
2
-
3
-
4
-
5
-
6
-
7
-
8
-
9
-
10
-
11
-
12
-
13
-
14
-
15
-
16
-
17
-
18
-
19
-
20
-
21
-
22
-
23
-
24
-
25
-
26
-
27
-
28
-
29
-
30
-
31
-
32
-
33
-
34
-
35
-
36
-
37
-
38
-
39
-
40
-
41
-
42
-
43
-
44
-
45
-
46
-
 47
47 -
 48
48 -
 49
49 -
 50
50 -
 51
51 -
 52
52 -
 53
53 -
 54
54 -
 55
55 -
 56
56 -
 57
57 -
58
-
59
-
60
-
61
-
62
-
63
-
64
-
65
-
66
-
67
-
68
-
69
-
70
-
71
-
72
-
73
-
74
-
75
-
76
-
77
-
78
-
79
-
80
-
81
-
82
-
83
-
84
-
85
-
86
-
87
-
88
-
89
-
90
-
91
-
92
-
93
-
94
-
95
-
96
-
97
-
98
-
99
-
100
-
101
-
102
-
103
-
104
-
105
-
106
-
107
-
108
-
109
-
110
-
111
-
112
-
113
-
114
-
115
-
116
-
117
-
118
-
119
-
120
-
121
-
122
-
123
-
124
-
125
-
126
-
127
-
128
-
129
-
130
-
131
-
132
-
133
-
134
-
135
-
136
-
137
-
138
-
139
-
140
-
141
-
142
-
143
-
144
-
145
-
146
-
147
-
148
-
149
-
150
-
151
-
152
-
153
-
154
-
155
-
156
-
157
-
158
-
159
-
160
-
161
-
162
-
163
-
164
-
165
-
166
-
167
-
168
-
169
-
170
-
171
-
172
-
173
-
174
-
175
-
176
-
177
-
178
-
179
-
180
-
181
-
182
-
183
-
184
-
185
-
186
-
187
-
188
-
189
-
190
-
191
-
192
-
193
-
194
-
195
-
196
-
197
-
198
-
199
-
200
-
201
-
202
-
203
-
204
-
205
-
206
-
207
-
208
-
209
-
210
-
211
-
212
-
213
-
214
-
215
-
216
-
217
-
218
-
219
-
220
-
221
-
222
-
223
-
224
-
225
-
226
-
227
-
228
-
229
-
230
-
231
-
232
-
233
-
234
-
235
-
236
-
237
-
238
-
239
-
240
-
241
-
242
-
243
-
244
-
245
-
246
-
247
-
248
-
249
-
250
-
251
-
252
-
253
-
254
-
255
-
256
-
257
-
258
-
259
-
260
-
261
-
262
-
263
-
264
-
265
-
266
-
267
-
268
-
269
-
270
-
271
-
272
 |
 |
