Brother International PE-DESIGN Ver.6 Users Manual - English - Page 156
Drawing a Rectangle
 |
View all Brother International PE-DESIGN Ver.6 manuals
Add to My Manuals
Save this manual to your list of manuals |
Page 156 highlights
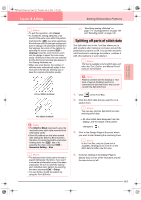
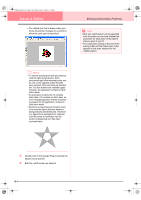
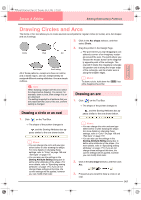
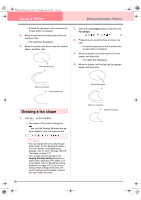
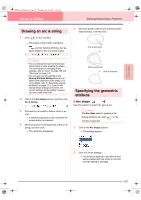
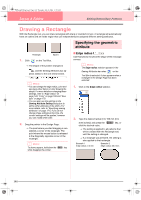
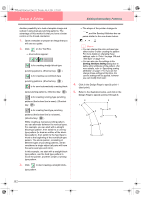
PeDesignV6Eng.book Page 148 Thursday, July 8, 2004 11:59 AM Layout & Editing Editing Embroidery Patterns Drawing a Rectangle With the Rectangle tool, you can draw rectangles with sharp or rounded corners. A rectangle will automatically have an outline and an inside region that can independently be assigned different sewing attributes. Specifying the geometric attribute Rectangle Square 1. Click on the Tool Box. → The shape of the pointer changes to , and the Sewing Attributes bar appears similar to the one shown below. b Memo: • You can change the edge radius, color and sew type either before or after drawing the shape. For more details on changing these settings, refer to "Edge radius" on page 148, "Color" on page 169 and "Sew type" on page 170. • You can also use the settings in the Sewing Attribute Setting dialog box to define other attributes of the stitch. (For more details, refer to "Specifying sewing attributes" on page 171.) If you do not change these settings at this time, the current settings will be applied, however you can modify them later. 2. Drag the pointer in the Design Page. → The point where you start dragging is considered a corner of the rectangle. The point where the mouse button is released is the diagonally opposite corner of the rectangle. b Memo: To draw a square, hold down the Shift key while dragging the pointer. ■ Edge radius Use this selector to select the shape of the rectangle corners. b Memo: The Edge radius selector appears in the Sewing Attributes bar when on the Tool Box is selected. It also appears when a rectangle in the Design Page has been selected. 1. Click in the Edge radius selector. 2. Type the desired radius (0 to 100 mm (0 to 3.93 inches)) and press the Enter key, or click the desired value. → The setting is applied to all patterns that will be created with the Rectangle tool, until the setting is changed. → If a rectangle was selected, the setting is also applied to that rectangle. Example 1 Edge radius: 0.0 mm Example 2 Edge radius: 20.0 mm 148
-
 1
1 -
2
-
3
-
4
-
5
-
6
-
7
-
8
-
9
-
10
-
11
-
12
-
13
-
14
-
15
-
16
-
17
-
18
-
19
-
20
-
21
-
22
-
23
-
24
-
25
-
26
-
27
-
28
-
29
-
30
-
31
-
32
-
33
-
34
-
35
-
36
-
37
-
38
-
39
-
40
-
41
-
42
-
43
-
44
-
45
-
46
-
47
-
48
-
49
-
50
-
51
-
52
-
53
-
54
-
55
-
56
-
57
-
58
-
59
-
60
-
61
-
62
-
63
-
64
-
65
-
66
-
67
-
68
-
69
-
70
-
71
-
72
-
73
-
74
-
75
-
76
-
77
-
78
-
79
-
80
-
81
-
82
-
83
-
84
-
85
-
86
-
87
-
88
-
89
-
90
-
91
-
92
-
93
-
94
-
95
-
96
-
97
-
98
-
99
-
100
-
101
-
102
-
103
-
104
-
105
-
106
-
107
-
108
-
109
-
110
-
111
-
112
-
113
-
114
-
115
-
116
-
117
-
118
-
119
-
120
-
121
-
122
-
123
-
124
-
125
-
126
-
127
-
128
-
129
-
130
-
131
-
132
-
133
-
134
-
135
-
136
-
137
-
138
-
139
-
140
-
141
-
142
-
143
-
144
-
145
-
146
-
147
-
148
-
149
-
150
-
 151
151 -
 152
152 -
 153
153 -
 154
154 -
 155
155 -
 156
156 -
 157
157 -
 158
158 -
 159
159 -
 160
160 -
 161
161 -
162
-
163
-
164
-
165
-
166
-
167
-
168
-
169
-
170
-
171
-
172
-
173
-
174
-
175
-
176
-
177
-
178
-
179
-
180
-
181
-
182
-
183
-
184
-
185
-
186
-
187
-
188
-
189
-
190
-
191
-
192
-
193
-
194
-
195
-
196
-
197
-
198
-
199
-
200
-
201
-
202
-
203
-
204
-
205
-
206
-
207
-
208
-
209
-
210
-
211
-
212
-
213
-
214
-
215
-
216
-
217
-
218
-
219
-
220
-
221
-
222
-
223
-
224
-
225
-
226
-
227
-
228
-
229
-
230
-
231
-
232
-
233
-
234
-
235
-
236
-
237
-
238
-
239
-
240
-
241
-
242
-
243
-
244
-
245
-
246
-
247
-
248
-
249
-
250
-
251
-
252
-
253
-
254
-
255
-
256
-
257
-
258
-
259
-
260
-
261
-
262
-
263
-
264
-
265
-
266
-
267
-
268
-
269
-
270
-
271
-
272
 |
 |
