Brother International PE-DESIGN Ver.6 Users Manual - English - Page 177
Region sew, Color
 |
View all Brother International PE-DESIGN Ver.6 manuals
Add to My Manuals
Save this manual to your list of manuals |
Page 177 highlights
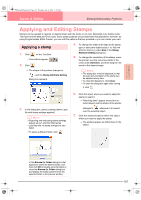
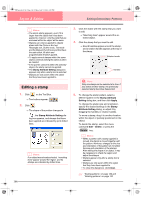
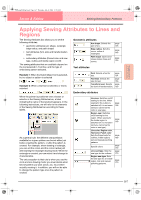
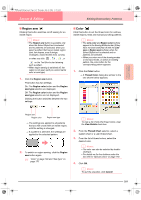
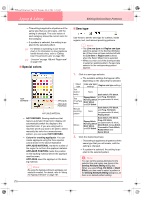
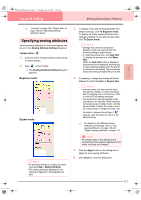
PeDesignV6Eng.book Page 169 Thursday, July 8, 2004 11:59 AM Layout & Editing Editing Embroidery Patterns ■ Region sew Clicking this button switches on/off sewing for an inside region. b Memo: • The Region sew button is available only when the Select Object tool is selected and no patterns are selected, when you select a pattern that has an inside region (text, fan shapes, arcs & strings, rectangles, closed broken lines, curves), or when you click , , , or on the Tool Box to start drawing such a pattern. • When region sewing is switched off, the region is not sewn (and you cannot set its color or sew type). 1. Click the Region sew button. This button has two settings: On: The Region color button and the Region sew type selector are displayed. Off: The Region color button and the Region sew type selector are not displayed. Clicking the button switches between the two settings. ■ Color Click this button to set the thread color for outlines, inside regions, texts and manual punching patterns. b Memo: • The Line color and Region color buttons appear in the Sewing Attributes bar (if they have not been switched off with the Line sew or Region sew buttons) when the Select Object tool is selected and no patterns are selected. • When you enter one of the drawing modes or text input mode, or select an existing pattern, the color button for the corresponding pattern appears. 1. Click the Color button. → A Thread Color dialog box similar to the one shown below appears. Advanced Opreation Layout & Editing Region sew Region color Region sew type → The settings are applied to all patterns that you will create with an inside region, until the setting is changed. → If a pattern is selected, the settings are applied to the selected pattern. 2. To switch on region sewing, click the Region sew button again. c "Color" on page 169 and "Sew type" on page 170 b Memo: To view a list of only the thread colors, clear the View Details check box. 2. From the Thread Chart selector, select a system chart or a user thread chart. 3. From the list of thread colors, select the desired color. b Memo: • The color can also be selected by doubleclicking it. • For details on the four buttons under the list, refer to "Special colors" on page 170. 4. Click OK. b Memo: To quit the operation, click Cancel. 169
-
 1
1 -
2
-
3
-
4
-
5
-
6
-
7
-
8
-
9
-
10
-
11
-
12
-
13
-
14
-
15
-
16
-
17
-
18
-
19
-
20
-
21
-
22
-
23
-
24
-
25
-
26
-
27
-
28
-
29
-
30
-
31
-
32
-
33
-
34
-
35
-
36
-
37
-
38
-
39
-
40
-
41
-
42
-
43
-
44
-
45
-
46
-
47
-
48
-
49
-
50
-
51
-
52
-
53
-
54
-
55
-
56
-
57
-
58
-
59
-
60
-
61
-
62
-
63
-
64
-
65
-
66
-
67
-
68
-
69
-
70
-
71
-
72
-
73
-
74
-
75
-
76
-
77
-
78
-
79
-
80
-
81
-
82
-
83
-
84
-
85
-
86
-
87
-
88
-
89
-
90
-
91
-
92
-
93
-
94
-
95
-
96
-
97
-
98
-
99
-
100
-
101
-
102
-
103
-
104
-
105
-
106
-
107
-
108
-
109
-
110
-
111
-
112
-
113
-
114
-
115
-
116
-
117
-
118
-
119
-
120
-
121
-
122
-
123
-
124
-
125
-
126
-
127
-
128
-
129
-
130
-
131
-
132
-
133
-
134
-
135
-
136
-
137
-
138
-
139
-
140
-
141
-
142
-
143
-
144
-
145
-
146
-
147
-
148
-
149
-
150
-
151
-
152
-
153
-
154
-
155
-
156
-
157
-
158
-
159
-
160
-
161
-
162
-
163
-
164
-
165
-
166
-
167
-
168
-
169
-
170
-
171
-
 172
172 -
 173
173 -
 174
174 -
 175
175 -
 176
176 -
 177
177 -
 178
178 -
 179
179 -
 180
180 -
 181
181 -
 182
182 -
183
-
184
-
185
-
186
-
187
-
188
-
189
-
190
-
191
-
192
-
193
-
194
-
195
-
196
-
197
-
198
-
199
-
200
-
201
-
202
-
203
-
204
-
205
-
206
-
207
-
208
-
209
-
210
-
211
-
212
-
213
-
214
-
215
-
216
-
217
-
218
-
219
-
220
-
221
-
222
-
223
-
224
-
225
-
226
-
227
-
228
-
229
-
230
-
231
-
232
-
233
-
234
-
235
-
236
-
237
-
238
-
239
-
240
-
241
-
242
-
243
-
244
-
245
-
246
-
247
-
248
-
249
-
250
-
251
-
252
-
253
-
254
-
255
-
256
-
257
-
258
-
259
-
260
-
261
-
262
-
263
-
264
-
265
-
266
-
267
-
268
-
269
-
270
-
271
-
272
 |
 |
