Brother International PE-DESIGN Ver.6 Users Manual - English - Page 204
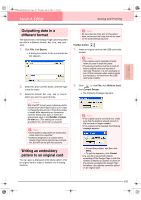
Writing multiple embroidery, files to an original card
 |
View all Brother International PE-DESIGN Ver.6 manuals
Add to My Manuals
Save this manual to your list of manuals |
Page 204 highlights
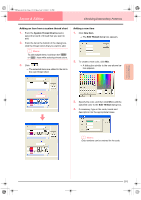
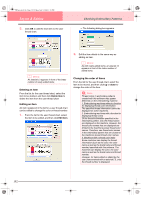
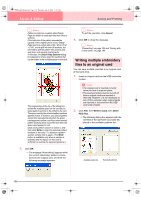
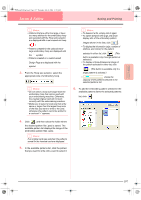
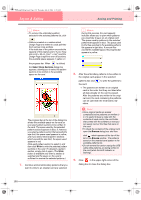
PeDesignV6Eng.book Page 196 Thursday, July 8, 2004 11:59 AM Layout & Editing Saving and Printing b Memo: Patterns created on a custom-sized Design Page are written to cards split into their various sections. If the total size of the pattern exceeds the capacity of the original card or if your Design Page is set to a custom size of 90 × 90 cm (3.54" × 3.54"), and is split into over 80 sections, you will need to split the pattern into sections and write them onto several original cards. In this case, the Select Hoop Sections dialog box appears to let you select the sections that can be written in the available space on the card. The progress bar at the top of the dialog box shows the available space on the card as you select pattern sections to be written to the card. The space used by the selected pattern sections appears in blue. If, however, you select a pattern section that exceeds the size limit, the space used appears in yellow, and if you select several pattern sections which exceed the size limit, the space used appears in red. Click each pattern section to select it, and then click Write to write the selected pattern sections to the card. To deselect a pattern section, simply click it again. (The Write button is available only when a section is selected and the space on the card is sufficient to receive the selected patterns.) 3. Click OK. → The message "Now writing" appears while the current embroidery pattern is transferred to the original card, and then the following message appears. b Memo: To quit the operation, click Cancel. 4. Click OK to close the message. b Memo: "Overwriting" on page 194 and "Saving with a new name" on page 194 Writing multiple embroidery files to an original card You can save multiple .pes files to an original card at the same time. 1. Insert an original card into the USB card writer module. a Note: • The original card is inserted correctly when you hear it snap into place. • The sewing machine must be turned off before original cards are inserted or removed. However, it is not necessary to turn off the computer when original cards are inserted or removed from the USB card writer module. 2. Click File, then Write to Card, then Other PES files. → The following dialog box appears with the contents of the last folder accessed displayed in the available patterns list. Available patterns Selected patterns 196
-
 1
1 -
2
-
3
-
4
-
5
-
6
-
7
-
8
-
9
-
10
-
11
-
12
-
13
-
14
-
15
-
16
-
17
-
18
-
19
-
20
-
21
-
22
-
23
-
24
-
25
-
26
-
27
-
28
-
29
-
30
-
31
-
32
-
33
-
34
-
35
-
36
-
37
-
38
-
39
-
40
-
41
-
42
-
43
-
44
-
45
-
46
-
47
-
48
-
49
-
50
-
51
-
52
-
53
-
54
-
55
-
56
-
57
-
58
-
59
-
60
-
61
-
62
-
63
-
64
-
65
-
66
-
67
-
68
-
69
-
70
-
71
-
72
-
73
-
74
-
75
-
76
-
77
-
78
-
79
-
80
-
81
-
82
-
83
-
84
-
85
-
86
-
87
-
88
-
89
-
90
-
91
-
92
-
93
-
94
-
95
-
96
-
97
-
98
-
99
-
100
-
101
-
102
-
103
-
104
-
105
-
106
-
107
-
108
-
109
-
110
-
111
-
112
-
113
-
114
-
115
-
116
-
117
-
118
-
119
-
120
-
121
-
122
-
123
-
124
-
125
-
126
-
127
-
128
-
129
-
130
-
131
-
132
-
133
-
134
-
135
-
136
-
137
-
138
-
139
-
140
-
141
-
142
-
143
-
144
-
145
-
146
-
147
-
148
-
149
-
150
-
151
-
152
-
153
-
154
-
155
-
156
-
157
-
158
-
159
-
160
-
161
-
162
-
163
-
164
-
165
-
166
-
167
-
168
-
169
-
170
-
171
-
172
-
173
-
174
-
175
-
176
-
177
-
178
-
179
-
180
-
181
-
182
-
183
-
184
-
185
-
186
-
187
-
188
-
189
-
190
-
191
-
192
-
193
-
194
-
195
-
196
-
197
-
198
-
 199
199 -
 200
200 -
 201
201 -
 202
202 -
 203
203 -
 204
204 -
 205
205 -
 206
206 -
 207
207 -
 208
208 -
 209
209 -
210
-
211
-
212
-
213
-
214
-
215
-
216
-
217
-
218
-
219
-
220
-
221
-
222
-
223
-
224
-
225
-
226
-
227
-
228
-
229
-
230
-
231
-
232
-
233
-
234
-
235
-
236
-
237
-
238
-
239
-
240
-
241
-
242
-
243
-
244
-
245
-
246
-
247
-
248
-
249
-
250
-
251
-
252
-
253
-
254
-
255
-
256
-
257
-
258
-
259
-
260
-
261
-
262
-
263
-
264
-
265
-
266
-
267
-
268
-
269
-
270
-
271
-
272
 |
 |
