Brother International WP230B Owners Manual - English - Page 20
Installing, Monitor, Stand
 |
View all Brother International WP230B manuals
Add to My Manuals
Save this manual to your list of manuals |
Page 20 highlights
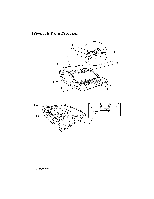
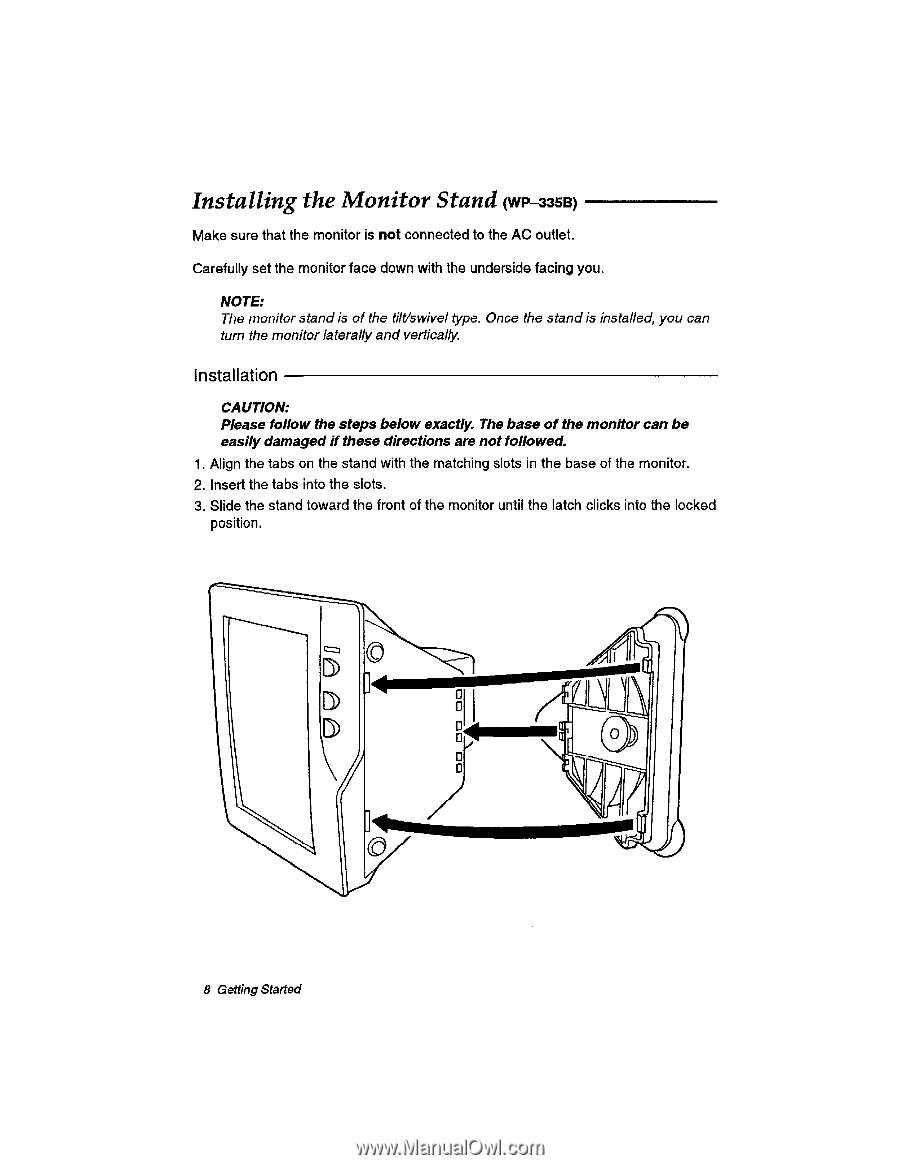
Installing the Monitor Stand (WP-335B) Make sure that the monitor is not connected to the AC outlet. Carefully set the monitor face down with the underside facing you. NOTE: The monitor stand is of the tilt/swivel type. Once the stand is installed, you can turn the monitor laterally and vertically. Installation CAUTION: Please follow the steps below exactly. The base of the monitor can be easily damaged if these directions are not followed. 1. Align the tabs on the stand with the matching slots in the base of the monitor. 2. Insert the tabs into the slots. 3. Slide the stand toward the front of the monitor until the latch clicks into the locked position. 0El 0 0 0 0 8 Getting Started
-
 1
1 -
2
-
3
-
4
-
5
-
6
-
7
-
8
-
9
-
10
-
11
-
12
-
13
-
14
-
 15
15 -
 16
16 -
 17
17 -
 18
18 -
 19
19 -
 20
20 -
 21
21 -
 22
22 -
 23
23 -
 24
24 -
 25
25 -
26
-
27
-
28
-
29
-
30
-
31
-
32
-
33
-
34
-
35
-
36
-
37
-
38
-
39
-
40
-
41
-
42
-
43
-
44
-
45
-
46
-
47
-
48
-
49
-
50
-
51
-
52
-
53
-
54
-
55
-
56
-
57
-
58
-
59
-
60
-
61
-
62
-
63
-
64
-
65
-
66
-
67
-
68
-
69
-
70
-
71
-
72
-
73
-
74
-
75
-
76
-
77
-
78
-
79
-
80
-
81
-
82
-
83
-
84
-
85
-
86
-
87
-
88
-
89
-
90
-
91
-
92
-
93
-
94
-
95
-
96
-
97
-
98
-
99
-
100
-
101
-
102
-
103
-
104
-
105
-
106
-
107
-
108
-
109
-
110
-
111
-
112
-
113
-
114
-
115
-
116
-
117
-
118
-
119
-
120
-
121
-
122
-
123
-
124
-
125
-
126
-
127
-
128
-
129
-
130
-
131
-
132
-
133
-
134
-
135
-
136
-
137
-
138
-
139
-
140
-
141
-
142
-
143
-
144
-
145
-
146
-
147
-
148
-
149
-
150
-
151
-
152
-
153
-
154
-
155
-
156
-
157
-
158
-
159
-
160
-
161
-
162
-
163
-
164
-
165
-
166
-
167
-
168
-
169
-
170
-
171
-
172
-
173
-
174
-
175
-
176
-
177
-
178
-
179
-
180
-
181
-
182
-
183
-
184
-
185
-
186
-
187
-
188
-
189
-
190
-
191
-
192
-
193
-
194
-
195
-
196
-
197
-
198
-
199
-
200
-
201
-
202
-
203
-
204
-
205
-
206
-
207
-
208
-
209
-
210
-
211
-
212
-
213
-
214
-
215
-
216
-
217
-
218
-
219
-
220
-
221
-
222
-
223
-
224
-
225
-
226
-
227
-
228
-
229
-
230
-
231
-
232
-
233
-
234
-
235
-
236
-
237
-
238
-
239
-
240
-
241
-
242
-
243
-
244
-
245
-
246
-
247
-
248
-
249
-
250
-
251
-
252
-
253
-
254
-
255
-
256
-
257
-
258
-
259
-
260
-
261
-
262
-
263
-
264
-
265
-
266
-
267
-
268
-
269
-
270
-
271
-
272
-
273
-
274
-
275
-
276
-
277
-
278
-
279
-
280
-
281
-
282
-
283
-
284
-
285
-
286
-
287
-
288
-
289
-
290
-
291
-
292
-
293
-
294
-
295
-
296
-
297
-
298
-
299
-
300
-
301
-
302
-
303
-
304
-
305
-
306
-
307
-
308
-
309
-
310
-
311
-
312
-
313
-
314
-
315
-
316
-
317
-
318
-
319
-
320
-
321
-
322
-
323
-
324
-
325
-
326
-
327
-
328
-
329
-
330
-
331
-
332
-
333
-
334
-
335
-
336
-
337
-
338
-
339
-
340
 |
 |
Installing
the
Monitor
Stand
(WP
-335B)
Make
sure
that
the
monitor
is
not
connected
to
the
AC
outlet.
Carefully
set
the
monitor
face
down
with
the
underside
facing
you.
NOTE:
The
monitor
stand
is
of
the
tilt/swivel
type.
Once
the
stand
is
installed,
you
can
turn
the
monitor
laterally
and
vertically.
Installation
CAUTION:
Please
follow
the
steps
below
exactly.
The
base
of
the
monitor
can
be
easily
damaged
if
these
directions
are
not
followed.
1.
Align
the
tabs
on
the
stand
with
the
matching
slots
in
the
base
of
the
monitor.
2.
Insert
the
tabs
into
the
slots.
3.
Slide
the
stand
toward
the
front
of
the
monitor
until
the
latch
clicks
into
the
locked
position.
El
0
0
0
0
8
Getting
Started
0