HP DesignJet T850 DesignJet T850 Printer Series DesignJet T950 Printer SeriesU - Page 101
Clean the encoder strip, Recalibrate the paper advance, Recalibrating the paper advance procedure
 |
View all HP DesignJet T850 manuals
Add to My Manuals
Save this manual to your list of manuals |
Page 101 highlights
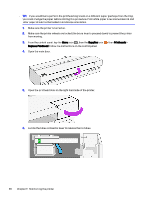
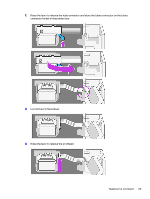
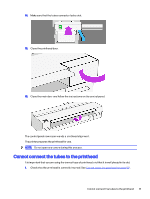
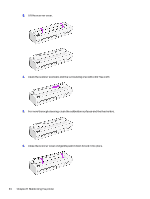
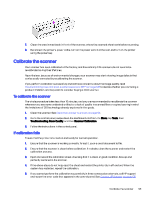
2. Check that the tubes connector lever (blue) is up before connecting the tubes connector. Clean the encoder strip You can use a small damp cloth to remove unwanted residue. 1. Turn off the printer: Press the power key and unplug the power cable. 2. Using tap water and a small cloth that will not leave fibers in the printer, dampen the cloth and remove any excess water, so that the cloth is damp but not wet. 3. Open the main door. 4. Hold the cloth in an inverted U shape around the encoder strip and carefully wipe until no further ink residue appears on the cloth. Be very careful not to scratch the encoder strip with your fingernails or any other object. Make sure that you are holding the cloth correctly. NOTE: Do not move the carriage away from the service station. 5. Close the main door. 6. Turn the printer on. Recalibrate the paper advance Accurate paper advance is important to image quality because it is part of controlling the proper placement of dots on the paper. If the paper is not advanced the proper distance between printhead passes, light or dark bands appear in the print and image grain may increase. The printer is calibrated to advance correctly with all the papers appearing in the control panel. When you select the type of loaded paper, the printer adjusts the rate at which to advance the paper while printing. However, if you are not satisfied with the default calibration of your paper, you may need to recalibrate the rate at which the paper advances. See Troubleshooting print-quality issues on page 116 to determine whether paper advance calibration will solve your issue. Recalibrating the paper advance procedure The recalibration procedure takes approximately three minutes. TIP: It is recommended to only have the paper loaded that you want to calibrate. 1. From the control panel, tap the Menu icon , then Tools > Troubleshooting > Automatic Paper- Advance Calibration. When prompted by the control panel, confirm the paper source and type. The printer automatically recalibrates the paper advance and prints a paper advance calibration image. 2. Wait until the control panel displays the status screen and re-print your print. NOTE: Do not worry about the paper advance calibration image. 92 Chapter 11 Maintaining the printer
-
 1
1 -
2
-
3
-
4
-
5
-
6
-
7
-
8
-
9
-
10
-
11
-
12
-
13
-
14
-
15
-
16
-
17
-
18
-
19
-
20
-
21
-
22
-
23
-
24
-
25
-
26
-
27
-
28
-
29
-
30
-
31
-
32
-
33
-
34
-
35
-
36
-
37
-
38
-
39
-
40
-
41
-
42
-
43
-
44
-
45
-
46
-
47
-
48
-
49
-
50
-
51
-
52
-
53
-
54
-
55
-
56
-
57
-
58
-
59
-
60
-
61
-
62
-
63
-
64
-
65
-
66
-
67
-
68
-
69
-
70
-
71
-
72
-
73
-
74
-
75
-
76
-
77
-
78
-
79
-
80
-
81
-
82
-
83
-
84
-
85
-
86
-
87
-
88
-
89
-
90
-
91
-
92
-
93
-
94
-
95
-
 96
96 -
 97
97 -
 98
98 -
 99
99 -
 100
100 -
 101
101 -
 102
102 -
 103
103 -
 104
104 -
 105
105 -
 106
106 -
107
-
108
-
109
-
110
-
111
-
112
-
113
-
114
-
115
-
116
-
117
-
118
-
119
-
120
-
121
-
122
-
123
-
124
-
125
-
126
-
127
-
128
-
129
-
130
-
131
-
132
-
133
-
134
-
135
-
136
-
137
-
138
-
139
-
140
-
141
-
142
-
143
-
144
-
145
-
146
-
147
-
148
-
149
-
150
-
151
-
152
-
153
-
154
-
155
-
156
-
157
-
158
-
159
-
160
-
161
-
162
-
163
-
164
-
165
-
166
-
167
-
168
-
169
-
170
-
171
-
172
-
173
-
174
-
175
-
176
-
177
-
178
-
179
-
180
-
181
-
182
-
183
-
184
-
185
-
186
-
187
-
188
-
189
-
190
-
191
 |
 |
