HP DesignJet T850 DesignJet T850 Printer Series DesignJet T950 Printer SeriesU - Page 125
Troubleshooting print-quality issues, General printing advice
 |
View all HP DesignJet T850 manuals
Add to My Manuals
Save this manual to your list of manuals |
Page 125 highlights
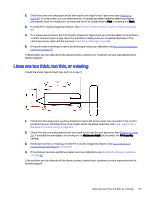
14 Troubleshooting print-quality issues Step by step instructions are provided for you to identify and resolve your issue. General printing advice To achieve the best performance from your printer, use only genuine manufacturer's supplies and accessories. ● Genuine manufacturer's supplies and accessories have been thoroughly tested to give trouble-free performance and best-quality prints. For details of recommended papers, see Order paper on page 100. ● Make sure that the paper type selected in the control panel is the same as the paper type loaded into the printer (see View information about the paper on page 32). Also make sure that the paper type selected in your software is the same as the paper type loaded into the printer. See Paper type is not in the driver or control panel on page 104 if you have doubts about the paper selection. CAUTION: If you have the wrong paper type selected, you could experience poor print quality and incorrect colors, and perhaps even damage to the printhead. ● Check that you are using the most appropriate print-quality settings for your purposes (see Printing on page 35). You are likely to see lower print quality if you have set the quality level to Fast. ● Check that your environmental conditions (temperature, humidity) are in the recommended range. See Environmental specifications on page 175. Horizontal lines across the image (banding) If your printed image suffers from added horizontal lines as shown (the color may vary). 1. Check that the paper type you have loaded corresponds to the paper type selected in the control panel and in your software. If you have doubts about the paper selection, see Paper type is not in the driver or control panel on page 104. 116 Chapter 14 Troubleshooting print-quality issues
-
 1
1 -
2
-
3
-
4
-
5
-
6
-
7
-
8
-
9
-
10
-
11
-
12
-
13
-
14
-
15
-
16
-
17
-
18
-
19
-
20
-
21
-
22
-
23
-
24
-
25
-
26
-
27
-
28
-
29
-
30
-
31
-
32
-
33
-
34
-
35
-
36
-
37
-
38
-
39
-
40
-
41
-
42
-
43
-
44
-
45
-
46
-
47
-
48
-
49
-
50
-
51
-
52
-
53
-
54
-
55
-
56
-
57
-
58
-
59
-
60
-
61
-
62
-
63
-
64
-
65
-
66
-
67
-
68
-
69
-
70
-
71
-
72
-
73
-
74
-
75
-
76
-
77
-
78
-
79
-
80
-
81
-
82
-
83
-
84
-
85
-
86
-
87
-
88
-
89
-
90
-
91
-
92
-
93
-
94
-
95
-
96
-
97
-
98
-
99
-
100
-
101
-
102
-
103
-
104
-
105
-
106
-
107
-
108
-
109
-
110
-
111
-
112
-
113
-
114
-
115
-
116
-
117
-
118
-
119
-
 120
120 -
 121
121 -
 122
122 -
 123
123 -
 124
124 -
 125
125 -
 126
126 -
 127
127 -
 128
128 -
 129
129 -
 130
130 -
131
-
132
-
133
-
134
-
135
-
136
-
137
-
138
-
139
-
140
-
141
-
142
-
143
-
144
-
145
-
146
-
147
-
148
-
149
-
150
-
151
-
152
-
153
-
154
-
155
-
156
-
157
-
158
-
159
-
160
-
161
-
162
-
163
-
164
-
165
-
166
-
167
-
168
-
169
-
170
-
171
-
172
-
173
-
174
-
175
-
176
-
177
-
178
-
179
-
180
-
181
-
182
-
183
-
184
-
185
-
186
-
187
-
188
-
189
-
190
-
191
 |
 |