HP DesignJet T850 DesignJet T850 Printer Series DesignJet T950 Printer SeriesU - Page 102
Clean the scanner scanbars, Return to default calibration
 |
View all HP DesignJet T850 manuals
Add to My Manuals
Save this manual to your list of manuals |
Page 102 highlights
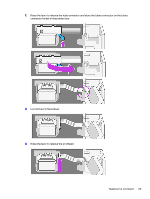
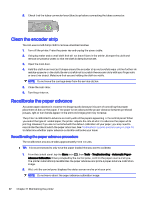
If you are satisfied with your print, continue using this calibration for your paper type. If you see improvement in your print, continue with the next step. If you are dissatisfied with the recalibration, return to the default calibration, see Return to default calibration on page 93. 3. If you would like to fine tune the calibration, or are using a transparent paper, swipe down the dashboard and tap the Menu icon , then Tools > Troubleshooting > Adjust Paper Advance. 4. Select the percentage of change from -99% to +99%. To correct light banding decrease the percentage. To correct dark banding increase the percentage. 5. To save the value, tap OK on the control panel. 6. Wait until the control panel displays the status screen and reprint your print. Return to default calibration This sets all the corrections made by the paper advance calibration to zero. To return to the default paper advance calibration value, you must reset the calibration. 1. From the control panel, tap the Menu icon , then Tools > Troubleshooting > Reseat Ready paper. 2. Wait until the control panel displays the operation has completed successfully. Clean the scanner scanbars You are recommended to clean the scanbars periodically, depending on how often you use the scanner. 1. Turn off the printer using the power key, turn off the power switch and disconnect the power cable. IMPORTANT: Make sure to turn off the printer before cleaning. It is important to allow the printer to restart after cleaning to solve any issues. 2. There are two small indented buttons at the front of the scanner. Press them to open the scanner cover. WARNING! Be careful while the scanner lid is open. Your fingers or hand may be trapped or crushed. Return to default calibration 93
-
 1
1 -
2
-
3
-
4
-
5
-
6
-
7
-
8
-
9
-
10
-
11
-
12
-
13
-
14
-
15
-
16
-
17
-
18
-
19
-
20
-
21
-
22
-
23
-
24
-
25
-
26
-
27
-
28
-
29
-
30
-
31
-
32
-
33
-
34
-
35
-
36
-
37
-
38
-
39
-
40
-
41
-
42
-
43
-
44
-
45
-
46
-
47
-
48
-
49
-
50
-
51
-
52
-
53
-
54
-
55
-
56
-
57
-
58
-
59
-
60
-
61
-
62
-
63
-
64
-
65
-
66
-
67
-
68
-
69
-
70
-
71
-
72
-
73
-
74
-
75
-
76
-
77
-
78
-
79
-
80
-
81
-
82
-
83
-
84
-
85
-
86
-
87
-
88
-
89
-
90
-
91
-
92
-
93
-
94
-
95
-
96
-
 97
97 -
 98
98 -
 99
99 -
 100
100 -
 101
101 -
 102
102 -
 103
103 -
 104
104 -
 105
105 -
 106
106 -
 107
107 -
108
-
109
-
110
-
111
-
112
-
113
-
114
-
115
-
116
-
117
-
118
-
119
-
120
-
121
-
122
-
123
-
124
-
125
-
126
-
127
-
128
-
129
-
130
-
131
-
132
-
133
-
134
-
135
-
136
-
137
-
138
-
139
-
140
-
141
-
142
-
143
-
144
-
145
-
146
-
147
-
148
-
149
-
150
-
151
-
152
-
153
-
154
-
155
-
156
-
157
-
158
-
159
-
160
-
161
-
162
-
163
-
164
-
165
-
166
-
167
-
168
-
169
-
170
-
171
-
172
-
173
-
174
-
175
-
176
-
177
-
178
-
179
-
180
-
181
-
182
-
183
-
184
-
185
-
186
-
187
-
188
-
189
-
190
-
191
 |
 |