HP DesignJet T850 DesignJet T850 Printer Series DesignJet T950 Printer SeriesU - Page 111
Troubleshooting paper issues, Paper cannot be loaded successfully, Unsuccessful roll load
 |
View all HP DesignJet T850 manuals
Add to My Manuals
Save this manual to your list of manuals |
Page 111 highlights
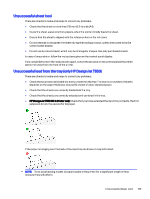
13 Troubleshooting paper issues When the printer detects a jam, it tries to resolve the issue automatically. If it cannot, it stops, and you must fix the problem manually. Paper cannot be loaded successfully There are various reasons why you may have issues loading the paper. ● Ensure that no paper is already loaded. ● Ensure that the paper is far enough inside the printer, you should feel the printer grab the paper. ● Do not attempt to straighten the paper during the aligning process, unless instructed to do so by the control-panel display. The printer automatically attempts to straighten the paper. ● The paper may be crumpled, or warped, or may have irregular edges. Unsuccessful roll load There are checks to make and steps to correct any problems. ● Check that the roll is at least 370 mm (14.5 in) wide: narrower rolls are not supported. ● Check the leading edge of the paper: if it is not straight or clean, it should be trimmed. Remove the initial 20 mm (1 in) from the roll and try again. This may be necessary even with a new roll of paper. ● Check that the roll ends are tight against the spindle ends. ● Check that the spindle is correctly inserted. ● Check that the paper is correctly loaded on the spindle, and that it loads over the roll towards you. ● Check that all roll tapes have been removed. ● Check that the paper is wound tightly on the roll. ● Do not touch the roll or paper at during the final steps of the loading process. If the paper has not been inserted straight, follow the instructions on the control panel. If you would like to start the load process again, cancel the process on the control panel and rewind the roll from the end of the spindle until the edge is removed from the printer. NOTE: If the roll has become loose around the core, the printer cannot load the paper. 102 Chapter 13 Troubleshooting paper issues
-
 1
1 -
2
-
3
-
4
-
5
-
6
-
7
-
8
-
9
-
10
-
11
-
12
-
13
-
14
-
15
-
16
-
17
-
18
-
19
-
20
-
21
-
22
-
23
-
24
-
25
-
26
-
27
-
28
-
29
-
30
-
31
-
32
-
33
-
34
-
35
-
36
-
37
-
38
-
39
-
40
-
41
-
42
-
43
-
44
-
45
-
46
-
47
-
48
-
49
-
50
-
51
-
52
-
53
-
54
-
55
-
56
-
57
-
58
-
59
-
60
-
61
-
62
-
63
-
64
-
65
-
66
-
67
-
68
-
69
-
70
-
71
-
72
-
73
-
74
-
75
-
76
-
77
-
78
-
79
-
80
-
81
-
82
-
83
-
84
-
85
-
86
-
87
-
88
-
89
-
90
-
91
-
92
-
93
-
94
-
95
-
96
-
97
-
98
-
99
-
100
-
101
-
102
-
103
-
104
-
105
-
 106
106 -
 107
107 -
 108
108 -
 109
109 -
 110
110 -
 111
111 -
 112
112 -
 113
113 -
 114
114 -
 115
115 -
 116
116 -
117
-
118
-
119
-
120
-
121
-
122
-
123
-
124
-
125
-
126
-
127
-
128
-
129
-
130
-
131
-
132
-
133
-
134
-
135
-
136
-
137
-
138
-
139
-
140
-
141
-
142
-
143
-
144
-
145
-
146
-
147
-
148
-
149
-
150
-
151
-
152
-
153
-
154
-
155
-
156
-
157
-
158
-
159
-
160
-
161
-
162
-
163
-
164
-
165
-
166
-
167
-
168
-
169
-
170
-
171
-
172
-
173
-
174
-
175
-
176
-
177
-
178
-
179
-
180
-
181
-
182
-
183
-
184
-
185
-
186
-
187
-
188
-
189
-
190
-
191
 |
 |