HP DesignJet T850 DesignJet T850 Printer Series DesignJet T950 Printer SeriesU - Page 154
The scanner diagnostic plot, Prepare the printer and the paper to print the diagnostic sheet
 |
View all HP DesignJet T850 manuals
Add to My Manuals
Save this manual to your list of manuals |
Page 154 highlights
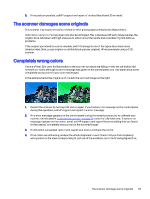
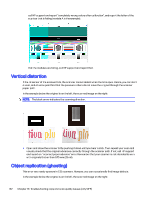
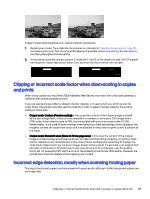
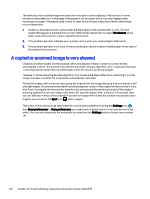
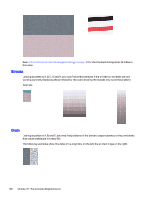
17 The scanner diagnostic plot You can print the plot onto a roll or a single sheet but do not use recycled or tracing paper. Prepare the printer and the paper to print the diagnostic sheet Turn on your printer and wait until it is functioning. Then select the paper on which the diagnostic plot is going to be printed (you can reuse the diagnostic plot at any time in the future, if it is saved carefully). NOTE: Ideally, the diagnostic plot should be printed on Heavyweight Coated Paper; do not use recycled or tracing paper. The size of the diagnostic plot is: 914 mm (36 in). You can print on a roll or a single sheet, which should be of the maximum width accepted by the printer. You can print the diagnostic plot from the control panel: tap the Menu icon Troubleshooting > Scanner Calibration > Start > Print. , then Tools > Visual check for errors while printing the diagnostic sheet Once the diagnostic plot is printed, the first step is to check that all the patterns included in it are correctly printed. The diagnostic plot, if printed correctly, should look like this: Some of the most common defects that may appear in a printed diagnostic plot are described below. If you find any of these problems, you should follow the recommended recovery procedure. See the Troubleshooting print-quality issues on page 116. Once the printer has been diagnosed and it is working The scanner diagnostic plot 145
-
 1
1 -
2
-
3
-
4
-
5
-
6
-
7
-
8
-
9
-
10
-
11
-
12
-
13
-
14
-
15
-
16
-
17
-
18
-
19
-
20
-
21
-
22
-
23
-
24
-
25
-
26
-
27
-
28
-
29
-
30
-
31
-
32
-
33
-
34
-
35
-
36
-
37
-
38
-
39
-
40
-
41
-
42
-
43
-
44
-
45
-
46
-
47
-
48
-
49
-
50
-
51
-
52
-
53
-
54
-
55
-
56
-
57
-
58
-
59
-
60
-
61
-
62
-
63
-
64
-
65
-
66
-
67
-
68
-
69
-
70
-
71
-
72
-
73
-
74
-
75
-
76
-
77
-
78
-
79
-
80
-
81
-
82
-
83
-
84
-
85
-
86
-
87
-
88
-
89
-
90
-
91
-
92
-
93
-
94
-
95
-
96
-
97
-
98
-
99
-
100
-
101
-
102
-
103
-
104
-
105
-
106
-
107
-
108
-
109
-
110
-
111
-
112
-
113
-
114
-
115
-
116
-
117
-
118
-
119
-
120
-
121
-
122
-
123
-
124
-
125
-
126
-
127
-
128
-
129
-
130
-
131
-
132
-
133
-
134
-
135
-
136
-
137
-
138
-
139
-
140
-
141
-
142
-
143
-
144
-
145
-
146
-
147
-
148
-
 149
149 -
 150
150 -
 151
151 -
 152
152 -
 153
153 -
 154
154 -
 155
155 -
 156
156 -
 157
157 -
 158
158 -
 159
159 -
160
-
161
-
162
-
163
-
164
-
165
-
166
-
167
-
168
-
169
-
170
-
171
-
172
-
173
-
174
-
175
-
176
-
177
-
178
-
179
-
180
-
181
-
182
-
183
-
184
-
185
-
186
-
187
-
188
-
189
-
190
-
191
 |
 |
