HP DesignJet T850 DesignJet T850 Printer Series DesignJet T950 Printer SeriesU - Page 129
Whole image is blurry or grainy, Paper is not flat, Set Print Quality
 |
View all HP DesignJet T850 manuals
Add to My Manuals
Save this manual to your list of manuals |
Page 129 highlights
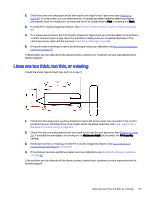
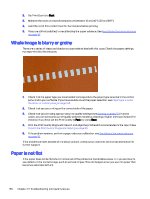
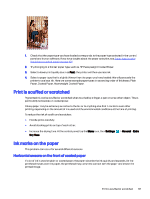
2. Set Print Quality to Best. 3. Maintain the room at a steady temperature between 10 and 30°C (50 and 86°F). 4. Load the roll of film and let it rest for five minutes before printing. 5. If you are still not satisfied, try recalibrating the paper advance. See Recalibrate the paper advance on page 92. Whole image is blurry or grainy There are a series of steps and checks you can make to deal with this issue. Check the paper, settings, run reports to find the issue etc. 1. Check that the paper type you have loaded corresponds to the paper type selected in the control panel and in your software. If you have doubts about the paper selection, see Paper type is not in the driver or control panel on page 104. 2. Check that you are printing on the correct side of the paper. 3. Check that you are using appropriate print-quality settings (see Printing on page 35). In some cases, you can overcome a print-quality problem merely by selecting a higher print-quality level. For instance, if you have set the Print Quality to Fast, try using Best. 4. Print the Print Quality Diagnostic Report, and align the printhead if recommended in the report. See To print the Print Quality Diagnostic Report on page 86. 5. If the problem remains, perform a paper advance calibration: see Recalibrate the paper advance on page 92. If the problem persists despite all the above actions, contact your customer service representative for further support. Paper is not flat If the paper does not lie flat when it comes out of the printer, but has shallow waves in it, you are likely to see defects in the printed image, such as vertical stripes. This can happen when you use thin paper that becomes saturated with ink. 120 Chapter 14 Troubleshooting print-quality issues
-
 1
1 -
2
-
3
-
4
-
5
-
6
-
7
-
8
-
9
-
10
-
11
-
12
-
13
-
14
-
15
-
16
-
17
-
18
-
19
-
20
-
21
-
22
-
23
-
24
-
25
-
26
-
27
-
28
-
29
-
30
-
31
-
32
-
33
-
34
-
35
-
36
-
37
-
38
-
39
-
40
-
41
-
42
-
43
-
44
-
45
-
46
-
47
-
48
-
49
-
50
-
51
-
52
-
53
-
54
-
55
-
56
-
57
-
58
-
59
-
60
-
61
-
62
-
63
-
64
-
65
-
66
-
67
-
68
-
69
-
70
-
71
-
72
-
73
-
74
-
75
-
76
-
77
-
78
-
79
-
80
-
81
-
82
-
83
-
84
-
85
-
86
-
87
-
88
-
89
-
90
-
91
-
92
-
93
-
94
-
95
-
96
-
97
-
98
-
99
-
100
-
101
-
102
-
103
-
104
-
105
-
106
-
107
-
108
-
109
-
110
-
111
-
112
-
113
-
114
-
115
-
116
-
117
-
118
-
119
-
120
-
121
-
122
-
123
-
 124
124 -
 125
125 -
 126
126 -
 127
127 -
 128
128 -
 129
129 -
 130
130 -
 131
131 -
 132
132 -
 133
133 -
 134
134 -
135
-
136
-
137
-
138
-
139
-
140
-
141
-
142
-
143
-
144
-
145
-
146
-
147
-
148
-
149
-
150
-
151
-
152
-
153
-
154
-
155
-
156
-
157
-
158
-
159
-
160
-
161
-
162
-
163
-
164
-
165
-
166
-
167
-
168
-
169
-
170
-
171
-
172
-
173
-
174
-
175
-
176
-
177
-
178
-
179
-
180
-
181
-
182
-
183
-
184
-
185
-
186
-
187
-
188
-
189
-
190
-
191
 |
 |
