HP DesignJet T850 DesignJet T850 Printer Series DesignJet T950 Printer SeriesU - Page 139
Light-colored area fills are missing in the scan or copy
 |
View all HP DesignJet T850 manuals
Add to My Manuals
Save this manual to your list of manuals |
Page 139 highlights
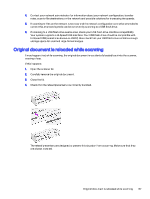
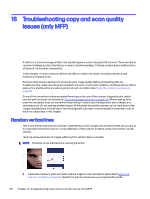
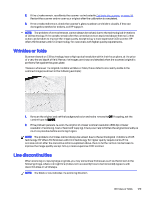
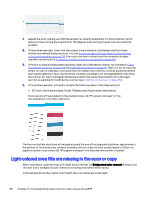
1. Repeat the scan, making sure that the product is correctly positioned: it is flat on the floor and it does not move. Turning the original 90 or 180 degrees and scanning it again may also solve the problem. 2. If the problem persists, check that the original to be scanned is not skewed, and that it does not become skewed during the scan. If so, see Incorrect paper advance, skew during scanning, or horizontal wrinkles on page 139. You might also want to deactivate the automatic de-skew algorithm as indicated in A copied or scanned image is very skewed on page 144. 3. If there is no skew but the problem persists, clean and calibrate the scanner as indicated in Clean the scanner scanbars on page 93 and Calibrate the scanner on page 95. Take care not to move the printer during the calibration, and check that the maintenance sheet is correctly positioned before starting the calibration. Also check that the maintenance sheet is not damaged before calibrating the scanner (an old or damaged maintenance sheet may cause this problem); if it is damaged, reprint it as explained in Calibrate the scanner (see Calibrate the scanner on page 95). 4. If the problem persists, proceed to analyze the following areas of the diagnostic plot: ■ D, H and L (for three modules, 0-Left, 1-Middle, and 2-Right and its intersection) If you see any of these defects in the studied areas, call HP support and report a "line discontinuities" error after calibration. The four vertical thin black lines at the beginning and the end of the diagnostic plot show, approximately, the position of the intersection between scanbars, where this kind of error usually appears. If the error appears outside these areas, call HP support and report "line discontinuities within a scanbar". Light-colored area fills are missing in the scan or copy When scanning or copying a map with a light area at the top, the Background color removal setting could interpret it as a background color, therefore removing it and other similar areas. In the example below the original is on the left, the scanned image on the right: 130 Chapter 16 Troubleshooting copy and scan quality issues (only MFP)
-
 1
1 -
2
-
3
-
4
-
5
-
6
-
7
-
8
-
9
-
10
-
11
-
12
-
13
-
14
-
15
-
16
-
17
-
18
-
19
-
20
-
21
-
22
-
23
-
24
-
25
-
26
-
27
-
28
-
29
-
30
-
31
-
32
-
33
-
34
-
35
-
36
-
37
-
38
-
39
-
40
-
41
-
42
-
43
-
44
-
45
-
46
-
47
-
48
-
49
-
50
-
51
-
52
-
53
-
54
-
55
-
56
-
57
-
58
-
59
-
60
-
61
-
62
-
63
-
64
-
65
-
66
-
67
-
68
-
69
-
70
-
71
-
72
-
73
-
74
-
75
-
76
-
77
-
78
-
79
-
80
-
81
-
82
-
83
-
84
-
85
-
86
-
87
-
88
-
89
-
90
-
91
-
92
-
93
-
94
-
95
-
96
-
97
-
98
-
99
-
100
-
101
-
102
-
103
-
104
-
105
-
106
-
107
-
108
-
109
-
110
-
111
-
112
-
113
-
114
-
115
-
116
-
117
-
118
-
119
-
120
-
121
-
122
-
123
-
124
-
125
-
126
-
127
-
128
-
129
-
130
-
131
-
132
-
133
-
 134
134 -
 135
135 -
 136
136 -
 137
137 -
 138
138 -
 139
139 -
 140
140 -
 141
141 -
 142
142 -
 143
143 -
 144
144 -
145
-
146
-
147
-
148
-
149
-
150
-
151
-
152
-
153
-
154
-
155
-
156
-
157
-
158
-
159
-
160
-
161
-
162
-
163
-
164
-
165
-
166
-
167
-
168
-
169
-
170
-
171
-
172
-
173
-
174
-
175
-
176
-
177
-
178
-
179
-
180
-
181
-
182
-
183
-
184
-
185
-
186
-
187
-
188
-
189
-
190
-
191
 |
 |
