HP DesignJet T850 DesignJet T850 Printer Series DesignJet T950 Printer SeriesU - Page 137
Troubleshooting copy and scan quality issues (only MFP), Random vertical lines
 |
View all HP DesignJet T850 manuals
Add to My Manuals
Save this manual to your list of manuals |
Page 137 highlights
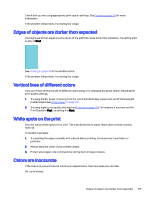
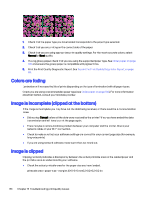
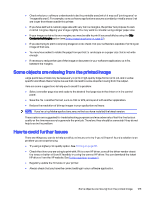
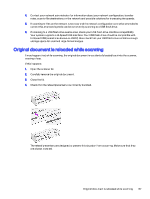
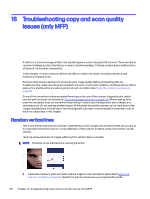
16 Troubleshooting copy and scan quality issues (only MFP) A defect is a common image artifact that usually appears when using any CIS scanner. These are due to incorrect settings, product limitations, or easily solvable mistakes. A failure mode is due to malfunctions of some of the scanner components. In this chapter the most common defects and failure modes are shown, sorted by relevance and frequency of appearance. Scanner cleanliness is paramount to ensure good image quality. Before proceeding with any troubleshooting, make sure the glass scanbars are clean and in good condition and the pressure sliders (wide, white plastic parts) are also in good and clean condition. See Clean the scanner scanbars on page 93. Some of the corrective actions proposed here require the use of the scanner diagnostic plot, which you can print and scan as indicated in The scanner diagnostic plot on page 145. When copying, to be sure that the defect does not come from the printing function, use this diagnostic plot to detect any scanning issue. Do not use any printed version of this guide to test the scanner, as the resolution of the images included here is insufficient. Use the diagnostic plot when recommended in response to any of the errors described in this chapter. Random vertical lines This is one of the most common issues in sheet-fed scanners. Usually, the vertical streaks are caused by dust particles inside the scanner, or miscalibration of the scanner (in these cases, the problem can be solved). Here are some examples of images suffering from vertical lines or streaks: NOTE: The black arrow indicates the scanning direction. 1. Clean the scanner's glass scanbars and the original to be scanned as described in Clean the scanner scanbars on page 93. Restart the printer and re-scan your original afterwards. 128 Chapter 16 Troubleshooting copy and scan quality issues (only MFP)
-
 1
1 -
2
-
3
-
4
-
5
-
6
-
7
-
8
-
9
-
10
-
11
-
12
-
13
-
14
-
15
-
16
-
17
-
18
-
19
-
20
-
21
-
22
-
23
-
24
-
25
-
26
-
27
-
28
-
29
-
30
-
31
-
32
-
33
-
34
-
35
-
36
-
37
-
38
-
39
-
40
-
41
-
42
-
43
-
44
-
45
-
46
-
47
-
48
-
49
-
50
-
51
-
52
-
53
-
54
-
55
-
56
-
57
-
58
-
59
-
60
-
61
-
62
-
63
-
64
-
65
-
66
-
67
-
68
-
69
-
70
-
71
-
72
-
73
-
74
-
75
-
76
-
77
-
78
-
79
-
80
-
81
-
82
-
83
-
84
-
85
-
86
-
87
-
88
-
89
-
90
-
91
-
92
-
93
-
94
-
95
-
96
-
97
-
98
-
99
-
100
-
101
-
102
-
103
-
104
-
105
-
106
-
107
-
108
-
109
-
110
-
111
-
112
-
113
-
114
-
115
-
116
-
117
-
118
-
119
-
120
-
121
-
122
-
123
-
124
-
125
-
126
-
127
-
128
-
129
-
130
-
131
-
 132
132 -
 133
133 -
 134
134 -
 135
135 -
 136
136 -
 137
137 -
 138
138 -
 139
139 -
 140
140 -
 141
141 -
 142
142 -
143
-
144
-
145
-
146
-
147
-
148
-
149
-
150
-
151
-
152
-
153
-
154
-
155
-
156
-
157
-
158
-
159
-
160
-
161
-
162
-
163
-
164
-
165
-
166
-
167
-
168
-
169
-
170
-
171
-
172
-
173
-
174
-
175
-
176
-
177
-
178
-
179
-
180
-
181
-
182
-
183
-
184
-
185
-
186
-
187
-
188
-
189
-
190
-
191
 |
 |