HP DesignJet T850 DesignJet T850 Printer Series DesignJet T950 Printer SeriesU - Page 20
Connecting the printer, Choose which connection method to use, Connectivity methods
 |
View all HP DesignJet T850 manuals
Add to My Manuals
Save this manual to your list of manuals |
Page 20 highlights
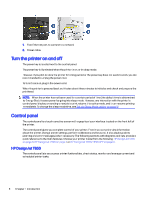
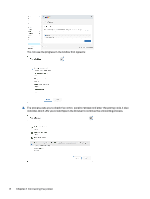
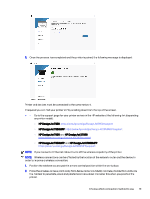
2 Connecting the printer Printing has never been easier, and your printer comes with various options for connecting to help you do so. With HP Smart Admin (see the HP website at the following link: https://admin.hpsmart.com/) or HP Command Center (see the HP website at the following link: https://hp-commandcenter.com/), you have a remote view to manage printers, users, and solutions, which allows you to stay on top of your team to keep your company up and running smoothly. Choose which connection method to use Your printer can be connected via Wireless or Gigabit Ethernet. Connectivity methods Step 1: Connect the printer to your network Use the control panel to choose one of these options: ● Connect to Ethernet: - If printer is new, connect the Ethernet cable before turning it on ● Connect to Wi-Fi: - If the printer is new, just follow the steps in the control panel - Printer and device (e.g., desktop, PC, laptop, mobile) must be connected to the same Wi-Fi Step 2: Set up your device a) Connect the printer to the HP ecosystem During the printer setup, after performing the network configuration and accepting that printer will connect to the internet, the printer retrieves the pin pairing code and displays it along with the portal URL. Follow the instructions on the control panel. In case the printer onboarding is skipped, you can pair your printer manually; access the embedded web server (EWS), then go to Connected Printing > Printer Pairing. NOTE: You may be asked to type the administration password. 1. Tap Start Pairing to begin pin pairing. Connecting the printer 11
-
 1
1 -
2
-
3
-
4
-
5
-
6
-
7
-
8
-
9
-
10
-
11
-
12
-
13
-
14
-
 15
15 -
 16
16 -
 17
17 -
 18
18 -
 19
19 -
 20
20 -
 21
21 -
 22
22 -
 23
23 -
 24
24 -
 25
25 -
26
-
27
-
28
-
29
-
30
-
31
-
32
-
33
-
34
-
35
-
36
-
37
-
38
-
39
-
40
-
41
-
42
-
43
-
44
-
45
-
46
-
47
-
48
-
49
-
50
-
51
-
52
-
53
-
54
-
55
-
56
-
57
-
58
-
59
-
60
-
61
-
62
-
63
-
64
-
65
-
66
-
67
-
68
-
69
-
70
-
71
-
72
-
73
-
74
-
75
-
76
-
77
-
78
-
79
-
80
-
81
-
82
-
83
-
84
-
85
-
86
-
87
-
88
-
89
-
90
-
91
-
92
-
93
-
94
-
95
-
96
-
97
-
98
-
99
-
100
-
101
-
102
-
103
-
104
-
105
-
106
-
107
-
108
-
109
-
110
-
111
-
112
-
113
-
114
-
115
-
116
-
117
-
118
-
119
-
120
-
121
-
122
-
123
-
124
-
125
-
126
-
127
-
128
-
129
-
130
-
131
-
132
-
133
-
134
-
135
-
136
-
137
-
138
-
139
-
140
-
141
-
142
-
143
-
144
-
145
-
146
-
147
-
148
-
149
-
150
-
151
-
152
-
153
-
154
-
155
-
156
-
157
-
158
-
159
-
160
-
161
-
162
-
163
-
164
-
165
-
166
-
167
-
168
-
169
-
170
-
171
-
172
-
173
-
174
-
175
-
176
-
177
-
178
-
179
-
180
-
181
-
182
-
183
-
184
-
185
-
186
-
187
-
188
-
189
-
190
-
191
 |
 |