HP DesignJet T850 DesignJet T850 Printer Series DesignJet T950 Printer SeriesU - Page 96
Align the printhead, Clean the printhead from the control panel
 |
View all HP DesignJet T850 manuals
Add to My Manuals
Save this manual to your list of manuals |
Page 96 highlights
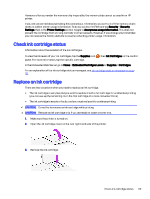
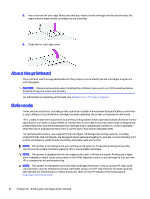
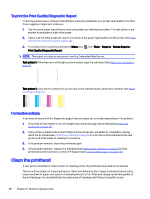
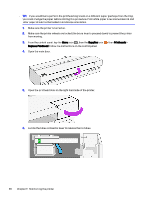
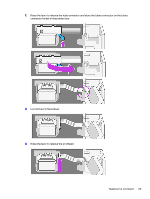
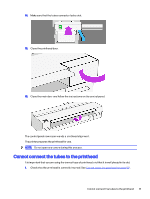
If print quality still seems poor after you complete all stages of cleaning, try aligning the printhead. NOTE: Cleaning uses ink, so clean the printhead only when necessary. NOTE: Failing to turn off the printer correctly can cause print-quality problems. Clean the printhead from the control panel When your print quality seems poor, and you are next to the printer, this is a simple method to address the issue. 1. Make sure there is paper in the input tray or a roll loaded. 2. Go to the control panel and tap the Menu icon Cleaning. , then Tools > Troubleshooting > Printhead Align the printhead Precise printhead alignment is essential for good area fill, line quality, and sharp edges in graphical elements. Your printer has an automatic printhead alignment process which runs whenever a printhead has been accessed or replaced. You may need to align the printhead after a paper jam or if you are experiencing print-quality problems. IMPORTANT: Load minimum A4 and latter size paper. Do not load them in landscape. 1. Load the paper you wish to use, see Paper handling on page 22. You can use a roll or a cut sheet; plain white paper is recommended. CAUTION: Do not use transparent or semi-transparent paper to align the printhead. 2. Ensure that the window is closed, as a strong light source near the printer during printhead realignment can affect alignment. 3. From the control panel, tap the Menu icon , then Tools > Troubleshooting > Printhead Alignment. NOTE: Printhead alignment can also be started from the Embedded Web Server (Print Quality > Tools > Printhead Alignment). 4. If the loaded paper is satisfactory, the printer runs the realignment and prints a realignment pattern. 5. The process takes about five minutes. Wait until the control-panel display shows the process complete before using the printer. If the printer cannot complete the printhead alignment successfully, you may be asked to clean the printhead and try again. Replace the printhead When the printhead is out of ink or has an issue that cannot be fixed, you must replace it. After replacement, the printer will automatically perform a printhead alignment on the loaded paper. Clean the printhead from the control panel 87
-
 1
1 -
2
-
3
-
4
-
5
-
6
-
7
-
8
-
9
-
10
-
11
-
12
-
13
-
14
-
15
-
16
-
17
-
18
-
19
-
20
-
21
-
22
-
23
-
24
-
25
-
26
-
27
-
28
-
29
-
30
-
31
-
32
-
33
-
34
-
35
-
36
-
37
-
38
-
39
-
40
-
41
-
42
-
43
-
44
-
45
-
46
-
47
-
48
-
49
-
50
-
51
-
52
-
53
-
54
-
55
-
56
-
57
-
58
-
59
-
60
-
61
-
62
-
63
-
64
-
65
-
66
-
67
-
68
-
69
-
70
-
71
-
72
-
73
-
74
-
75
-
76
-
77
-
78
-
79
-
80
-
81
-
82
-
83
-
84
-
85
-
86
-
87
-
88
-
89
-
90
-
 91
91 -
 92
92 -
 93
93 -
 94
94 -
 95
95 -
 96
96 -
 97
97 -
 98
98 -
 99
99 -
 100
100 -
 101
101 -
102
-
103
-
104
-
105
-
106
-
107
-
108
-
109
-
110
-
111
-
112
-
113
-
114
-
115
-
116
-
117
-
118
-
119
-
120
-
121
-
122
-
123
-
124
-
125
-
126
-
127
-
128
-
129
-
130
-
131
-
132
-
133
-
134
-
135
-
136
-
137
-
138
-
139
-
140
-
141
-
142
-
143
-
144
-
145
-
146
-
147
-
148
-
149
-
150
-
151
-
152
-
153
-
154
-
155
-
156
-
157
-
158
-
159
-
160
-
161
-
162
-
163
-
164
-
165
-
166
-
167
-
168
-
169
-
170
-
171
-
172
-
173
-
174
-
175
-
176
-
177
-
178
-
179
-
180
-
181
-
182
-
183
-
184
-
185
-
186
-
187
-
188
-
189
-
190
-
191
 |
 |
