Samsung SGH-T779 User Manual Ver.uvlj4_f8 (English(north America)) - Page 19
Setting Up Your Device, Start, OFF / ON, Add network, Connect, GMT+00:00
 |
View all Samsung SGH-T779 manuals
Add to My Manuals
Save this manual to your list of manuals |
Page 19 highlights
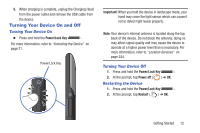
Setting Up Your Device When you first turn on your device, you are asked to set up a few things. To do that, the following screens display. Some screens can be skipped (tap Skip) or re-displayed (tap Back). Some screens display depending on the options you choose. Welcome 1. Tap the language field, scroll through the list, and tap the language you want your device to use, such as, English (United States). 2. Tap Start. Wi-Fi If prompted, make sure the Wi-Fi OFF / ON icon is set to ON and choose one of the following options: Note: If your SIM card is not installed or detecting the network, you will be prompted to establish an active Wi-Fi connection. Ⅲ Tap Add network to enter a Network SSID that is not listed. Ⅲ Tap Scan to make sure you have an accurate list of Wi-Fi networks. Ⅲ Tap one of the Wi-Fi networks in the list, enter the password, and tap Connect. Tap and connect to another Wi-Fi network or tap Next to continue. Ⅲ Tap Skip to perform this task later. For more information, refer to "Wi-Fi" on page 202. Set Date and Time 1. Tap the time zone field (GMT+00:00) and select the correct time zone. 2. Under Date, set the date (month, day, year), if necessary. 3. Under Time, set the time (hour, minute, and AM or PM), if necessary. 4. Tap Next. Getting Started 14
-
 1
1 -
2
-
3
-
4
-
5
-
6
-
7
-
8
-
9
-
10
-
11
-
12
-
13
-
 14
14 -
 15
15 -
 16
16 -
 17
17 -
 18
18 -
 19
19 -
 20
20 -
 21
21 -
 22
22 -
 23
23 -
 24
24 -
25
-
26
-
27
-
28
-
29
-
30
-
31
-
32
-
33
-
34
-
35
-
36
-
37
-
38
-
39
-
40
-
41
-
42
-
43
-
44
-
45
-
46
-
47
-
48
-
49
-
50
-
51
-
52
-
53
-
54
-
55
-
56
-
57
-
58
-
59
-
60
-
61
-
62
-
63
-
64
-
65
-
66
-
67
-
68
-
69
-
70
-
71
-
72
-
73
-
74
-
75
-
76
-
77
-
78
-
79
-
80
-
81
-
82
-
83
-
84
-
85
-
86
-
87
-
88
-
89
-
90
-
91
-
92
-
93
-
94
-
95
-
96
-
97
-
98
-
99
-
100
-
101
-
102
-
103
-
104
-
105
-
106
-
107
-
108
-
109
-
110
-
111
-
112
-
113
-
114
-
115
-
116
-
117
-
118
-
119
-
120
-
121
-
122
-
123
-
124
-
125
-
126
-
127
-
128
-
129
-
130
-
131
-
132
-
133
-
134
-
135
-
136
-
137
-
138
-
139
-
140
-
141
-
142
-
143
-
144
-
145
-
146
-
147
-
148
-
149
-
150
-
151
-
152
-
153
-
154
-
155
-
156
-
157
-
158
-
159
-
160
-
161
-
162
-
163
-
164
-
165
-
166
-
167
-
168
-
169
-
170
-
171
-
172
-
173
-
174
-
175
-
176
-
177
-
178
-
179
-
180
-
181
-
182
-
183
-
184
-
185
-
186
-
187
-
188
-
189
-
190
-
191
-
192
-
193
-
194
-
195
-
196
-
197
-
198
-
199
-
200
-
201
-
202
-
203
-
204
-
205
-
206
-
207
-
208
-
209
-
210
-
211
-
212
-
213
-
214
-
215
-
216
-
217
-
218
-
219
-
220
-
221
-
222
-
223
-
224
-
225
-
226
-
227
-
228
-
229
-
230
-
231
-
232
-
233
-
234
-
235
-
236
-
237
-
238
-
239
-
240
-
241
-
242
-
243
-
244
-
245
-
246
-
247
-
248
-
249
-
250
-
251
-
252
-
253
-
254
-
255
-
256
-
257
-
258
-
259
-
260
-
261
-
262
-
263
-
264
-
265
-
266
-
267
-
268
-
269
-
270
-
271
-
272
-
273
-
274
-
275
-
276
-
277
-
278
-
279
-
280
-
281
-
282
-
283
-
284
-
285
-
286
-
287
-
288
-
289
-
290
-
291
-
292
-
293
-
294
 |
 |