Samsung SGH-T779 User Manual Ver.uvlj4_f8 (English(north America)) - Page 202
VPN Client, World Clock, Add city, Reorder, Remove, DST settings
 |
View all Samsung SGH-T779 manuals
Add to My Manuals
Save this manual to your list of manuals |
Page 202 highlights
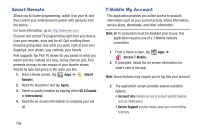
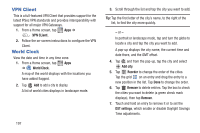
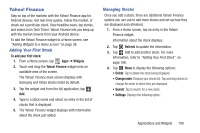
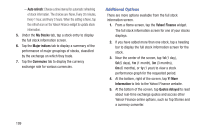
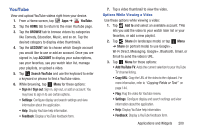
VPN Client This is a full-featured VPN Client that provides support for the latest IPSec VPN standards and provides interoperability with support for all major VPN Gateways. 1. From a Home screen, tap Apps ➔ (VPN CLient). 2. Follow the on-screen instructions to configure the VPN Client. World Clock View the date and time in any time zone. 1. From a Home screen, tap Apps ➔ World Clock. A map of the world displays with the locations you have added flagged. 2. Tap Add to add a city to display. A list of world cities displays in landscape mode. 197 3. Scroll through the list and tap the city you want to add. Tip: Tap the first letter of the city's name, to the right of the list, to find the city more quickly. - or - In portrait or landscape mode, tap and turn the globe to locate a city and tap the city you want to add. A pop-up displays the city name, the current time and date there, and the GMT offset. 4. Tap and from the pop-up, tap the city and select Add city. 5. Tap Reorder to change the order of the cities. Tap the grid on an entry and drag the entry to a new position in the list. Tap Done to change the order. 6. Tap Remove to delete entries. Tap the box to check the cities you want to delete (a green check mark displays), then tap Remove. 7. Touch and hold an entry to remove it or to set the DST settings, which enable or disable Daylight Savings Time adjustments.
-
 1
1 -
2
-
3
-
4
-
5
-
6
-
7
-
8
-
9
-
10
-
11
-
12
-
13
-
14
-
15
-
16
-
17
-
18
-
19
-
20
-
21
-
22
-
23
-
24
-
25
-
26
-
27
-
28
-
29
-
30
-
31
-
32
-
33
-
34
-
35
-
36
-
37
-
38
-
39
-
40
-
41
-
42
-
43
-
44
-
45
-
46
-
47
-
48
-
49
-
50
-
51
-
52
-
53
-
54
-
55
-
56
-
57
-
58
-
59
-
60
-
61
-
62
-
63
-
64
-
65
-
66
-
67
-
68
-
69
-
70
-
71
-
72
-
73
-
74
-
75
-
76
-
77
-
78
-
79
-
80
-
81
-
82
-
83
-
84
-
85
-
86
-
87
-
88
-
89
-
90
-
91
-
92
-
93
-
94
-
95
-
96
-
97
-
98
-
99
-
100
-
101
-
102
-
103
-
104
-
105
-
106
-
107
-
108
-
109
-
110
-
111
-
112
-
113
-
114
-
115
-
116
-
117
-
118
-
119
-
120
-
121
-
122
-
123
-
124
-
125
-
126
-
127
-
128
-
129
-
130
-
131
-
132
-
133
-
134
-
135
-
136
-
137
-
138
-
139
-
140
-
141
-
142
-
143
-
144
-
145
-
146
-
147
-
148
-
149
-
150
-
151
-
152
-
153
-
154
-
155
-
156
-
157
-
158
-
159
-
160
-
161
-
162
-
163
-
164
-
165
-
166
-
167
-
168
-
169
-
170
-
171
-
172
-
173
-
174
-
175
-
176
-
177
-
178
-
179
-
180
-
181
-
182
-
183
-
184
-
185
-
186
-
187
-
188
-
189
-
190
-
191
-
192
-
193
-
194
-
195
-
196
-
 197
197 -
 198
198 -
 199
199 -
 200
200 -
 201
201 -
 202
202 -
 203
203 -
 204
204 -
 205
205 -
 206
206 -
 207
207 -
208
-
209
-
210
-
211
-
212
-
213
-
214
-
215
-
216
-
217
-
218
-
219
-
220
-
221
-
222
-
223
-
224
-
225
-
226
-
227
-
228
-
229
-
230
-
231
-
232
-
233
-
234
-
235
-
236
-
237
-
238
-
239
-
240
-
241
-
242
-
243
-
244
-
245
-
246
-
247
-
248
-
249
-
250
-
251
-
252
-
253
-
254
-
255
-
256
-
257
-
258
-
259
-
260
-
261
-
262
-
263
-
264
-
265
-
266
-
267
-
268
-
269
-
270
-
271
-
272
-
273
-
274
-
275
-
276
-
277
-
278
-
279
-
280
-
281
-
282
-
283
-
284
-
285
-
286
-
287
-
288
-
289
-
290
-
291
-
292
-
293
-
294
 |
 |