Samsung SGH-T779 User Manual Ver.uvlj4_f8 (English(north America)) - Page 70
Contacts and Accounts, Accounts, Setting Up Your Accounts
 |
View all Samsung SGH-T779 manuals
Add to My Manuals
Save this manual to your list of manuals |
Page 70 highlights
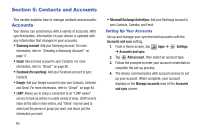
Section 5: Contacts and Accounts This section explains how to manage contacts and accounts. Accounts Your device can synchronize with a variety of accounts. With synchronization, information on your device is updated with any information that changes in your accounts. • Samsung account: Add your Samsung account. For more information, refer to "Creating a Samsung Account" on page 17. • Email: Add an Email account to sync Contacts. For more information, refer to "Email" on page 88. • Facebook (fro synching): Add your Facebook account to sync Contacts. • Google: Add your Google account to sync your Contacts, Calendar, and Gmail. For more information, refer to "Gmail" on page 84. • LDAP: Allows you to setup a connection to an "LDAP-aware" servers to look up entries in a wide variety of ways. LDAP servers index all the data in their entries, and "filters" may be used to select just the person or group you want, and return just the information you want. 65 • Microsoft Exchange ActiveSync: Add your Exchange account to sync Contacts, Calendar, and Email. Setting Up Your Accounts Set up and manage your synchronized accounts with the Accounts and sync setting. 1. From a Home screen, tap Apps ➔ Settings ➔ Accounts and sync. 2. Tap Add account, then select an account type. 3. Follow the prompts to enter your account credentials to complete the set-up process. 4. The device communicates with account servers to set up your account. When complete, your account displays in the Manage accounts area of the Accounts and sync screen.
-
 1
1 -
2
-
3
-
4
-
5
-
6
-
7
-
8
-
9
-
10
-
11
-
12
-
13
-
14
-
15
-
16
-
17
-
18
-
19
-
20
-
21
-
22
-
23
-
24
-
25
-
26
-
27
-
28
-
29
-
30
-
31
-
32
-
33
-
34
-
35
-
36
-
37
-
38
-
39
-
40
-
41
-
42
-
43
-
44
-
45
-
46
-
47
-
48
-
49
-
50
-
51
-
52
-
53
-
54
-
55
-
56
-
57
-
58
-
59
-
60
-
61
-
62
-
63
-
64
-
 65
65 -
 66
66 -
 67
67 -
 68
68 -
 69
69 -
 70
70 -
 71
71 -
 72
72 -
 73
73 -
 74
74 -
 75
75 -
76
-
77
-
78
-
79
-
80
-
81
-
82
-
83
-
84
-
85
-
86
-
87
-
88
-
89
-
90
-
91
-
92
-
93
-
94
-
95
-
96
-
97
-
98
-
99
-
100
-
101
-
102
-
103
-
104
-
105
-
106
-
107
-
108
-
109
-
110
-
111
-
112
-
113
-
114
-
115
-
116
-
117
-
118
-
119
-
120
-
121
-
122
-
123
-
124
-
125
-
126
-
127
-
128
-
129
-
130
-
131
-
132
-
133
-
134
-
135
-
136
-
137
-
138
-
139
-
140
-
141
-
142
-
143
-
144
-
145
-
146
-
147
-
148
-
149
-
150
-
151
-
152
-
153
-
154
-
155
-
156
-
157
-
158
-
159
-
160
-
161
-
162
-
163
-
164
-
165
-
166
-
167
-
168
-
169
-
170
-
171
-
172
-
173
-
174
-
175
-
176
-
177
-
178
-
179
-
180
-
181
-
182
-
183
-
184
-
185
-
186
-
187
-
188
-
189
-
190
-
191
-
192
-
193
-
194
-
195
-
196
-
197
-
198
-
199
-
200
-
201
-
202
-
203
-
204
-
205
-
206
-
207
-
208
-
209
-
210
-
211
-
212
-
213
-
214
-
215
-
216
-
217
-
218
-
219
-
220
-
221
-
222
-
223
-
224
-
225
-
226
-
227
-
228
-
229
-
230
-
231
-
232
-
233
-
234
-
235
-
236
-
237
-
238
-
239
-
240
-
241
-
242
-
243
-
244
-
245
-
246
-
247
-
248
-
249
-
250
-
251
-
252
-
253
-
254
-
255
-
256
-
257
-
258
-
259
-
260
-
261
-
262
-
263
-
264
-
265
-
266
-
267
-
268
-
269
-
270
-
271
-
272
-
273
-
274
-
275
-
276
-
277
-
278
-
279
-
280
-
281
-
282
-
283
-
284
-
285
-
286
-
287
-
288
-
289
-
290
-
291
-
292
-
293
-
294
 |
 |